architecture | part 1: migration setup | part 2: towards operations
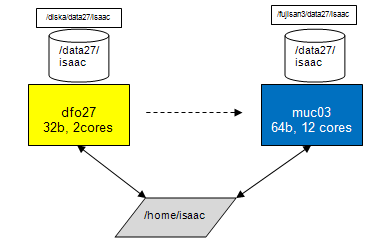 |
Sketch of old and new architecture for dfo blades. The old dfo systems have two cores and run a 32b OS. The new systems have 12 cores and run a 64b OS. For each account, the old and the new system share the same $HOME directory but have different data disks. For backwards compatibility, the old and new disks have similar names (you can drop the /diska and /fujisan3 part in their names) but are physically different. |
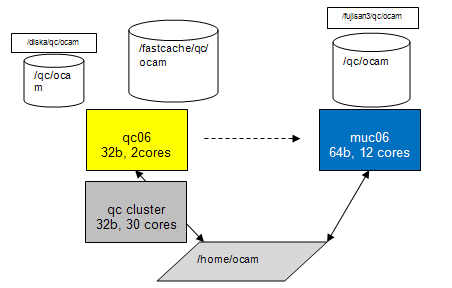 |
Sketch of old and new architecture for qc blades. The old qc systems have two cores and run a 32b OS. There is also the QC cluster with up to 30 cores. The new systems have 12 cores and run a 64b OS. For each account, the old and the new system share the same $HOME directory but have different data disks. For backwards compatibility, the old and new disks have similar names (you can drop the /diska and /fujisan3 part in their names) but are physically different. |
 |
Sketch of new architecture. The muc01...muc05 servers have three home accounts and three internal data disks mounted. The muc servers muc06...muc08 have only one account and one internal data disk. |
Technology
The new systems have 12 Intel cores, arranged in 2 CPUs with 6 cores each. The cores are 'hyperthreaded', which means they have two 'virtual cores' each. This is why e.g. ganglia reports 24 cores for each muc. At the moment it is unclear whether we can access 24 cores individually for condor processing nodes or "only" 12. So far I have been very conservative and assigned even less cores, namely 8, for condor processing.
For an overview of the basic parameters of the systems, go to http://qc-ganglia.hq.eso.org/ganglia/?c=qcXX%2BdfoXX&h=muc02.hq.eso.org (replace muc02 by any other muc blade).
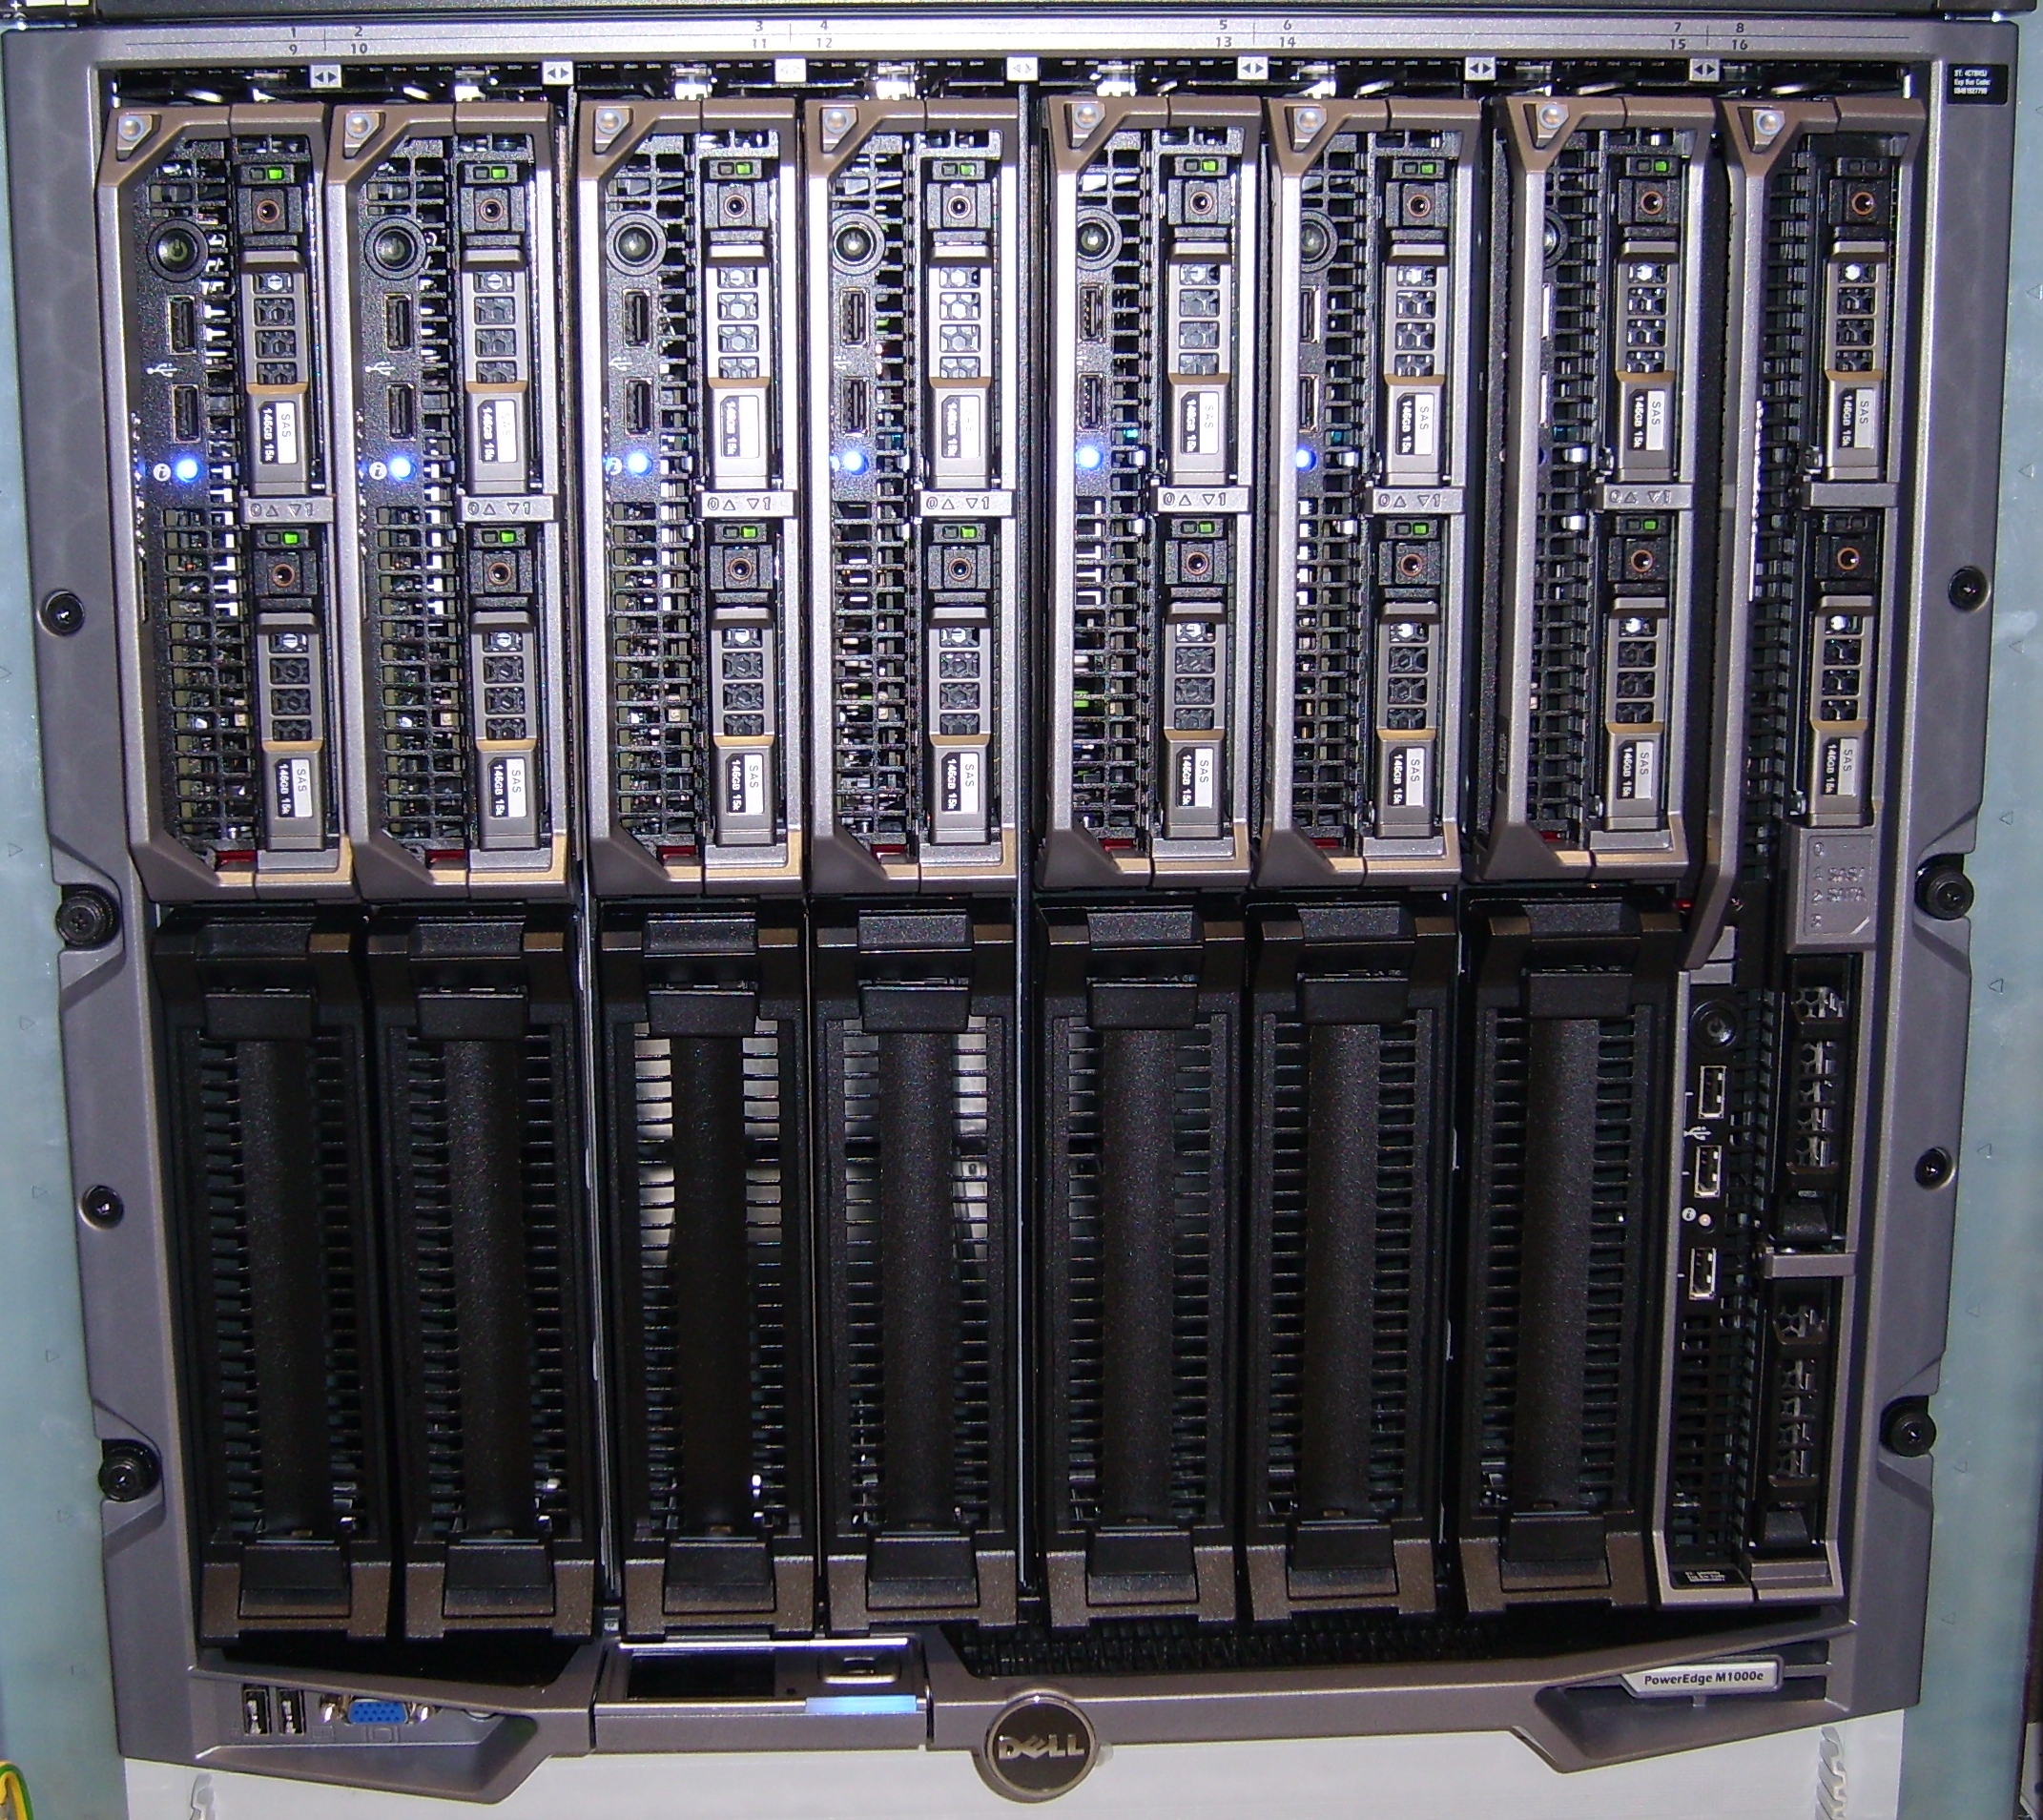
Physical view: Here is a picture of the 8 muc blades in the data centre, starting at left with muc01. The bigger blade at the very right is muc08.
Status
| muc01 | muc02 | muc03 | muc04 | muc05 |
|
muc07 |
|
muc01 | muc02 | muc05 | ||||||||||||||||||||
| installed? VLT, DFS |
yes | yes | yes | yes | yes | yes | yes | |||||||||||||||||||||||
| accounts? | crires | fors2 | kmos | giraffe | uves | xshooter | isaac | sphere | vimos | visir | hawki | naco2 | sinfoni | amber | midi2 | pacman | ocam | muse | vircam | sciproc | uvesr* | giraffe_r* | fors1 | qc_shift | preimg | |||||
| muc_migrate? | yes | yes | yes | yes | yes | yes | yes | yes | yes | yes | yes | yes | yes | yes | yes | no | no | no | ||||||||||||
| inc. data (muc_migrate -I) ? | yes | yes | yes | yes | yes | yes | yes | yes | yes | yes | yes | yes | yes | yes | yes | no | no | no | ||||||||||||
| full data migration (-A)? | yes | yes | yes | yes | yes | yes | yes | yes | yes | yes | yes | yes | yes | yes | yes | yes | yes | no data | yes | |||||||||||
| calChecker | yes | yes | yes | yes | yes | yes | yes | yes | yes | yes | yes | yes | yes | yes | yes | never | never | |||||||||||||
| trendPlotter | yes | yes | yes | yes | yes | yes | yes | yes | yes | yes | yes | yes | yes | yes | yes | |||||||||||||||
| pipeline, condor? | yes | yes | yes | yes | yes | yes | yes | yes | yes | yes | yes | yes | yes | yes | yes | F | S | I | N | Vs | Vr | |||||||||
| processQC (py/midas/gnuplot) | yes py | yes mid | yes py | yes mid | yes mid | yes | yes | yes py | yes | yes py | yes gnu | yes py | yes py | yes py+mid | yes py | |||||||||||||||
| autoDaily | yes | yes | yes | yes | yes | yes | yes | yes | yes | yes | yes | yes | yes | yes | processPreImg | |||||||||||||||
| operational | yes | yes** | yes | yes | yes | yes | yes | yes | yes | yes | yes | yes | yes | (yes)** | never*** | never | never | never | never | never | F | S | I | N | Vs | Vr | ||||
1. Download migration tool muc_migrate from http://www.eso.org/~qc/dfos/tools/muc_migrate.tar into your current $DFO_INSTALL_DIR. Untar it and follow the README file.
Before proceeding, make sure that you are running the latest versions, and only standard versions, of the dfos tools.
2. Login from your dfo/qc blade home account to the new muc account (start with one from the list above):
ssh -XY <your_account>@<newhost> (e.g. on giraffe@dfo23: ssh -XY giraffe@muc02)
For your comfort, you may want to define in your .qcrc
alias <account>_muc='xhost + <newhost>; ssh -XY <account>@<new_host'.
3. Setup of data disk: call
muc_migrate (without parameters)
and follow the on-line instructions. You will later call 'muc_migrate -I' ('CAPITAL I' for Incremental) and even later 'muc_migrate -A' (for All). Of course you can also call the standard -v|-h options.
Don't forget your $HOME directory is served from the OTSHSR server to both machines. It does not only look identical on both machines, it is the same! This setup makes migration an easy task, but also more risky than the previous migrations. Whatever you change under your $HOME will become effective for both the old and the new blade. This means that e.g. muc_migrate is also visible on your old account and could be called there by mistake. While it is not expected that this causes damage, it might cause confusion. So make always sure that you know where you are. (muc_migrate will not execute on the old dfo or qc blades.)
The migration tool will guide you through the setup process:
| - the tool tolerates non-standard names for $DFO_LST_DIR and $DFO_PLT_DIR. Your input to the corresponding question is stored in a file $DFO_BIN_DIR/config.muc_migrate and taken into account. |
| - for all other data directories it assumes standard names like 'raw', 'service' and 'reduced'. Should you use e.g. 'ser' and 'red' on your old system, the tool is not intelligent enough to recognize this. In that case, it has created e.g. 'service' for you. Simply rename it by hand to 'ser' and you are safe upon the next execution. |
| - if you are asked, during 'muc_migrate' step 5.1, about providing a password: terminate the session, call instead 'muc_migrate -I' and follow the instructions in the first step. Then, if all works fine, come back to 'muc_migrate'. |
|
- for QC cluster instruments: the setting of $DFO_ROOT_DIR_FC
and $DFO_ROOT_DIR_DISKA in .qcrc needs to become conditional, with a few lines like |
If you arrive at the last step (7) you have successfully set up your new system.
Note that for all /data directories the "sticky bit" is set. This means you could create data on other accounts' data disks, but you cannot delete data there. This is the same setup as on the /tmp directories and is considered "safe enough" unless we discover issues. The sticky bit becomes useful when a data disk has to be moved to another machine in case of muc failures.
4. Incremental data migration. Call
muc_migrate -I (for incremental data sync)
and get a defined set of data from your old DATA disk copied over to your new DATA disk. This includes the 2012-12 and all 2013 subdirectories of $DFO_LOG_DIR, $DFO_LST_DIR etc. (see the tool dialogue). This is intended to give you a starter set to test the dfos tools and operations on the new machine.
Make sure to call muc_migrate -I again before the new muc blade becomes operational.
5. Baseline verification.
You may want to open a firefox session first. Since it runs on the same host as your operational one, you need to specify a different session name. Then something strange happens, namely the program tries to check plugin compatibility, this you can abort since it contains only exotic language packages. Then click on the 'HOME' button and you should see your local dfoMonitor.html (or another page if configured so). Since this is loaded from $DFO_MON_DIR, it is exactly the operational dfoMonitor. You can click on any button and should see the same response as usual. But: if you launch, let's say certifyProducts for a current date, this will likely fail since the dfos tool looks into $DFS_PRODUCT which is on the new DATA disk, on the new machine. The same dfoMonitor on the old machine would launch the expected action. This is what I mean by initial confusion ... [By the way, firefox comes in a mildly newer version than on the old machines, I didn't notice any difference other than the version number.]
Once you have the starter data set, you should first call core tools like:
ngasClient; dataclient; createReport.
Then, after having confirmed that your data are up-to-date, you could call calChecker. Note that on the muc blades you need to call
calChecker -r .dfosrc_muc
in order to prevent the tool sourcing the operational .dfosrc! This feature will disappear but is necessary for the time being.
Otherwise it will work exactly the same way as the operational one, including scp to the web server if not called with option -n. For your orientation, the tool displays a visible 'muc' label on the local version, and an invisible one on the exported version (between 'Paranal date' and [?], you can make it visible with your left mouse button).
Next, try trendPlotter for a certain report, without (and later, with) option -f. Again, you should not notice any difference. For your orientation, the tool displays the server if you mouse over the area left of 'pipeline version'.
6. Old and new linux tools
Because of the new 64bit OS, a few standard linux tools have changed or needed to be replaced.
- firefox: very mildly updated from 3.0.9 to 3.0.19
- xv: decommissioned ("Alexis: too old to be found for 64bit"), replaced by the imageMagick package (our 'convert' is from there). Call 'display' instead.
7. Pipeline tests and verification
Remember that the new muc servers run a 64bit OS, with corresponding VLT, DFS software and pipelines. The pipelines, while functionally exact copies of your current last pipeline version (as of January 24), are newly compiled and therefore could in principle cause some hickups. This should be carefully checked next.
Call createAB and check the ABs for proper content (in particular the RAWFILE, MCALIB, MASSOC and SOF_CONTENT sections, there should always be clean pathnames without any preceding /fujisan3 or similar).
Then call createJob, processAB, processQC, getStatusAB, and finally a whole JOBS_NIGHT. Best choice for the date is either one from the past (already finished), or, latter, redoing dates which are currently in your operational $DFS_PRODUCT.
If you are doing past, already finished dates, remember to call
createAB -m CALIB -d 2013-01-12 -D 2013-01-15
or so in order to offer to createAB the proper pool of mcalib.
When calling JOBS_NIGHT, you may want to call 'getStatusAB -d <date>' frequently during execution (now the recent upgrade of this tool pays back). This is fun because you may end up in watching up to 8 cores doing AB processing at a time. Alternatively you could also call 'condor_q' (and 'condor_status' to see the configuration of the muc server). There will be soon two new tools which provide a graphical presentation of condor_q and condor_status (the mucMonitor and cascadeMonitor).
You may notice (in particular if you work on already finished nights) a new type of job file in $DFO_JOB_DIR: the mcalDown files, which are created to avoid multiple bulk downloads of mcalibs by up to 8 processAB instances. More here.
Any ABs, logs, and products will be separate from the operational ones, since they reside on different DATA disks. Any database content (in particular QC1 parameters and scores) will overwrite the previous content! So you better check carefully recipe by recipe. In case of issues make sure to reconstruct the old valid content by calling that AB again on the old server. Use muc_compare for the comparison of old and new QC1 parameters and scores (see chapter II, section 3).
8. Continue beyond CALIB scoring
If all works fine, nothing is wrong with checking, at least once, the further steps in the workflow: certifyProducts, moveProducts, ingestProducts.
Then, call createAB for SCIENCE and check the AB content. If it is fine, continue with ingestProducts and harvestAB. Don't worry about the operational account: any subsequent second attempts will be recognized. The only (known) issue is that you maight get confused "where do I stand operationally". Hence, do this only once, for verification.
9. Full data migration
While the incremental data migration needs to be done from time to time to be up-to-date, the full migration needs to be done only once. Call
muc_migrate -A
and then do something else, since this step may take hours. The tool telss you in details what kind of data are migrated. Essentially, all standard DFO directories on the old data disk, but no fits files (exception: the ones in the GEN_CALDIR). Still, this may take a long time, in particular the headers and the QC plots.
The reason why the data migration is done that way is to give you a chance to review your system and remove (or leave behind) obsolete or obscure information. Any non-standard information that you want to preserve can be copied of course to the new DATA disks, but you need to do this. Either do an scp from old DATA to new DATA, or mv the old content to your HOME (while logged in on the old blade) and from there to your new DATA (while logged in on the new blade). Preferred way is always tar files (don't forget to remove them).
In the end we will have a better performing system, and we hope also a better understood and controlled system: all processing is standard, no obscure rsyncs and background tools, no case-by-case handling.
10. Support and backup scheme (eventually this will be moved to some permanent place)
Support. All muc blades are Nagios monitored (see their status here). The nagios fires automatic alerts if configured thresholds are violated (very much like our scoring system). These alerts are sent to the SOS support person on duty (unlike our scoring system...). muc01-07 have been marked priority 1 (meaning if they break over the weekend then SOS will come in between 9:00-17:00 to fix them).
The muc blades are all backed up. Current scheme is backing up everything which however will be fine-tuned. The homes, which are not on the mucXX machines, are backed up as part of the backups of the otshsr-vip host. From an email by Alexis on 2013-02-18:
Included:
/fujisan3/data/kmos
/fujisan3/data/pacman
/fujisan3/data/sphere
/fujisan3/data21/uves
/fujisan3/data22/naco2
/fujisan3/data23/giraffe
/fujisan3/data24/vimos
/fujisan3/data25/fors1
/fujisan3/data25/xshooter
/fujisan3/data26/fors2
/fujisan3/data27/isaac
/fujisan3/data28/midi2
/fujisan3/data29/sinfoni
/fujisan3/data30/visir
/fujisan3/data31/amber
/fujisan3/data32/crires
/fujisan3/data33/preimg
/fujisan3/qc/hawki
/fujisan3/qc/ocam
/fujisan3/qc/vircam
/fujisan3/data/sciproc
Excluded:
"*.fits"
"*.fits.gz"
"*.fits.Z"
Retrieval:
For conciseness, the old (operational) blade is sometimes called 'ops' in the following, the new machine 'muc'.
1. firefox
In order to run an instance on your muc, you need to terminate those firefox sessions using your $DISPLAY on ops (i.e. the ones you can see, not the ones running under vnc). Then, switch to your workspace for the new muc blade and call 'firefox -P &'. It will start checking plugins, you can cancel this safely. Then click on the 'Home' button in your browser window and you should see the dfoMonitor (or whatever other page you have configured as 'home').
Before you use that page, refresh it, since what you see is still the same page as before on ops. But now the content is invalid since it is partly built from content on the data disk which is different of course. Also, some boxes will now flag red (e.g. 'autoDaily'). Apart from that, all buttons should work in exactly the same way as before.
When you switch back to ops, do the same: kill local sessions on muc; call 'firefox -P &' on ops; re-run it once.
2. calChecker
In the crontab file on ops, you should have two lines for calChecker (one incremental, one full). If your incremental data migration is up-to-date, and after the baseline verification from section I, you can now enter the same two lines into the crontab file on muc, with two differences:
Then you can expect to see calChecker pages with alternating origin, which is very convenient to check for any differences. Of course, there shouldn't be any, except for the hidden marker at the righthand side of the Paranal date.
Should you recognize red boxes, this might be due to incomplete migration of the calibration memory, check $DFO_CAL_DIR/CALCHECK/VCAL and/or $TMP_DIR/CALCHECK/PREVIOUS (same applies to CAL4CAL). A wrong red flag for long-term calibrations might come from incomplete migration of the data reports, check $DFO_LST_DIR/REPORT.
If you do not see any differences between the two versions: congratulations, your calChecker is operational on the muc server!
A side effect of making calChecker operational is that from that date on you are up-to-date with your headers, opslogs and data lists. As long as calChecker is running both on ops and on muc, header downloads, opslog extracts and data reports are created twice, in the respective $DFO_HDR_DIR and $DFO_LST_DIR on ops and muc. The exported data reports comes every 15 minutes from either ops of muc.
3. DFOS operations (without autoDaily: verification phase)
Next step is now to manually execute pipeline tests and use the dfos tools step by step. Thereby you verify the proper pipeline processing and QC reporting. Before you do that, please check carefully
Then, find a 'transition date': ideally, this is a date for which
For that transition date, and all later dates except for TODAY, start doing the dfos operations by hand on muc. Use the helper tool muc_compare to compare your QC1 parameters and scores.
Verification: DFOS scheme with autoDaily on ops| date | ops | muc | remarks |
| 2013-02-21 | AUTODAILY; certifyP+moveP; ingestP*; createAB SCI; finishN | createJob**; JOBS_NIGHT; muc_compare***; certifyP+moveP; ingestP*;createAB SCI; finishN | transition date |
| 2013-02-22 | AUTODAILY; certifyP+moveP; ingestP*; createAB SCI; finishN | createJob**; JOBS_NIGHT; muc_compare***; certifyP+moveP; ingestP*;createAB SCI; finishN | |
| etc. | |||
| TODAY-1 | AUTODAILY; certifyP+moveP; ingestP*; createAB SCI; finishN | createJob**; JOBS_NIGHT; muc_compare***; certifyP+moveP; ingestP*;createAB SCI; finishN | |
| TODAY | AUTODAILY | DO NOTHING | don't touch on muc |
* ingestP: both CALIB and SCIENCE; you can ingest from either machine but only the first
time there is ingestion, the second time you get an email warning but that's ok; make sure
to ingest from muc at least from time to time
** before calling:
*** muc_compare: helper tool to compare scores and QC1 parameters
If you find issues with pipeline results (using muc_compare, comparing QC1 reports, etc.), investigate and close them, before you continue. The main purpose of this verification phase is, well, verification.
Do these checks for a couple of days. A useful checklist for the verification phase is provided here. Do not touch the date TODAY since it is still under AUTODAILY control (touch it tomorrow).
Don't get confused with the offered options on dfoMonitor. The DFO_STATUS file is the same on ops and on muc, so doing a dfos step on muc indicates this being done already on ops, although this is not true.
4. DFOS operations (with autoDaily: commissioning phase)
When all of this works fine, in particular the muc_compare tool prooves correct and complete scoring and QC reporting, the next step is to use autoDaily on muc, still on the command-line.
For this make sure to run the latest version of autoDaily (v2.1+), and to have a properly edited .dfosrc_muc (see above). You will also need the latest version of createJob (v2.1+).
In order to avoid confusion, it is best to turn off autoDaily on ops for these tests (and turn it on again afterwards).
The scheme is as follows:
Commissioning: DFOS scheme with autoDaily on muc| date | ops | muc | remarks |
| <date> | as above | 'autoDaily -D -r .dfosrc_muc'; muc_compare; certifyP etc. as above | any date after transition date |
| TODAY | AUTODAILY | DO NOTHING | don't touch on muc |
The DFOS operations downstream are the same as before. The important new item is the verification of autoDaily.
Before you start, make sure to delete, on muc, all previously executed ABs for that date, and edit AB_list_CALIB_<date> to have no DONE tags.
Then, on muc, call autoDaily -D -r .dfosrc_muc, enter the date into $DFO_MON_DIR/list_data_dates and lean back. The system should deliver you all processed and scored ABs, which you then can verify with muc_compare.
5. DFOS operations (with autoDaily in cronjob and incremental: operational phase)
When all of this works fine, edit the cronjob file on muc and enter the 'autoDaily -r .dfosrc_muc' call (without 'D'!) at the same time as on ops. At the same time, comment-out the same entry on ops. Make sure to do this when the daytime calibration queue has finished and hence no new calibrations are to be expected. Alternatively, you could do this anytime provided you make sure that the AB_list does not contain any 'DONE' entry, and no ABs for that date are on the muc machine.
Congratulations, you are operational with autoDaily and calChecker on the new muc system!
There remains some cleaning up and fine-tuning:
- on muc, call 'cleanupProducts -E' to check for any fits files which made it to the new system during the migrationor commissioning
- on ops and muc, check carefully that you have migrated all non-standard directories
- on old system, turn off the calChecker calls
- check all cronjobs (crontab -l) that they run fine on muc
- switch .dfosrc to .dfosrc_old and .dfosrc_muc to .dfosrc
6. Tipps and tricks
Auto-login to muc from your PC:|
Include, on your linux PC, in .pecs/misc-all.ali the lines If you really want to work on your PC, you just exit the muc session. |
|
- use 'vncserver :1 -depth ... -geometry ...' to create vnc session muc<nn>:1 for your account - use 'vncsession -kill :1' to kill that one - available vnc IDs are 1-9 (the higher ones are blocked by firewall rules) - business rule: each account has *3* vnc IDs, in groups 1-3, 4-6, and 7-9. The groups are distributed by alphabet. On muc02, we have:
- these IDs can be used in a predictable way; use the related DISPLAY settings for your cronjobs. - control your window manager in ~/.vnc/xstartup: choose among twm, mvm, gnome-session, and startxfce. |
|
For hotfly we need to edit .dbrc: # old blades and replace it by # new muc blades |