CHANGE RECORD
|
ISSUE
|
DATE
|
SECTION/
PAGE
AFFECTED
|
REASON/INITIATION
DOCUMENTS/REMARKS
|
|
1.0 / prep 1
|
20/12/2000
|
All
|
NOVEMBER 2000 - First Version
|
|
Update for
MAR2001 RELEASE
|
|
1.1
|
08/04/2001
|
20,22,23,49,
52,81
|
VLTSW20010019-18:
OCS.SUBSYST setup keyw no longer supported
|
|
20 (49)
|
VLTSW20010017: always use INS.MODE is compulsory in the
first SETUP
|
|
11,31,36,54,80
|
VLTSW20010014:
STOP cmd is not supported
|
|
15,18,83
|
VLTSW20010054 : OCS.OCS.* à
OCS.OS.*
|
|
26,27,28
|
VLTSW20010012: no alias tables
|
|
30
|
VLTSW20010044: db classes for each subsystem
interface
|
|
18,26,79
|
Config kw not supported OCSi.OCS.ALIAS
|
|
25,26,42,51,77
|
Configuration file xxoControl.cfg->xxmcfgINS.cfg
|
|
36
|
Cancel inactive exposures using command END
|
|
37
|
Added description to FORWARD
|
|
41
|
Added new sections in chapter 9.8 in SOS
|
|
52
|
New section 11.10 db point/structure (FAQ)
|
|
38
|
New section – binary tables
|
|
Update for MAR
2002 RELEASE
|
|
ISSUE
|
DATE
|
SECTION
|
REASON/INITIATION/REMARKS
|
|
1.2
|
20/03/2002
|
4
|
VLTI module
|
|
9.8.6.2
|
VLTSW20010618 : Multiple ICS headers
|
|
9.4.5
|
VLTSW20010575 : Wait –first
VLTSW20020051 : reply to wait command (9.4.5)
|
|
9.5
|
VLTSW20010044:Life cycle
(present in MAR2001 but not
mentioned in doc)
|
|
0
9.8.6
|
VLTSW20010691: Partial header files
New section
|
|
9.8, 9.8.5.3, 9.8.6.3, 9.8.4
|
SOS (new feature in MARCH2002)
Sos interaction new section 9.8.4
|
|
9.7.2
|
Exposure status
|
|
9.7.4
|
VLTSW20010724: substates
|
|
9.7.1
|
last expoId (updates)
|
|
9.4.3.1,9.4.3.2,
9.4.3.5
|
VLTSW20010104 : SETUP (new sections)
While exp running; repeate ; redeclare
|
|
9.4.6
|
VLTSW20010535: END cmd
|
|
9.4.7
|
VLTSW20010682: Forward
|
|
10.1
|
VLTSW20010013 :default startup
|
|
7.7
|
VLTSW20010494: default mode
|
|
9.2,10.3
|
User specifed cfg keyword (AppConfigure argument)
|
|
7
7.2
7.5,
7.3, 7.6
|
Configuration (VLTSW20010010/13, VLTSW20010448)
DBROOT, DBIFROOT
OCS.INSi.HDRCAT ,
default values for DCS/OS cfg kw.
|
|
7.4
|
VLTSW20010448: TELESCOP fits kw (OCS.TEL.ID)
|
|
13
|
Maintenance of boss
|
|
11
|
FAQ added questions
|
|
Reference
|
updated
|
|
Appendix
|
updated
|
|
Update for
APR2003 RELEASE
|
|
ISSUE
|
DATE
|
SECTION
|
REASON/INITIATION/REMARKS
|
|
3
|
30/03/2003
|
7.7
|
VLTSW20020342- max number of modes
|
|
10.2
|
VLTSW20020180
added overload able function SetupPostProc
|
|
10.7
|
VLTSW20010458/VLTSW20020360/
VLTSW20020583
Operation bypassing the OS/SOS (new section)
|
|
9.4.3.4
|
VLTSW20020256 SETUP –noExposure
(new subsection )
|
|
9.4.5
9.7.5
11.16
|
VLTSW20010669: WAIT -header
Synchronization (new section)
|
|
11.6.2
|
VLTSW20020478 additional fits header keywords at SOS
level (new section)
|
|
9.6.1
|
VLTSW20020427: supplementary 'arf' files are removed
|
|
7.3
|
VLTSW20020281: added optional detector configuration
keyword: OCS.DETi.WIPING to set wiping
|
|
7.3
|
VLTSW20020280: added optional detector configuration
keyword: OCS.DETi.STOP to leave detector ONLINE
|
|
9.6
|
VLTSW20020431: auto add cfg and setup kws to FITS header
VLTSW20010669: each exposure starts with a new empty header
|
|
9.7.4
|
Added new substates
|
|
6.6
10.3
|
New section about dictionaries
Updated with dictionary info
|
|
11.17
|
FAQ special online action
|
|
9.4.3.3
|
Default mode (1 mode) – new section
|
|
Appendix
|
CDT,dict,cfg updated
|
|
|
|
|
|
|
|
Update for
APR2004 RELEASE
|
|
ISSUE
|
DATE
|
SECTION
|
REASON/INITIATION/REMARKS
|
|
4
|
30/03/2004
|
7.1
|
VLTSW20030249 - added new cfg kw OCS.CON.LOGLEVEL
|
|
8
|
VLTSW20020505 - new 'image file naming' scheme is applied
as default : "Standard-Naming"
|
|
9.4.5
|
VLTSW2003312 - added new parameter '-cond' to command
WAIT
|
|
9.4.5
|
VLTSW2003350 - added new parameter '-all' to command WAIT
|
|
7.1
|
VLTSW20030387 – new configuration keyword OCS.ARC.TIMEOUT
|
|
9.4.3.4
|
VLTSW20030119 - SETUP cmd without paremeter
'-expoId' specified is considered as -noExposure
|
|
10.2
|
VLTSW20030388 - Added overloadable
empty functions ApplImageHandleProc()
|
|
7.3
|
VLTSW20030149 - When cfg kw OCS.DETi.STOP is set,
cmd ONLINE is only sent when state is not yet ONLINE.
|
|
9.4.9
|
VLTSW20030250 New command ACCESS
|
|
9.6.3
|
New section: archiver process
|
|
Appendix
|
Manpage,CDT, dictionary update
|
|
|
|
|
|
|
TABLE OF CONTENTS
1 Scope.............................................................................................................................................................................................. 10
2 Documents and Acronyms.............................................................................................................................................. 10
2.1 Applicable
Documents.............................................................................................................................................. 10
2.2 Reference
Documents................................................................................................................................................ 10
2.3 Acronyms.......................................................................................................................................................................... 11
3 Introduction........................................................................................................................................................................... 12
4 Overview..................................................................................................................................................................................... 13
5 User’s Guide................................................................................................................................................................................ 14
6 Getting Started..................................................................................................................................................................... 14
6.1 The processes
of the Observation Software............................................................................................. 14
6.2 Initializing....................................................................................................................................................................... 15
6.3 Server class..................................................................................................................................................................... 15
6.4 State handling.............................................................................................................................................................. 15
6.5 Configuration................................................................................................................................................................ 16
6.6 Dictionary........................................................................................................................................................................ 16
6.7 Command
handling.................................................................................................................................................... 16
6.8 Database events.......................................................................................................................................................... 17
6.9 Interfaces......................................................................................................................................................................... 17
6.10 Exposures.......................................................................................................................................................................... 17
6.11 OS as Super OS.................................................................................................................................................................. 18
6.12 Logging................................................................................................................................................................................ 18
7 Configuration Guide........................................................................................................................................................... 20
7.1 General system
configuration keywords................................................................................................. 21
7.2 Configuration
of the subsystems..................................................................................................................... 22
7.3 Additional
detector configuration keywords...................................................................................... 24
7.4 Additional TCS
configuration keywords................................................................................................... 27
7.5 Additional ICS
configuration keywords..................................................................................................... 27
7.6 OS Subsystem
Configuration Keywords........................................................................................................ 27
7.7 Instrument
modes....................................................................................................................................................... 28
8 Setup Guide................................................................................................................................................................................. 31
9 Programmer’s Guide............................................................................................................................................................ 33
9.1 Initialisation................................................................................................................................................................. 34
9.2 The Server
class............................................................................................................................................................ 36
9.3 Interface
classes........................................................................................................................................................ 39
9.4 Standard
commands................................................................................................................................................ 40
9.4.1 STATE
Command and related functions.................................................................................................................... 40
9.4.2 State
changing commands............................................................................................................................................ 41
9.4.3 SETUP
Command........................................................................................................................................................... 43
9.4.4 START
Command............................................................................................................................................................ 47
9.4.5 WAIT
Command............................................................................................................................................................... 48
9.4.6 Other
exposure control commands.............................................................................................................................. 50
9.4.7 FORWARD
command..................................................................................................................................................... 50
9.4.8 Commands
operating on fits file.................................................................................................................................. 51
9.4.9 Other
Commands............................................................................................................................................................ 51
9.5 Database and
database events........................................................................................................................ 52
9.6 The final image.............................................................................................................................................................. 53
9.6.1 Partial
header files......................................................................................................................................................... 53
9.6.2 Binary
Tables.................................................................................................................................................................. 55
9.7 Exposure............................................................................................................................................................................. 56
9.7.1 The
exposure table......................................................................................................................................................... 56
9.7.2 Exposure
status............................................................................................................................................................... 57
9.7.3 Functions
accessing the exposure table................................................................................................................... 58
9.7.4 Main
steps of exposure.................................................................................................................................................. 58
9.7.5 Synchronization.............................................................................................................................................................. 59
9.8 Super
Observation Software (SOS).................................................................................................................... 61
9.8.1 Configuration
of OS subsystem.................................................................................................................................... 62
9.8.2 Hierarchical
setup keywords....................................................................................................................................... 63
9.8.3 Dictionary
for SOS......................................................................................................................................................... 63
9.8.4 SOS
interaction............................................................................................................................................................... 63
9.8.5 Command
handling........................................................................................................................................................ 67
9.8.6 Creating
the finale image file by SOS......................................................................................................................... 68
9.8.7 Not-BOSS-based
OS as a subsystem of SOS............................................................................................................... 71
10 Observation Software Based on BOSS................................................................................................................. 72
10.1 Default Startup........................................................................................................................................................... 73
10.2 List of
overloadable functions........................................................................................................................ 74
10.3 Additional
configuration keyword.............................................................................................................. 75
10.4 Additional
setup keyword.................................................................................................................................... 76
10.5 Add new command...................................................................................................................................................... 79
10.5.1 Send
a message.......................................................................................................................................................... 80
10.6 Modifying
existing command callbacks..................................................................................................... 80
10.6.1 Declare
mode, detector, subsystem, exposure status.......................................................................................... 80
10.7 Operation
bypassing the OS/SOS.......................................................................................................................... 81
11 FAQ and Troubleshooting.............................................................................................................................................. 82
11.1 Manual start up
of BOSS OS.................................................................................................................................. 82
11.2 Parameter ‘-expoId’
in the commands........................................................................................................... 82
11.3 Subsystem list
or instrument mode is not declared in the setup............................................... 82
11.4 Usage of
command STATUS.................................................................................................................................... 83
11.5 Usage of
command ADDFITS................................................................................................................................... 84
11.6 Add additional
keyword to the fits header............................................................................................ 84
11.6.1 Example-1:
Add keyword to OS image.................................................................................................................. 84
11.6.2 Example-2:
Add keyword to SOS image file......................................................................................................... 85
11.7 Dictionary for
OS......................................................................................................................................................... 86
11.8 Parameter ‘-detId’
in command......................................................................................................................... 86
11.9 Place of
pre-processing functions.................................................................................................................... 87
11.10 Instrument with
no detector............................................................................................................................. 87
11.11 Data base point
‘NewData’................................................................................................................................... 88
11.12 Additional
Action when Exposure fails, succeeds or aborted.................................................... 89
11.13 Interface for
subsystem that does not fall into any of the given categories................ 90
11.14 What to do when
OS subsystem of SOS is not based on BOSS.......................................................... 91
11.15 TCS in the SOS
structure.......................................................................................................................................... 92
11.16 File merging...................................................................................................................................................................... 93
11.17 Add Special
Online Action...................................................................................................................................... 94
12 Installation Guide............................................................................................................................................................... 95
13 Maintenance............................................................................................................................................................................. 95
14 Reference.................................................................................................................................................................................... 96
14.1 Manpage of the
bossControl............................................................................................................................... 96
14.2 Manpage of the
bossSERVER class..................................................................................................................... 97
14.3 Manpage of
bossAbortCB, bossStartCB, bossPauseCB…................................................................... 105
14.4 Manpage of
bossEXPOSURE class...................................................................................................................... 109
14.5 Manpage of
bossINSMODE class........................................................................................................................ 113
14.6 Manpage of
bossINTERFACE_DCS........................................................................................................................ 116
14.7 Manpage of
bossINTERFACE_CCD........................................................................................................................ 118
14.8 Manpage of
bossArchiver.................................................................................................................................... 120
This
page has been left intentionally blank.
This document describes the BOSS package.
The following documents, of the exact issue shown, form a
part of this document to the extent specified herein. In the event of conflict
between the documents referenced herein and the contents of this document, the
contents of this document shall be considered as a superseding requirement.
|
Reference
|
Document Number
|
Issue
|
Date
|
Title
|
|
[AD 01]
|
GEN-SPE-ESO-19400-0794
|
2.0
|
31/10/1997
|
DICB - Data
Interface Control Document
|
|
[AD 02]
|
VLT-SPE-ESO-10000-0011
|
2.0
|
30/09/1992
|
VLT Software Requirements
Specification
|
|
[AD 03]
|
VLT-PRO-ESO-10000-0228
|
1.0
|
10/03/1993
|
VLT Software Programming
Standards
|
|
[AD 04]
|
VLT-PLA-ESO-10000-0441
|
1.0
|
01/05/1995
|
VLT Science Operation Plan
|
|
[AD 05]
|
VLT-MAN-ESO-17210-0667
|
1.0
|
03/12/1997
|
Guidelines for VLT
applications.
|
|
[AD 06]
|
VLT-SPE-ESO-17212-0001
|
2.0
|
23/02/1995
|
INS Software Specification
|
|
[AD 07]
|
VLT-SPE-ESO-17240-0385
|
2.1
|
15/07/1996
|
INS Common Software
Specification
|
|
[AD 08]
|
VLT-ICD-ESO-17240-19400
|
2.6
|
17/11/1997
|
ICD between VCS and Archive
|
|
[AD 09]
|
VLT-ICD-ESO-17240-19200
|
1.0
|
29/10/1996
|
ICD between VCS and OH
|
|
|
|
|
|
|
The following documents contain additional information and
are referenced in the text:
|
Reference
|
Document Number
|
Issue
|
Date
|
Title
|
|
[RD 01]
|
VLT-MAN-ESO-17240-1973
|
2.0
|
03/01/2001
|
|
|
[RD 02]
|
VLT-SPE-ESO-15400-0886
|
2.0
|
18/12/1996
|
XXXX ICS
|
|
[RD 03]
|
VLT-MAN_ESO-17110-0771
|
1.7
|
30/09/1999
|
CCS-Event Tool Kit –EVH
|
|
[RD 04]
|
VLT-MAN_ESO-17240-0853
|
1.1
|
06/05/1996
|
Objective SLX-OSLX
|
|
[RD 05]
|
|
|
|
VLT SW Installation
|
|
[RD 06]
|
VLT-ICD-ESO-17240-19400
|
2.0
|
17/11/97
|
VLT Archive System
|
|
[RD 07]
|
VLT-MAN-ESO-17240-0672
|
1.6
|
25/09/98
|
CCD Detectors Control
Software-User Manual
|
|
[RD 08]
|
VLT-MAN-ESO-13640-1388
|
1.1
|
22/11/99
|
FIERA CCD Controller
–Software User Manual
|
|
[RD 09]
|
VLT-MAN-ESO-14100-1878
|
1.2
|
13/12/99
|
IRACE DCS User Manual
|
|
[RD-10]
|
VLT-MAN-ESO-17240-2325
|
1.0
|
10/10/2000
|
Configuration Tool User
Manual
|
|
[RD-11]
|
VLT-MAN-ESO-17240- 2153
|
1.3
|
|
Startup Tool
|
This document employs several abbreviations and acronyms to
refer concisely to an item, after it has been introduced. The following list is
aimed to help the reader in recalling the extended meaning of each short
expression:
|
|
|
|
OS
|
Observation Software
|
|
BOSS
|
Base
Observation Software Stub
|
|
XXXX
|
Template
instrument
|
|
XXXX ICS
|
Template
instrument ICS
|
|
XXXX OS
|
Template instrument OS
|
|
OS
|
Observation Software
|
|
SOS
|
Super OS. An OS that also controls OS.
|
|
<CAT>
|
Category denoting detector, instrument, telescope or OS
subsystem
|
|
single exposure
|
One exposure.
|
|
parallel exposure
|
Exposures started at the same time
|
|
semi-parallel exposure
|
Exposures running simultaneously. Started at different
time.
|
|
|
|
|
|
|
|
|
|
|
|
|
|
|
|
|
|
|
|
|
|
|
|
|
|
|
|
|
|
|
This version of the UM describes the behavior of the BOSS
package APR2003 version.
The Observation software is responsible for taking care of
one single exposure or simultaneous exposures. OS coordinates the communication
between the subsystems of an instrument (ICS, DCS) and the telescope.
The BOSS software (BOSS is short for base observation
software stub) is designed to incorporate the common features of all
observation software, while the OS that is based on BOSS should incorporate the
specialties characterizing the instrument.
The observation software of a specific instrument
therefore consists of a
·
an instrument independent part (BOSS), and
·
an instrument specific part (OS).
Boss includes the implementation of all the standard
commands [AD 07]. In special cases,
the default process can be extended. The communication with the subsystems
takes place through interfaces. The package includes suitable interfaces for
the most commonly used subsystems. When an exposure is finished, the VOLAC
system [RD 06] is informed about
the event (through a database point) to archive the image.
During the development of an OS one must exploit the
features and functionality of BOSS as much as possible. This would make sure
that the OS-es have the least size, and therefore make the maintenance of the
software easier.
The development of an OS is described through an example [RD 01].
The implementation of the most commonly used extra features
(such as additional command or keyword) are described in Chapter 10.
Before going through the details of BOSS, it is recommended
to first install and run the template instrument [RD 01]. This way one can gain better understanding what an
OS is doing.
The BOSS software package consist of the following modules:
|
Module
|
Description
|
|
ibac
|
Instrument Basic Application Classes
Includes handling of logs, bits, strings, list ..
|
|
ixac
|
Instrument Extended Application Classes
This module contains classes to handle common VLT data
types (e.g. Short Fits Keywords, Database,…)
|
|
boss
|
Base Observation Software Stub
Incorporates the implementation of the common properties
of OS
|
|
osb
|
Interface module including the dictionary and CDT of
boss
( ESO-VLT-DIC.BOSS, bossSERVER.cdt)
|
|
bossvlti
|
Necessary only for VLTI instruments
This small module contains the interface for ISS.
|
Release versions numbers:
MAR2001: boss 1.35.1.3, osb 1.12, bossvlti
1.2, ixac 1.37, ibac 1.26
MAR2002: boss 1.81, osb 1.20, bossvlti
1.5, ixac 1.43, ibac 1.29
APR2003: boss 1.106, osb 1.24, bossvlti
1.5, ixac 1.45, ibac 1.29
APR2004: boss 1.129, osb 1.28, bossvlti
1.6, ixac 1.46, ibac 1.30
The Template Instrument User Manual [RD 01] introduces an
example observation software based on BOSS. Users are suggested to first
install and run the example described in this manual and then try the various
features described in this manual.
The Observation Software of an instrument consists of two
processes:
·
‘Main Control Process’
It is a multipurpose process the functionality of which is
described in detail in this document.
The name of the process is ‘xxoControl’ where xx is
the instrument ID.
·
‘Archiver Process’
The ‘File Handler
Process’ is an auxiliary process that handles the post-processing of data, i.e.
merging image file with header files. The process also takes care of informing
VOLAC when the final image is ready. The name of this auxilary process is
composed of the string ‘bossArchiver_’ and the instrument id, e.g.: ‘bossArchiver_xxo’
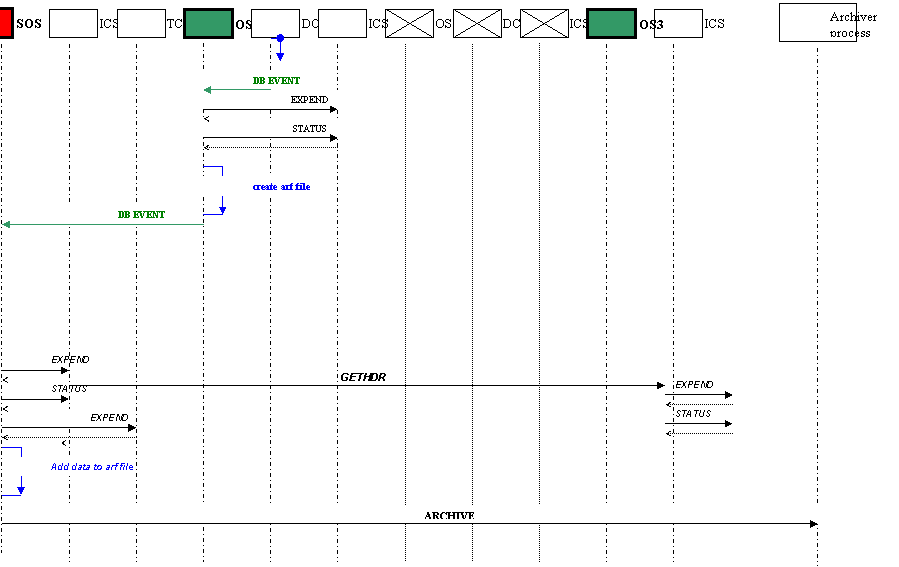
BOSS takes care
of the communication between the ‘Main Control Process’ and the ‘Archiver
Process’. During this action a supplementary file with extension ‘.arf’ is
created, which is removed after the final image is ready. (Note that in case
the process is started up in debug mode the supplementary files are not removed
but renamed as ‘.arf_’ after successful handling. In this case they are removed
only during the re-start of the Archiver process.)
These processes
must be started at the same time.
6.2
Initializing
There is a
support class (bossCtrlMain.C) included in BOSS to support initialising and
exiting CCS, initialising the boss ‘Main Control Process’, and setting the
verbose level according to the command line options (see Chapter 9.1). The developers are recommended to apply it following the pattern of the main function of the template instrument [RD 01].
The heart of the
boss package is the bossSERVER class. The default functionalities of BOSS can
be altered when necessary.
The bossSERVER
class includes special (normally empty) functions. In these functions (i.e. in
their overloads) the implementation of the additional properties of the
instruments should be placed.
Note that
overloading other functions is also possible (as most of the function of the
bossSERVER are declared virtual),
however it is not recommended.
In some cases the default properties of BOSS fully satisfies
the requirement of an instrument. In this case the instrument can be startup
based on its configuration and database using the auto startup functionality
(see section 10.1).
The bossSERVER takes care of handling the states and
sub-states of the instrument.
The states of the subsystems are [AD 07]: OFF, LOADED,
STANDBY, ONLINE.
The state of the instrument is normally associated with the
state of its subsystems and it represents the minimum states of all the
subsystems. Therefore when one of the subsystems is state OFF, the global state
of the instrument is also OFF.
Note that the OS process has a state itself, which is
different from the instrument state and not connected to the subsystem states
at all. It simply shows whether OS process is alive, thus it is either ONLINE
or OFF.
When the OS process is ONLINE it can have the following
substates: SETUP, OBSERVING, PAUSED, IDLE.
The instruments are configured via Application Configuration
Files. These files (that should be placed in a separate module) contain
information about the individual subsystems and the OS of the instrument and
also startup options.
The configuration of the OS of an instrument (Section 7) consists of the declaration of its subsystems (Section 7.2, 7.3, 7.6) and the instrument modes (Section 7.7).
The configuration and setup keywords are declared in dictionaries,
where the configuration keywords are checked during startup and the setup
keywords are checked during runtime.
The common
configuration and setup keywords regarding the OS are specified in dictionary
ESO-VLT-DIC.OSB.
Any additional instrument specific configuration and setup keywords
must be specified by the user.
The additional configuration keywords should be included in
the dictionary ESO-VLT-DIC.<INSNAME>_CFG.
Note that as the configuration file is handled by the
configuration tool (ctoo) the dictionary (which contains the additional
configuration keyword) must be also set as part of the instrument configuration
[RD-10]. Section 10.3 explains how to add additional configuration keywords.
Additional setup keywords (see also 10.4) should be specified in the dictionary
named:
ESO-VLT-DIC.<INSNAME>_OS.
The following
dictionaries are automatically loaded by BOSS:
ESO-VLT-DIC.OBS
ESO-VLT-DIC.OSB
ESO-VLT-DIC.TPL
ESO-VLT-DIC.<INSNAME>_OS
ESO-VLT-DIC.DPR
BOSS supports the
handling of the following commands:
ABORT, ADDFITS,
COMMENT, CONT, END, EXIT, FORWARD, OFF, ONLINE, PAUSE, PING,
SETUP, STANDBY,
START, STATE, STATUS, WAIT, VERSION
Normally the
commands are declared in templates and sent to an OS by BOB. Nevertheless the
commands can be also sent directly to the OS (using e.g. testscripts or GUI).
Handling these
commands BOSS takes care of the necessary communication between its subsystem.
It sends (synchronous and asynchronous) messages to the subsystems and
synchronises their replies.
The state and
substate of the OS is updated according to the actions of the given command.
The default
implementation of the commands callbacks are placed in the class bossSERVER.
For more
information about the details of the procedures see Chapter 9.4.
6.8
Database events
During the initialization BOSS attaches database events to
some of the database points of the subsystems of the instrument. These database
events are playing an important role in the synchronization process of BOSS.
The addresses of the relevant database points - status,
state, newdata - are given in the configuration file.
For more details see Chapter 9.5.
BOSS includes several interface
classes through which the communication between OS and the instrument’s
subsystems can take place. These are:
bossINTERFACE,
bossINTERFACE_ICS, bossINTERFACE_TCS,
bossINTERFACE_OCS,
bossINTERFACE_DCS, bossINTERFACE_CCD,
bossINTERFACE_IRACE,
bossINTERFACE_TCCD, bossINTERFACE_FIERA
The subsystems are declared in
the configuration file however the interfaces for them have to be declared in
SERVER class of the instrument (see Chapter 9.2). Each subsystem must be coupled to an interface. It is also essential to build the database according to the subsystems.
BOSS stores the declared
interfaces on its internal subsystem list. The interfaces are identified by the
name of their belonging subsystem. (The names of the subsystems are given in
the configuration file.)
The exposures that can be handled by BOSS fall into the
following categories:
Single exposure: Single exposure.
The looping TCCD (without
image is saved) belongs to also this category.
Parallel
exposures: Two
or more exposures are handled simultaneously. Exposures are started at the same
time, and have the same expoId. Only one single START command is used to start
the exposures (see Figure 1).
Semi-Parallel
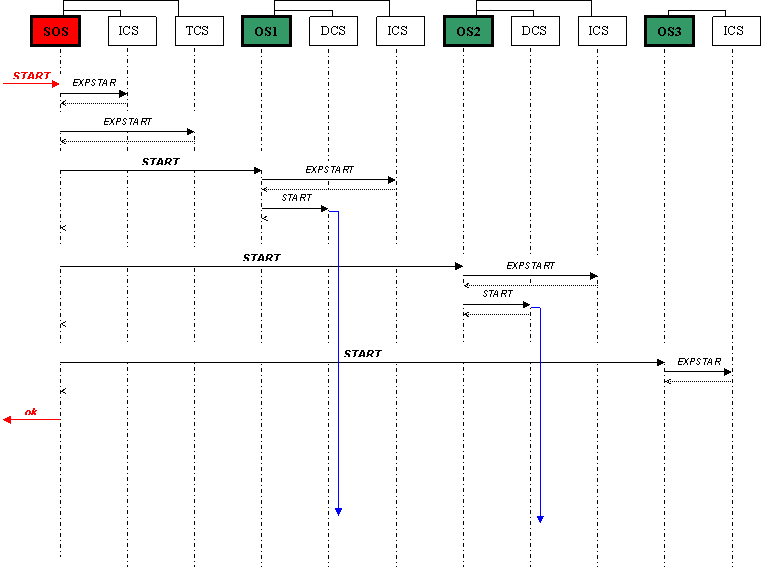
exposure: Exposures are running simultaneously (see Figure
2), however they are handled independently from each other, and each exposure has its unique exposure id. The exposures are started separately.
Figure 1 Example for parallel exposure
Figure 2 Example for semi-parallel exposure
Each time an exposure is declared by the user (through the
command SETUP) BOSS adds the exposure to its internal exposure table, that is
also represented in the database. The exposure table is updated each time when
the state, mode, filename, etc of an exposure is modified (see also Section 9.7.1, Table 9). In case of error it could be useful to check exposure table.
The exposures are identified by their exposure id-s. Before
an exposure can be started the detector (or detectors) with which the exposure
is taken must be uniquely identified. (See also declaration of mode, and
parameter detId of the commands).
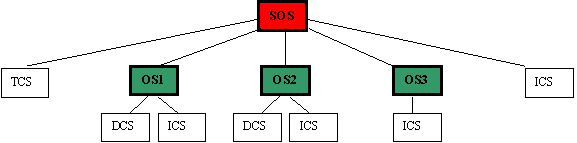
An OS become SOS (see Chapter 9.8) when one or more of its subsystem is an OS. The configuration of an SOS (Chapters 7.6, 9.8.1) is similar to the configuration of a normal OS.
To setup the parameters of the subsystems on lower levels
hierarchical keywords are used (see section 9.8.2)
Logging can help detecting bugs or understanding the
behavior of the code. The different type of logs are declared in the module
ibac. There are five types of logs, which will appear according to command line
or start up options. Developers are recommended to apply these logs in the OS
application. Please see below the usage of these logs (for more information,
see man pages of ibac and ibacLog):
Warning log:
Log data into the standard VLT log file and to the stdout
(if verbose is specified). the level is put to 1. This procedure is called when
there are errors or abnormal events for application
WarningLog
("A configuration file has to be specified");
WarningLog
("Could not read database attribute %s.",dbaddr);
Info log:
Log data into the standard VLT log file and to the stdout
(if verbose is specified). the level is put to 2. This procedure is called when
operational mode is modified.
InfoLog("Checking
FITS header file '%s'", fitsHdrFile);
InfoLog("Getting
TCS FITS header at start of exposure");
Action log:
Log data into the database attribute dependent on the level
specified. Log data into the standard VLT log file and to the stdout.
ActionLog(1,
"Cleaning up done.");
ActionLog(1,
"%s command failed", msg.Command());
Test log:
Log data into the standard VLT log file and to the stdout
(if verbose is specified). The level is put to 3.
TestLog("
expoId: %d ; detector :%s ",expoId, (char*)detId);
TestLog("Handling
the DB event from attribute '%.80s'",dbaddr);
Debug log:
Log data into the standard VLT log file and to the stdout
(if verbose is specified). The level is put to 5. This procedure is called when
users want more detailed debugging information.
Recommended to add at the beginning of each function.
ExtDbgLog("bossSERVER::OnlineCB()");
ExtDbgLog("bossEXPOSURE::GetSubsystems(expoId
:%d)",expoId);
The OS is configured via configuration file [AD 07].
In this configuration file the basic information about the
instrument (name, prefix, database) and its subsystems (that are to be controlled
by the OS) must be declared.
The subsystems that can be handled by BOSS fall into the
following categories:
DET: detector subsystem
INS: instrument subsystem
OS: OS subsystem (in
case of SOS)
TEL: telescope
These categories are also referred as <CAT> below. If
there are more than one subsystem belonging to the same category they must be
indexed.
Some keywords must be declared for all type of subsystems
(Chapter 7.2) while others only for certain type of subsystems. Many configuration parameters have default values. When the default value is applicable the keyword can be omitted from the configuration. The optional keywords are
written by italic letters in the tables.
The instrument modes (see Chapter 7.7) must be also declared in the configuration file to make the SETUP simpler.
The configuration file is handled by the bossSERVER class.
It configures the interface classes for the given subsystems, and stores the
defined modes in its internal mode table, that is also represented in the
database. (See classes bossINS_MODES and bossMODES_TABLE_ENTRY on figure Figure
3.)
For an example of a complete configuration of an instrument
please take a look at the configuration of the template instrument OS [RD 01]
in the Appendix 1.
Note that the configuration of the ICS [AD 06, AD 07,RD 02]
itself is also placed togethere with the OS configuration but here only the
keywords relationg to the OS are described.
Here only the keywords that are relevant to the OS are
described.
Table 7.1 Configuration of the subsystems
|
Configuration keyword
|
Short description
|
|
INS.CON.ID
|
Instrument identifier
|
|
INS.CON.PREFIX
|
Name prefix for modules and
servers
|
|
OCS.CON.OSDBROOT
|
Database point of the
intrument OS itself (optional).
|
|
OCS.CON.ORIGIN
|
Origin
|
|
OCS.CON.RELEASE
|
Release date
|
|
OCS.ARC.TIMEOUT
|
Archiver timeout
(optional).
|
|
OCS.CON.LOGLEVEL
|
Log level (optional).
|
The name of the instrument and the two letter instrument
code always have to be supplied in the configuration.
Name of the instrument:
INS.CON.ID "XXXX";
Two letter instrument code:
INS.CON.PREFIX "xx";
Database address of the OS of the instrument:
OCS.CON.OSDBROOT
“<alias>xxo”;
The default value for OSDBROOT is: “:Appl_data:<INS.CON.ID>:OS”;
Archiver timeout:
OCS.ARC.TIMEOUT 60;
The support process of the OS
-called the ‘archiver process’- takes care of the merging of the images. Via
this keyword the time -as default 60 sec- allowed to handle one image can be
altered.
Loglevel:
OCS.CON.LOGLEVEL 1;
This is an optional configuration
keyword, which only taken into account if the logging level otherwise not specified
as command line option (see section 11.1). Value of this keyword should be 1 to
5 which corresponds to the gradual increase of Acton/Log/Verbose level (see
also 6.12). Default value is 0.
General information about origin, release date can be
supplied by keywords
OCS.CON.ORIGIN and
OCS.CON.RELEASE.
Table 7.2
Configuration of the subsystems
|
Configuration keyword
|
Short description
|
|
OCS.<CAT>.NUM
|
Number of subsystem
belonging to the given category.
|
|
OCS.<CAT>i.NAME
|
name of the subsystem
|
|
OCS.<CAT>i.ACCESS
|
access mode of the
subsystem: NORMAL, IGNORE,FORBIDDEN
|
|
OCS.<CAT>i.DICTi
|
Dictionary of the subsystem
: ESO-VLT-DIC.XXXX
|
|
OCS.<CAT>i.ENVNAME
|
Environment name where
process of the subsystem is running
|
|
OCS.<CAT>i.PROCNAME
|
name of process of the
subsystem
|
|
OCS.<CAT>i.KEYWFILT
|
Keywords that are forwarded
to the subsystem
|
|
OCS.<CAT>i.TIMEOUT
|
|
|
OCS.<CAT>i.DBROOT
|
The database address of
the subsystem (optional).
|
|
OCS.<CAT>i.DBSTATE
|
db address of ‘state’ (optional)
|
|
OCS.<CAT>i.DBIFROOT
|
The database address of
the subsystem interface (optional).
|
Number of subsystems - OCS.<CAT>i.NUM
The number of the subsystems of
the given category is a required information for the startup tool [RD-11] therefore should be placed in the
configuration file.
Note that this keyword is not
available for TCS subsystem, as there can be only one TCS.
E.g.:
OCS.DET.NUM 2
denotes that there are two DCS
subsystems , e.g. one FIERA and one TCCD.
Name of subsystem - OCS.<CAT>i.NAME
The individual subsystems can be
referred to by their NAME-s. The names can be up to 32 character long,
nevertheless it is recommended to use short names.
Note that in case of Unit telescope (TEL) the name is
restricted to have the following values:
“UT1”, “UT2”, “UT3”, “UT4”. (UT0 can be used when TCS is in
simulation)
Access mode of subsystem- OCS.<CAT>i.ACCESS
As the examples below show, the
ACCESS of a subsystem can have three values:
OCS.DET1.ACCESS
"NORMAL"
OCS.DET2.ACCESS
"FORBIDDEN"
OCS.TEL.ACCESS
"IGNORE"
In normal operation mode the
subsystem process must be properly installed and ready to be started up. In
this case the ACCESS modes must be set to NORMAL.
When the subsystem is IGNORED all
request (i.e. messages) to the subsystem will be ignored, i.e. considered as
successfully finished. This option can be used during development when the
process for the subsystem is not yet available, or just simply make the tests
quicker. When a subsystem is ignored its state has no impact on the global
state of the instrument.
When during operation one of the
subsystem goes out of order its access mode should be switched to FORBIDDEN.
This forbids the usage of this subsystem. In this case all request to the
subsystem are rejected (error message is sent).
Dictionary of subsystem - OCS.<CAT>i.DICTi
Only the ‘tail’ of the dictionary
of the subsystem must be given, i.e: XXXX for a dictionary ESO-VLT-DIC.XXXX.
More then one dictionary can be
supplied using indexes.
E.g.: OCS.INS.DICT1
"ICS_AA"
OCS.INS.DICT2 "ICS_BB"
Environment name - OCS.<CAT>i.ENVNAME
e.g.:
OCS.INS.ENVNAME "wxxxx"
Note
that the environment where the process is running, should not be given
by environment variable, eg,.: $RTAPENV.
On
the contrary, the environment variables are set according to the configuration
file.
Keyword filter- OCS.<CAT>i.KEYWFILT
The keywords in the setup that
match the pattern will be forwarded to the subsystem.
When more the one filter id
given, they must be separated by a comma.
E.g.: OCS.DET2.KEYWFILT
"DET2.*.*.*.*.*.*,DET.*.*.*.*.*.*"
Timeout - OCS.<CAT>i.TIMEOUT
Must be given in seconds.
Database address of subsystem - OCS.<CAT>i.DBROOT
Must be supplied when other then
default, e.g.:
OCS.DET3.DBROOT
"<alias>fiera";
Default values:
DCS: "<alias><INS.CON.ID>:DCS:<OCS.DETi.NAME>"
ICS: "<alias><INS.CON.ID>:<OCS.INSi.NAME>"
TCS: "<alias>TCS"
OS: "<alias><INS.CON.ID>:DCS:<OCS.OSi.NAME>"
Based on the value of DBROOT
other default database addresses -of state, newdata(DCS) and status (DCS)- are
specifed.
Database address of state - OCS.<CAT>i.DBSTATE
The state (i.e. ONLINE, STANDBY,
OFF) of the subsystems are stored in a database point.
In order to declare the global
state of the instrument it is required to supply the database addresses of
these point in the configuration file when other then default.
E.g.:
OCS.OS2.DBSTATE
"<alias>yyo:status.state";
OCS.TEL.DBSTATE
"<alias>TCS:tcsState.tcsSubstate";
OCS.INS1.DBSTATE
"<alias>XXXX:ICS:PROCESSES:WS:icsControl.state";
Default values:
DCS (TCCD/FIERA): " <DBROOT>.opState"
DCS (IRACE): "<DBROOT>.:irace.state"
ICS: "<DBROOT>:PROCESSES:WS:icsControl.state"
TCS: "<RTAPENV>:<alias>TCS:tcsState.tcsState"
OS: “<DBROOT>:status.state”
Database address of interface - OCS.<CAT>i.DBIFROOT
The keyword specifies the root
database address of the interface of subsystem. When database is declared as
specified in section 9.5, the default values are applicable, and keyword can be omitted from the configuration.
The keyword is used for declaring
the db address of the interface of the subsystem where configuration and
runtime information (e.g. lifecycle for DCS) about the subsystem is displayed
by BOSS.
Defaults:
DCS : "<OSDBROOT
>:subsystems:<OCS.DETi.NAME>" , e.g. :
"<alias>xxo:subsystems:fiera"
ICS: “<OSDBROOT
>:subsystems:<OCS.INSi.NAME>” , e.g.:
"<alias>XXXX:OS:subsystems:ics"
TCS: “<OSDBROOT
>:subsystems:<OCS.TEL.NAME>” , e.g.:
"<alias>xxo:subsystems:tcs"
OS: “<OSDBROOT >:subsystems:<OCS.OSi.NAME>” , e.g.:
"<alias>sos:subsystems:xxxx"
where the database root of the OS
(<OSDBROOT>) is specified
by the configuration kewyords : OCS.CON. OSDBROOT.
According to the type of the detector boss supplies deafult
values the database address of status, state, and new filename. When the
detector is not TCCD, FIERA or IRACE or the data are different then the default
the keywords in Table 7.3 must be supplied.
Table 7.3
Additional detector configuration keywords
|
Configuration keyword
|
Short description
|
|
OCS.DETi.TYPE
|
Type of the detector ACE,FIERA, IRACE
|
|
OCS.DETi DBSTATE
|
db address of
‘state’ (when other then default)
|
|
OCS.DETi.DBNEWDT
|
db address of ‘new data
file’ (when other then default)
|
|
OCS.DETi.DBEXPSTS
|
db address of ‘exposure
status’ (when other then default)
|
|
OCS.DETi.WIPING
|
Start/Stop wiping of
detectors during online/standby
|
|
OCS.DETi.STOP
|
leave detector ONLINE
when the system is set to STANDBY
|
Type - OCS.DETi.TYPE
The TYPE of the detector is
FIERA, ACE or IRACE according to the available detector subsystem interfaces.
Based on the type of the detector, the default data for the database address of
state, status, and newdata are declared. Therefore the database addresses below
only have to be supplied when other then default.
Database points:
The database points for state,
newdata, exposure status, specified by keywords OCS.DETi.DBSTATE,
OCS.DETi.DBNEWDT, OCS.DETi.DBEXPSTS generate
events that are captured by BOSS. The procedures that are executed in the event
of their change are described in Chapter 9.5.
These data must be supplied when
other then default. The default values are:
Type:TCCD or FIERA
OCS.DETi.DBSTATE
" <DBROOT>.opState";
# e.g.
OCS.DETi.DBNEWDT "<DBROOT>.:exposures:exposure_1:transfer.fileNameUnComp";
OCS.DETi.DBEXPSTS "<DBROOT>.:exposures:exposure_1.expStatus";
Type: IRACE
OCS.DETi.DBSTATE "<DBROOT>:irace.state";
OCS.DETi.DBNEWDT "<DBROOT>:exposure.newDataFileName"
OCS.DETi.DBEXPSTS "<DBROOT>:exposure.expStatus"
Where DBROOT is specified by the
keyword OCS.DETi.DBROOT, when other then default ( see section 7.2).
E.g.:
OCS.DET2.DBSTATE "<alias>tccd.opState"
OCS.DET2.DBNEWDT "<alias>tccd:exposures:exposure_1:transfer.fileNameUnComp"
OCS.DET2.DBEXPSTS "<alias>tccd:exposures:exposure_1.expStatus"
In Appendix 1 example for setting
the database points for FIERA and IR DCS can be also found.
(Note that as default values are
used the settings are commented out.)
Set Wiping- OCS.DETi.WIPING (optional):
When the keyword OCS.DETi.WIPING
is set to true (i.e. ‘T’) it starts wiping the detectors during online and
stops the wiping during standby. The OS sends the corresponding commands
STARTWP, STOPWP to the CCD during the execution of commands ONLINE and STANDBY
respectively. The default value of the keyword is ‘F’. (If the state is already
in the desired value these commands will not be resent).
Leave detector ONLINE - OCS.DETi.STOP (optional):
When keyword CS.DETi.STOP
is set to false (i.e. ‘F’) the OS leaves the detector ONLINE when the system is
set to STANDBY. The default value of the keyword is ‘T’.
Table 7.4 Additional TCS configuration keywords
|
Configuration keyword
|
Short description
|
|
OCS.TEL.ID
|
Sets TELESCOP kw in the
fitshdr when TCS is ignored
|
|
|
|
The TELESCOP keyword that is placed in the final fits header
is normally specified by the TCS subsystem. When the TCS subsystem is ignored
but given on the subsystemlist of a selected mode (7.7), the TELESCOPE keyword still has to be included in the fitsheader. In this case its value is set as given by
the OCS.TEL.ID keyword in the configuration.
The OCS.TEL.ID must correspond to the given Telescope as
declared in DICD. E.g.: For Unit Telescope i the value must be set to:
'ESO-VLT-Ui'.
Boss gives a log when keyword is not specified in the
configuration. (The OCS.TEL.ID is checked when the acces of TCS is normal.)
Table 7.5 Additional ICS configuration keywords
|
Configuration keyword
|
Short description
|
|
OCS.INSi.HDRCAT
|
Category of the ICS
keywords in the final fits header (optional).
|
|
|
|
Keyword should be used when more then one ICS headers are
merged together with the final imagefile. As the result of this keyword, the
category of the keywords (INS.*.*) in the header file created by the subsystem
will be replaced by the specifed category. Typically an index is added, (e.g.
"INS3") but other specifications (e.g. "XXX INS") are also
possible. The newly created keywords must be included in the dictionaries of
the subsytem.
See chapter 9.6.1, 9.8.6.2 for more details.
7.6
OS Subsystem
Configuration Keywords
An OS can also be a subsystem in case of SOS. The OS as a
subsystem is configured by the same keywords as other subsystems. See Table 7.2.
Table 7.6 Additional OS configuration keywords (required
only when OS subsystem is not based on BOSS)
|
Configuration keyword
|
Short description
|
|
OCS.OSi.DBSTATE
|
db address of
‘state’ (when other then default)
|
|
OCS.OSi.DBNEWDT
|
db address of ‘new data
file’ (when other then default)
|
|
OCS.OSi.DBEXPSTS
|
Exposure status
database attribute (when other then default)
|
|
OCS OSi PREFIX
|
Keyword prefix for SOS
Setup keywords (optional)
|
The configuration keywords OCS.OSi.DBSTATE,
OCS.OSi.DBNEWDT, OCS.OSi.DBEXPSTS
specifying the database address of the state, newdata and exposure status
respectively are only necessary when the subsytem OS is not based on BOSS. The
default values are:
OCS.OSi.DBSTATE <DBROOT>:status.state;
OCS.OSi.DBNEWDT <DBROOT>.osNewData;
OCS.OSi.DBEXPSTS <DBROOT>:exposure.expStatus;
Where DBROOT is specified by the keyword OCS.DETi.DBROOT,
when other then default (see section 7.2).
The setup keywords sent to SOS and intended to reach sub
OS-es must be prefixed. The default prefix is OCSi (where i correspons to the
category index). It is possible but not recommended to specify other prefix by
the keyword OCS. OSi.PREFIX. (For more infirmation on SOS setup keyword see section
9.8.2)
For more information about super OS see Chapter 9.8.
The modes of the instrument - that is declared as a series
of SETUP parameters - can include SETUP values for the ICS, DCS, OS subsystems
and also for the telescope as well. When an instrument mode is specified, the subsystems
that are involved in the given mode must be also declared.
Setting up/or starting subsystems that are not on the
subsystem-list are not allowed to. (A warning log appears on the logmonitor if
setup includes a subsystem that is not on the subsystemlist.) Single exposures
can be executed simultaneously only if they have the same instrument mode. Currently
no proper check is included for these points in BOSS, so satisfying the above
conditions are the user’s responsibility.
Note that the modes are always specific properties of the
instrument. Declaring them makes the setup of the exposures simpler. [AD 07]
The selected mode always has to be specified in the first
setup of an exposure. The setup of a mode can be only omitted when there is
only one mode specified in the configuration (see section 9.4.3.3) or when previous exposure is repeated (see section 9.4.3.2).
The maximum number of modes is limited to 40.
Table 7.7 Configuration of
instrument modes
|
Configuration keyword
|
Short description
|
|
OCS.MODEi.NAME
|
Name of the mode.
|
|
OCS.MODEi.SETUP
|
List of setup keywords
together with their values.
|
|
OCS.MODEi.SUBSYST
|
List of the name of the
subsystems involved in the mode.
|
|
OCS.MODEi.PATH
|
The instrument path that is
connected to the mode.
|
|
|
|
To configure an instrument mode the keyword in Table 7.7 are used, as the following examples show:
#
Instrument modes
#
mode 1
OCS.MODE1.NAME "IR_IMAGING"
OCS.MODE1.SETUP
"-function DET1.DIT 10 DET1.NDIT 1"
OCS.MODE1.SUBSYST
"IRDCS ICS UT0"
OCS.MODE1.PATH "BLUE"
#
mode 2
OCS.MODE2.NAME
"GUIDING"
OCS.MODE2.SETUP
"-file ccd.ref"
OCS.MODE2.SUBSYST "TCCD
ICS"
OCS.MODE2.PATH
"RED"
During the declaration of the OCS.MODE2.SETUP,
the parameters ‘–function’ and ‘–file’ are used (similarly
to the SETUP command).
Please note that the length of the NAME, PATH, and subsyst is limited to 64, 64, 256 characters
respectively. The length of the SETUP declaration is limited to 256 characters.
In case this is not enough (as normally) declare the setup values in a file
and use the ‘–file’ parameter as shown in the second example (GUIDING
mode).
The instrument mode always has to be declared in the first
SETUP of an exposure unless there is only one mode specified in the
configuration file (see also Chapter 8). The mode has to be set by the keyword INS.MODE as the following example shows:
SETUP –expoid 0 –function
INS.MODE IR_IMAGING
The INS.MODE setup keyword is also forwarded to the ICS
subsystem together with the other INS*.*.* keywords (pattern declared in the
configuration file by the keyword KEYWFILT)
in the setup.
Please note that in the case one of the setup keywords, that
is also included into the specified mode is repeated in the same setup, the
value given in the mode will be set.
E.g. in case of
SETUP –expoid 0 –function
INS.MODE IR_IMAGING DET1.DIT 5
the value of DET1.DIT will be set to 10.
When someone needs to overwrite a value declared in the
specified mode, a subsequent SETUP command has to be sent (without specifying
the mode). E.g.:
SETUP –expoid 0 –function
INS.MODE IR_IMAGING
SETUP –expoid <id>
–function DET1.DIT 5
In the above case the value of DET1.DIT is set to 5, and
also the name of the mode is changed to ‘Undeclared’. Note that this
will only effect the value of database point where the mode is stored (see also
Table 9). However, the ICS will NOT get a new setup command with ‘INS.MODE Undefined’. Note that modification is only valid for the given exposure, the actual parameters of the mode can not be changed during SETUP.
Therefore a subsequent command with ‘INS.MODE IR_IMAGING’ is sent the keyword
DET1.DIT is set to 10 again.
In general when one of the mode setup keywords are redefined
with different values the given mode cannot be identified any longer.
Nevertheless changing the path (using keyword OCS.PATH) is
allowed and will not effect the name of the mode. I.e. in the following example
the mode stored by OS remains ‘IR_IMAGING’.
SETUP –expoid 0 –function INS.MODE
IR_IMAGING
SETUP –expoid <id>
–function OCS.PATH “RED”
The detector(s) with which the exposure is taken must be
present on the subsystemlist (that is specified by the given mode). BOSS
automatically detects the detectors on the subsystem list and stores their
names. See also exposure table (Table 9) in Section 9.7.1.
For example the following setup
SETUP –expoid <id>
–function INS.MODE IR_IMAGING
declares the detector unambiguously. In the above case the
exposure is taken by IRDCS.
If there are more then one detectors are on the subsystem
list (declared by a given mode), the exposures can be started with any or all
of the declared detectors on the subsystem.
When the exposure has to be started only by one detector
only (and there are more detectors are specified on the subsystem list) the
required detector has to be specified during the START command using the –detId
parameter. E.g.:
START –expoId 1–detId
IRDCS
When detId is not specified parallel
exposure will be started. I.e. START command is sent to all the detectors on
the subsystem list simultaneously.
Any SETUP keywords that are in the dictionaries of the
subsystems can be given in the setup. One must make sure that the keywords are
indexed according to the declaration in configuration file (see filter).
The keywords declared in the SETUP command are forwarded to
the subsystems by BOSS. The command is successful when all subsystems set up
the corresponding data successfully. (See tests of the XXXX Instrument [RD
01]).
There are special keywords for declaring the image name and
for selecting an instrument mode. It is also possible to modify the elements of
a selected instrument mode. These keywords are declared in the BOSS dictionary.
Do not include subsystem and mode configuration keywords in
the setup!!
Also do not include setup keyword in the configuration!!
Table 8.1 Setup keywords
|
Setup keyword
|
Short description
|
|
INS.MODE
|
declare instrument mode
(optional)
|
|
OCS.PATH
|
set the path (optional)
|
|
OCS.DETi.IMGNAME
|
declare the image filename
(required when image is to be saved)
|
|
OCS.DETi.NAMING
|
Set filenaming type
(optional, default is standard naming)
|
|
|
|
|
|
|
Setting the image name by keyword OCS.DETi.IMGNAME:
The name of the image file is declared by the keyword OCS.DET.IMGNAME
in the SETUP. When this keyword is specified, BOSS first stores the name (for
its internal use), and later (when an exposure is ready to be started) it takes
care that the filename is set correctly according to the naming type. As
default OS is using standard naming. This means that the given filename is
automatically extended by a number indicating the day of the year, and a serial
number.
OS takes care of setting the image filename for the detector
(in charge) by sending a SETUP to the detector with the appropriate DCS setup
keyword.
When the image filename is set as an empty string, i.e. :
OCS.DET.IMGNAME “”, it is interpreted to take an exposure without saving the
image. Not all the detectors support this. E.g. IRACE detector software returns
an error when image filename is not set at the start of the exposure. BOSS DCS
interfaces therefore include a check for this.
See examples for usage of SETUP keywords below:
SETUP "-expoId 0
-function INS.MODE IR_SPECTROSCOPY INS.DROT.POSANG 10.0
DET2.WIN1.UIT1 15.0 DET2.EXP.NREP 1 OCS.DET.IMGNAME testImage.fits"
SETUP "-expoId
1 -function OCS.PATH red"
Setting the Image naming with OCS.DETi.NAMING
The naming type can have the following values:
“Standard-Naming”
“Sequence-Naming”
“Request-Naming”
As default “Standard-Naming” is
applied. According to this scheme the filename has the following format:
<imgname><doy>_<seq>_<imgext>.fits
where:
<imgname> : base filename
without extention
<seq> :
sequential number between 0001-9999
(see more
detailed description at “Sequence-Naming”)
<doy> :
day of the year 001-256
<imgext> : extention as
specified by the setup keyword OCS.DETi.IMGEXT
When “Sequence-Naming” is applied, the filename is supplemented with 4
digits. When files with the given base name (specified by OCS.DET.IMGNAME)
already exist this digit is increased automatically.
The first file will be named as:
<basename>_0001.fits
(Regardless whether or not file with name
<basename>.fits exists already.)
Then all the following files are named as:
<basename>_0002.fits,
<basename>_0003.fits, ….,<basename>_xxxx.fits,
When “Request -Naming” is selected, file with specified name
should not exist already. During the start of the exposure an error is returned
when file with the given filename already exists.
Once a particular detector’s naming type is setup it will
remain until the user changes it again.
If the naming is not declared “Sequence-Naming” is applied
as default.
Note1: When the TCCD is in simulation mode, always
“Request-Naming” is set. As in this case TCCD accepts only special filenames
(e.g. ccdImageLcuSim.fits).
Note2: When no index is given all the detectors naming type
will be set, i.e.
OCS.DET.NAMING
Request-Naming
sets the naming type of all detectors to “Request-Naming”.
Mode:
For more information on keywords INS.MODE, OCS.PATH see
Chapter 7.7.
More information about the functionalities of SETUP command
is found in 9.4.3
The main classes that construct the BOSS software can be
seen in Figure 3. In this chapter, the roles of these classes are introduced in detail. It is important for the developers to understand the functionality of the relevant classes.


Figure 3 Class design of the module boss
The ‘main’ function of an instrument OS is
supported by the bossCtrlMain class of the BOSS package.
The ‘main’ function of an instrument OS therefore should
follow the example bellow:
static void *use_rcsId =
((void)&use_rcsId,(void *) &rcsId);
#include
"bossCtrlMain.h"
int
main(int argc, char *argv[])
{
bossCtrlMain mainHandler("xx",rcsId);
mainHandler.CreateServer( new xxoSERVER( "XXXX");
// Startup: Register to CCS, set
defaults, parse runstring, create SERVER object
mainHandler.Init(argc, argv);
//Enter the main loop
evhHandler->MainLoop();
//Terminate : Deregister from CCS
mainHandler.Exit(EXIT_SUCCESS);
}
On the command line one can set the required verbose level,
e.g. for debugging purpose set the highest logging level as:
xxoControl –v 5 –l 2 -noDate
The command line parameters are:
-l <level> set
standard log level
-v <level> set
verbose log level
-a <level> set
action log level
-t <level> set
timer log level
-h print this
help
-version print the
version number of the software
-noDate turn off the
display of date in verbose log messages (written to stdout)
-noFileLine turn off the
display of file name and line number in verbose log
messages
(written to stdout)
-noExit when
applicable, avoid that application exits in case of a problem
when starting
it up.
-c <file> specify
application configuration file
xxoControl :
‘Main Control Process’
bossArchiver_xxo
: ‘File Handler Process’
:
The CreateServer function of bossCtrlMain as its names
implies creates a new instance of the instrument’s OS SERVER class. Note that
the OS SERVER class of the instrument has to be a child class of the bossSERVER
class !
The developer of an instrument OS must supply the following
data:
- database address of the root point of the OS (e.g.:
"<alias>xxo")
- Name of the instrument (e.g.: "XXXX") (which
has to correspond to INS.CON.ID
Specified in the configuration
module, e.g. in xxmcfg/config/xxmcfgINS.cfg [RD-10]
- dictionary ("XXXX_OS" for ESO-VLT-DIC.XXXX_OS)
of the instrument (if there is )
These parameters must be given as arguments
of the constructor function of the SERVER class.
The Init() function of the class bossCtrlMain regiters to
CCS and also initialize and configure the instrument server by calling the
Init() function of the SERVER class. See details of SERVER class including the
steps of functions Init() and Configure() in the next chapter.
The bossSERVER -as shown in Figure 4a - is an evh [RD 03] application. Figure Figure 4b shows the protected variables of this class, that can be accessed by the child classes.
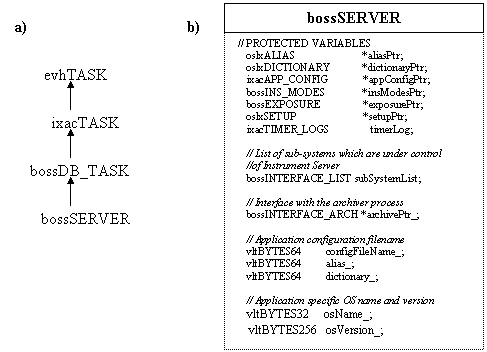
Figure 4 a) The inheritance chain of the
bossSERVER class.
b) Protected variables of the bossSERVER class
bossSERVER::bossSERVER(char * InsName)
:bossDB_TASK(dbPoint)
{
// set the name of configfile, dictionary
// Saves the name of the root database point
// Resets error handling
// Create instance of : dictionary
// Check if exposure db root point exists
// Reset list of pending WAIT commands
// Sets state alignment
}
The function ‘SubsystemInterfaces’ has a default
implementation in BOSS to generate the interfaces automatically based on the
configuration file (During auto startup the default function is used (see
section 10.1). When there are subsystems that do not fall into the predeclared categories (ICS, DCS, TCS, OS) the function ‘SubsystemInterfaces’ has to be overloaded specifying all the subsystem interfaces (see also section 9.3). Below you find an example how to declare an interface of a subsystem:
ccsCOMPL_STAT xxoSERVER::SubsystemInterfaces()
{
//#= Define a subsystem of an instrument
//
bossINTERFACE_IRACE irdcsPtr_; // declared in header file
irdcsPtr_ = new bossINTERFACE_IRACE (“<alias>iracq”, “DET1”);
AddSubSystem (irdcsPtr_);
…
return SUCCESS;
}
To have a direct access to the interfaces declare them as
protected variable in the header file of the class. In order to couple the
interface to the subsystem (declared in the configfile) the database point of
the subsystem and category together with its index must be given as an
argument.
Always add the subsystem interface to the subsystemList (see
next chapter) using the function:
ccsCOMPL_STAT
bossSERVER::AddSubSystem(bossINTERFACE *subSystemPtr)
For an example please see the implementation of template
instrument OS [RD 01].
Note that missing keywords in the configuration can be
source of various errors. Make sure that the second argument of the interface
corresponds to the category of the keywords in the configuration exactly.
In case additional configuration keywords are necessary to
configure the system, these keywords have to be placed into the dictionary of
the instrument OS, and the belonging implementation should go into the function:
ccsCOMPL_STAT
bossSERVER::AppConfigure(ctooCONFIG *)
Note that functions InitPostProc() and AppConfigure () are
just empty functions in BOSS. The function InitPostProc and AppConfigure are
typically used during the declaration of setup and configuration keywords. See
Chapters 10.3, 10.4 for more information how to declare additional keywords.
There are several interface classes available in the BOSS
library that should satisfy most needs. The available interfaces are shown in Figure 5.
In special cases you might wish to overload some of these
interface classes. (Refer to man pages of the interface classes). When new
interface class is to be developed it must always inherit from the base class
bossINTERFACE.C or from any of its child class.
Figure 5 Available
interface classes in BOSS
The interfaces should be selected according to the type of
the subsystem. Each interface class has its own database class, with the same
name. It is essential to include the corresponding database classes of the
interfaces into the database of the instrument.
For more information how to declare the connection between
given subsystem, its interface, and its database, see the function SubsystemInterfaces
of the bossSERVER class (Section 9.2). Example is given in the template instrument document [RD 01].
BOSS stores the declared interfaces
on its internal subsystem list (see class bossINTERFACE_LIST on Figure 3.). The interfaces are identified by the name of their belonging subsystem. (The names of the subsystems are given in the configuration file.)
The bossSERVER class contains the
implementation of all callbacks that are called whenever a standard command is
sent to the OS process. The list of the standard commands [AD 07] can be
found in the appendix.
As the there are all the commands
callbacks are implemented in one bossSERVER class, ( and it is therefore
consists of numerous functions) for maintenance reason it is shared among
several files:
bossSERVER.C bossSetModeCB.C bossWaitCB.C
bossStateCtrl.C
bossExitCB.C bossAddFitsCB.C
bossExpoCtrl.C
bossStateCB.C bossCommentCB.C
bossStatusCB.C bossStateAlign.C
bossSetupCB.C bossForwardCB.C
Note: most of the commands supported by bossSERVER class
have a <subSystem> parameter, which is used to forward the command
towards software (i.e sub-systems) implicated in the control of the instrument.
The behavior of the standard commands can be changed. See
following sections.
STATE ==>-state <STRING>
Returns the state and substate of the instrument in the
format of:
ONLINE/BUSY
STANDBY/IDLE
Note the state and sub-state of the instrument are saved in
the database under points ... . When the command STATE is received the function
StateCB is executed, which reads these dbpoints :
evhCB_COMPL_STAT
bossSERVER::StateCB(msgMESSAGE &msg, void *)
{
// Gets current value of the state form the db point ...
// Gets current value of the sub-state from the db point...
// Compose complete state i.e. STATE/SUBSTATE
// Sends reply
// Handles error when necessary
}
The instrument state is
associated with the state of the subsystem. It shows the minimum state of its
subsystems (or the state of the OS).
Event is attached to the ‘state’ database attribute of each
subsystems. (See also configuration in Table 7.2.) . When ‘ aligned state’ is true (i.e. ‘T’) every time when a subsystem’s state is altered the function evhCB_COMPL_STAT bossSERVER::StateEvtCB(evtEVENT_MSG&
event , void *)
is called that checks and sets the overall state of the
instrument.
See also manpages of:
BossStateAligned, bossStateCB,
bossDB_TASK (getStateName), bossSERVER (CheckStates)
OFF -subSystem <STRING> ==> -done
<STRING>
ONLINE -subSystem <STRING> ==> -done
<STRING>
STANDBY -subSystem <STRING> ==> -done
<STRING>
The handling of these commands is carried out by the
OnlineCB, StandbyCB, OffCB. These functions are reasonably simple and they are
also similar to each other. The procedure of the online callback is shown
below:
evhCB_COMPL_STAT
bossSERVER::OnlineCB(msgMESSAGE &msg, void *userData)
{
// Check if execution of command is allowed in the current state
// Log action
// Gets current sub-state
// Set sub-state
// optional user declaration: Call
pre-processing function
// Re-configure server according to the configuration file
// Handles command
// calls function StateCtrlCmdProc which executes the following:
//Parse message parameters
// If parameter '-subsystem' is specified
// send message to specified sub-system
// Else
// send command to all available sub-systems (except TCS).
// Wait sub-system reply(ies)
// Synchronize sub-system replies
}
ccsCOMPL_STAT bossSERVER::OffPreProc(msgMESSAGE
&, void *)
ccsCOMPL_STAT
bossSERVER::StandbyPreProc(msgMESSAGE &, void *)
ccsCOMPL_STAT
bossSERVER::OnlinePreProc(msgMESSAGE &, void *)
that are originally empty (returning SUCCESS immediately).
See also manpage of:
bossStateCtrl
SETUP -expoId <INTEGER> -detId
<STRING> -file <STRING>
-function <STRING> -noMove <LOGICAL>
-check <LOGICAL> -noExposure <LOGICAL>
==> -expoId <INTEGER>
evhCB_COMPL_STAT
bossSERVER::SetupCB(msgMESSAGE &msg, void *)
{
// Check condition for execution of command
// Log action
// Sets the start time marker of the command
// Sets sub-state to 'SETUP'
// Handle setup command: parses command parameter
// If there is no setup keyword Return error
// Get/Check expoId specified in command
// Extracts application configuration keywords
// If application configuration keywords found
// Configure list of the sub-system interfaces
// Configure instrument modes.
// Handles instrument modes (if specified): adds setup keywords corresponding
to the instrument mode
// Update database (add new exposure)
// Check if exposure is declared in the db
// Check instrument modes : check whether setup keywords influence the
current instrument mode
// Calls keyword trigger dispatcher
// Extract OBS.* TPL*,DPR.* keywords to be placed in FITS header
// optional user declaration: call
preprocessing function
// Forwards setup command to sub-system(s)
// Wait for sub-system reply(ies)
// Synchronizes sub-system replies
// Set the global exposure status inactive
// Sets sub-state to IDLE
}
In case of error happens during the SETUP, the exposure is
cancelled. That means that it no longer exists and cannot be started. Should
the setup sent to a running exposure fail, the exposure remains active of
course- see 9.4.3.1.
When SETUP includes setup keyword of subsystem which is not
included in the given mode BOSS logs the case on the logmonitor, but no error
is returned.
Note that the parameters specified in the SETUP command
refers to the OS exposures. BOSS modifies the setup parameters before forwarding
it to the subsystems if necessary.
As default BOSS allows SETUP while exposure is running.
The situation is represented by the substate OBSERVING|SETUP
which can be monitored by the databasepoint: : <alias>xxo:status.substateui.
(see 9.7.2)
Users can restrict this option (when applicable) calling the
function:
AllowSetupWhileExpRunning(ccsFALSE);
e.g. in the constructor of the overloaded bossSERVER class.
Note: Sending SETUP to a finished/failed/aborted/cancelled
exposure is not allowed.
When the SETUP sent to a running exposure (e.g. altering
the integration time) fails the users are informed by an error message, but the
exposure is not affected by boss.
When same or similar exposures has to be carried out many
times, it is worth to use the ‘the repeate exposure’ functionality to avoid superfluous
setup imposed by e.g. the INS.MODE keyword.
Repeating exposure of course only makes sense when exposure
has been previously set up successfully (otherwise error is returned). It is
allowed to alter the setup of the repeated exposure by consequence SETUP
commands.
To repeate an exposure omit the parameters ‘–function’ and
‘–file’ for the new exposure:
msgSend "" xxoControl SETUP "-expoId
0"
During the above setup no setup keyword is sent to the
subsystems, but a new expoId is generated.
Note that as the new setup starts with an empty header
TPL,OBS,DPR,OCS keywords must be sent again in order to place them in the fits
header in a consecutive setup.
During START the previous exposure is repeated.
Examples of repeating exposure:
A) Typical case
SETUP
–expoId 0 –function INS.MODE GUIDING …
1
START
-expoId 1
WAIT
-expoId 1
SETUP
–expoId 0
2
SETUP
–expoid 0 –function TPL*,OBS* ..
2
START
-expoId 2
WAIT
-expoId 1
B) Pre declaration of
exposures
SETUP
–expoId 0 –function ….
1
SETUP
–expoId 0
2
SETUP
–expoId 0
3
START
-expoId 1
START
-expoId 2
START
-expoId 3
Caution: Pre declared repeated exposures have to be
started in order.
C) Special case
In
a special case when one sets up a new exposure while an other is running, the
expoId and/or detId should be always specified for the other commands sent to
the exposures.
E.g.:
SETUP –expoId
0 –function INS.MODE OPT_IMAGING …
1
START
–expoId 1
SETUP
–expoId 0 - function INS.MODE OPT_IMAGING …
2
START
–expoId 2
WAIT
expoId 1 // wait for the exposure 1
In case the user forgets the
specify the expoId (or optionally the detId) for the command
WAIT, the default expoId (i.e.
for the last exposure is 2) takes places.
The setup of a mode (INS.MODE) can be omitted when there is
only one mode specified in the configuration.
When default mode is applied (i.e. the mode is not specified
in the setup) the setup parameters of the mode are included in the setup until
the first successful setup.
In the following setups the INS.MODE setup parameters will
be only included if INS.MODE has been included in the setup or the global state
of the instrument has been changed before.
In the special case of ‘one mode’ setup without parameter
-functions is accepted for first setup:
E.g.: SETUP -expoId 0.
As default boss automatically sets up a new
exposure, or request an existing exposure for the SETUP.
In special cases the SETUP may not
correspond to any exposures (e.g. there is no detector connected to the OS). In
this case the parameter ‘–noExposure’ is applicable (for both OS and
SOS) as the example below shows:
SETUP -noExposure -function
INS.LAMPi.ST F
Functionality must be used with extreme
caution not to interrupt running exposures!!
The case when neither the parameter -expoId
nor the parameter –noExposure is supplied for the SETUP is extremely
discouraged (nevertheless as default this would be understood as –noExposure).
Instrument
mode:
When parameter
'noExposure' is given it is NOT compulsory to declare the instrument mode in
the setup. However when INS.MODE keyword is found amongst the setup keywords,
it is treated the same way regardless the parameter -noExposure is given or not
in the setup. I.e.: The setup keywords belonging to the instrument mode as
declared in the configuration file are sent.
Pre and
Post processing functions:
The SetupPreProc()
and SetupPostProc() functions are also executed during the setup which
bypassing the exposures just like in case of a 'normal' setup. When these
functions are dependent on the type of the setup, use the variable
'noExposure' as shown below:
ccsCOMPL_STAT xxoSERVER::SetupPreProc(msgMESSAGE &, vltINT32 expoId,void *)
{
if (noExposure) {..}
else {..}
return SUCCESS;
}
For existing
instruments it is suggested to reconsider the content of SetupPre/PostProc()
functions before applying the functionality of 'noexposure setup'.
TCCD and FIERA detector software can handle only two
exposures at a time: one that is running and one is to be prepare to be started.
In order to avoid conflicts when a user tries to setup new exposures on BOSS
without starting them, (i.e. sending consecutive SETUP commands with expoId 0) including
keywords for a CCD, e.g.:
SETUP –expoId 0 –function INS.MODE OPT_IMAGING DET3.WIN.UIT1
10
4
SETUP –expoId 0 –function INS.MODE OPT_IMAGING DET3.WIN.UIT1
10
5
after the execution of the second SETUP command the first
exposure becomes INVALID. This means that it cannot be started. I.e.
START –expoId 4 will result in error.
This functionality was developed to make sure that templates
can be always restarted, regardless the number of inactive exposures hanging
around as a result of a failed or aborted template.
START -expoId <INTEGER> -detId <STRING>
-at<STRING> Þ -done
<STRING>
evhCB_COMPL_STAT
bossSERVER::StartCB(msgMESSAGE &msg, void *userData)
{
// Check conditions of command
// If sub-state is IDLE Set sub-state to BUSY
// Get/Check expoId specified in command (as a parameter)
// Get filename
// Get/Check detId specified in command (as parameter)
// Preparation for the exposure:
// Get the detector declared by -detId parameter
// (otherwise detector(s) on the detector list)
//
Check current exposure status of the given detector
//
if exposure filename is not given display a warning log
//
if exposure filename is given
// Check if there is enough disc place
// create file
// Set the image filename (by sending a SETUP to dcs)
// Set the status file name for the next exposure
//
activate the databasepoint status
// Call pre-processing function
StartPreProcMain()
{ if (isImagefile) StartPreProc();else
StartPreProcSpecial();}
// Send command to DCS/OS
// optional user declaration: Call
post-processing function
StartPostProc()
// Send subsystem replies
// Short exposure action
}
When an
exposure is started the db events attached to the status db attribute of the
detector (or detectors) are activated.
(The status
db attribute of the detectors is set in the configuration file (See Chapter 7.3). These db events have impact on the observation status, as well as on the releasing the pending wait commands.
In most
callbacks the preprocessing and post-processing functions are empty functions.
The StartPreProc is an exception, it calls tcsExpStart (during which the
tifGetFitsStart process is executed) and the icsExpStart (which sends the
EXPSTRT –path <inspath> command to ICS) as show below.
ccsCOMPL_STAT
bossSERVER::StartPreProc(msgMESSAGE &, vltINT32 expoId,void *)
{
// send expstart to tcs
if (tcsExpStart(expoId)!=SUCCESS)
{
ErrAdd (bossMODULE_ID, bossERR_START_PREPROC, __FILE_LINE__ );
return FAILURE;
}
// send expstart to ics (to all of them if there are more then one
declared)
if ( icsExpStart(expoId)!=SUCCESS)
{
ErrAdd (bossMODULE_ID, bossERR_START_PREPROC, __FILE_LINE__ );
return FAILURE;
}
return SUCCESS;
}
When the user
wish to alter the START command overloading the StartPreProc and/or
StartPostProc functions he must take into consideration the original
functionality of the StartPreProc !
Note that
StartPreProc is only called when image name is given for the exposure (i.e.
image is created by the exposure. When image is not created the function
StartPreProcSpecial (empty as default) is called. Both functions are called by
the function StartPreProcMain which calles StartPreProc or StartPreProcSpecial
according to the condition. All of these functions can be overloaded when
reqired:
virtual
ccsCOMPL_STAT StartPreProcMain(msgMESSAGE &msg, vltINT32 expoId,void
*userData);
virtual
ccsCOMPL_STAT StartPreProc(msgMESSAGE &msg, vltINT32 expoId, void
*userData);
virtual
ccsCOMPL_STAT StartPreProcSpecial(msgMESSAGE &msg, vltINT32 expoId, void
*userData);
WAIT -expoId
<INTEGER> -detId <STRING> -first <LOGICAL> -all -cond
<STRING> Þ -expStatus <INTEGER>
WAIT
–detId IRDCS
WAIT
–expoId 2
BOSS is able
to handle more then one WAIT commands simultaneously.
The number of
replies to wait command depends on the exposure status.
Only one
reply is sent when the exposure is already FINISHED, FAILED or ABORTED.
Two replies
are sent when exposure is running when WAIT command is received. The first
reply is sent to acknowledge that WAIT command has been received and informs
about the status, and last reply is sent when exposure is FINISHED, FAILED or
ABORTED or specified condition is fulfilled.
Error reply
is sent when exposure has not yet been started or the parameter ‘-expoId’ or
‘-detId’ is invalid. Error reply is sent also when exposure fails or it is
aborted by the user.
When the
parameter –all is specified the WAIT command refers to all running exposures,
and return when all exposures has been finished failed or aborted or satisfy a
specified condition.
It is possible to specify a condition to alter the timing of
the final reply sent to the WAIT command. The values of this parameter can have
the following values:
CanSetupNextObs –
Condition when new exposure can be setup without interrupting the currently
running exposure. This condition is fulfilled when all the partial headers are
collected from the subsystems and the telescope, i.e. when READING_OUT state
has been reached on FIERA. (This option is only relevant for FIERA detectors.
Regarding other detectors, the headers are collected when SUCCESS event is
reached, therefore there is no difference between condition CanSetupNextObs and
CanStartNextObs. )
CanStartNextObs
– Condition when next exposure can be started. I.e. the currently running
observation has been successfully finished, headers from other subsystems has
been collected and merging process has been informed to archive the image.
ObsEnd –
Default condition denoting the exposure is completed and the image file has
been merged with headers and archived.
With the help
of parameters ‘–cond’ and ‘–all’ the execution of the observations can be
optimized for speed.
SETUP –expoId 0 –file <>,
START –expoId 1
WAIT –expoId 1 –cond CanStartNextObs
SETUP –expoId 0 –function
<>
START –expoId 2
WAIT –expoId
2 –cond CanStartNextObs
…
WAIT –all
Also in an
urgent situation (unforeseen event, e.g. exploding supernova) these options
give way to the setup and start of a new exposure while safely ending a running
exposure as fast as possible.
SETUP –expoId 0 –file <>,
START –expoId 1
END –expoId
1
WAIT –expoId 1 –cond CanSetupNextObs
SETUP –expoId 0 –function
<>
WAIT - expoId 1 –cond CanStartNextObs
START -expoId 2
WAIT –all
PAUSE -expoId <INTEGER> -detId <STRING> -at
<STRING> Þ -done <STRING>
Pause the current exposure at a given optional time.
CONT -expoId <INTEGER> -detId
<STRING> -at <STRING> Þ
-done <STRING>
Continue a paused exposure at a given optional time.
END -expoId <INTEGER> -detId <STRING> Þ -done <STRING>
End the current exposure as soon as possible and read out
the data. Image file is saved.
When this command is sent when the exposure status is still
inactive (i.e. after setting up an exposure but before starting it) the exposure
will be cancelled.
When command END sent to TCCD/FIERA that is looping, the OS
(which receives the command) will send a STOP command to the DCS (rather then
END command).
ABORT -expoId <INTEGER> -detId <STRING> Þ -done <STRING>
The command ABORT terminates all the currently running
actions. The exposures are terminated immediately (no image is saved). The
abort command replies when reply from the subsystem arrives. As the reply does
not mean that the exposure has been already stopped it is recommended to send a
WAIT command after ABORT before a new exposure is set up.
STATUS -expoId <INTEGER> -function <STRING>
-global<LOGICAL>
Þ
-status <STRING>
Get the status of the functions in the list of arguments.
See also the documents on DCS Software for more information
about the ABORT, END commands [RD 07], [RD 08], [RD 09].
FORWARD -subSystem <STRING> -command <STRING>
-arguments <STRING>
Þ
-reply <STRING>
This command forwards the specified command with a specified
arguments to the specified sub-system. It returns the reply of the sub-system
command as a string. When the specified subsystem is set to be ignored the
command has no effect.
E.g.:
msgSend "" xxoControl FORWARD "-subSystem
IRDCS -command SETUP -arguments \",,DET.DIT 20,,,\"
"
Note that max length of parameter ‘–arguments’ is: 256bytes
See also FAQ 11.4 for more examples.
ADDFITS -expoId <INTEGER> -detId <STRING> -info
<STRING> ==> -done <STRING>
Add information to the FITS header.
See also section 11.5 for examples.
COMMENT -expoId <INTEGER> -detId <STRING>
-clear <LOGICAL> -string <STRING>>
==> -done <STRING>
Add a comment to the FITS header of an image.
e.g.:
msgSend "" xsoControl ADDFITS "-detId
XXXX -info OCS1.INS.FILT 9"
ACCESS -subSystem <STRING> -mode <STRING> [-info
<LOGICAL > ]
Þ
-reply <STRING>
The ACCESS command changes the ACCESS mode of the
subsystems, i.e. IGNORE or NORMAL. The parameter -subSystem specifies the name
of the subsystem the access mode of which is to be changed. Name should be
given according to the configuration file. When set to 'ALL' the mode of all
subsystems is changed to the specified mode. (Default value ALL.)
The parameter -mode specifies the mode, its value can be set
to IGNORE or NORMAL.
If mode of a subsystem is set to be ignored, all commands
that are sent to it are ignored.
(Default value NORMAL.)
If the parameter –info is specified the command returns
information about the ACCESS mode of all subsystems. This parameter should not
be used together with the other parameters.
E.g.:
Set all the subsystems mode to NORMAL:
msgSend "" xxoControl ACCESS ""
Returns information about all the subsystems:
msgSend "" xxoControl ACCESS "-info"
Set the access mode of the TCS to be ignored:
msgSend "" xxoControl ACCESS "-subSystem
UT0 -mode IGNORE"
VERSION Þ-version
<STRING>
Returns the version of the boss module and if there is the
version of the toplevel instrument OS module.
VERBOSE -status <STRING> Þ -reply <STRING>
State handling
For each declared subsystem the database point where its
state is stored must be know for the OS.
OS attaches database events to the databbase points of the
subsystems (the access mode of which is normal). These events have impact on
the global state of the instrument.
Exposure handling
In case of DCS subsystems OS attaches database events also
to the database points ‘exposure status’ and the ‘newdata’(see Section 7.3). These events invoke the processes that must be carried out after the images have been created. E.g. the image must be merged with the header files produced by other subsystems.
Connection to VOLAC
The ready image files are archived by the VOLAC system. The
VOLAC system is informed about new files through the database point:
<alias>newData.newDataFileName.
Based on the application-supplied
information OS_ROOT, this database point is created automatically.
To achieve this the
application’s database (xxo.db) must include the osbEnv.db file (which includes
boss.db). It is ensured that the database point ‘<alias>newData’ is only
created once, regardless the number of OS-es in the system.
See Template instrument example Chapter 10 (xxo.db)., and Chapter 11.10 (FAQ) for more details.
Life Cycle
The status of the detectors are displayed under the
databasepoint:
‘<alias>xxo:subsystems:<subsyst>:lifecycle’
as specified in VLT-SPE-ESO-17240-0385.
Where <subsyst> must be set to the lower case
version of the subsystem name,
i.e. in xxoSERVER.class the database point for the ‘IRDCS’
sybsystem is set to ‘irdcs’.
CLASS bossINTERFACE_LIST xxodbSUB_SYSTEMS
BEGIN
ATTRIBUTE bossINTERFACE_IRACE irdcs
END
When the image file has been created by the detector, boss
merges it together with header files (containing information about the other
subsystems e.g. ICS, TCS or the DCS itself).
Each exposure starts with a new empty header, i.e. keywords
that are retrieved from the setup are not reserved for the following exposures.
There are several keywords that are placed automatically in
the fits header by BOSS retrieving the values from the configuration file or
from the setup.
These fits header keywords based on the configuration are:
INSTRUME (according to INS.CON.ID)
ORIGIN (according to OCS.CON.ORIGIN)
INS.DATE (according to OCS.CON.RELEASE)
TELESCOP (according
to OCS.TEL.ID)
These fits header keywords based on setup keywords are:
OBJECT (according
to DPR.CATG,OBS.TARG.NAME , DPR.TYPE)
if
(DPR.CATG=="SCIENCE") then OBJECT = OBS.TARG.NAME)
otherwise
OBJECT = DPR.TYPE ( OBJECT is set to "" when keyword is missing)
OBSERVER (according
to OBS.OBSERVER)
PI-COI (according
to OBS.PI-COI.NAME)
Note that setup keywords starting by OCS.*.* , OBS.*.*, TPL.*.*
or DPR.*.* are also automatically placed into the header.
Normally the users do not have to worry about the header
merging process nevertheless during the development it is useful to know what
temporary files are created (9.6.1 ).
It is also possible to specify additional binary tables (9.6.2).
Given the image filename (by a setup keyword
OCS.DETi.IMGNAME) BOSS creates the final image file by merging the image file
created by the DCS together with the header files gained from various
subsystems. The partial header files are removed after successful merging.
Supposing that the filename is given as ‘myfile.fits’ the
following files are created:
I) header file created by TCS or VLTI :
TCSHDR_<detId>
_<expoId>.tcs or
TCSHDR_<detId>
_<expoId>.iss
Where detId
is the name of the detector that creates the ‘myfile.fits’ image and expoId
is the serial number of the exposure. This file is created during EXPSTRT
process and finished during EXPEND process.
II) header files created by ICS-es:
myfile_<subsName>_hdr.fits
Where subsName
is the name of the ICS subsystem that creates the header.
This file is
created during EXPEND. (STATUS command is sent to ICS to retrieve the header.)
III) header files created by FIERA or TCCD :
myfile.fits.det
Created when imagefile is ready.
IV) header file created by BOSS:
myfile_hdr.fits
This file
contains the TPL/DPR/OBS keywords which has been included into the SETUP
command. It also contains any additional keywords that are added during runtime
by the commands COMMENT and ADDFITS.
(Data saved
into this file at the end of the exosure.)
The extension of the header files created by the subsystems
is declared by the subsystem itself. The boss interfaces adopt this
information. See function bossINTERFACE:: GetStatusFits() for more
details.
For the archiver process an auxiliary file is created with
name: ‘myfile.arf', which is removed
after successful handling. This auxiliary file contains the name of the files
to be merged, deleted.
Note that when requested (by the configuration keyword
OCS.INS.HDRCAT) the archiver process changes the category in the header file as
well.
All these files are collected under directory
$INS_ROOT/SYSTEM/DETDATA/.
When SOS controls the exposure additional header files might
be created.(See section 9.8.6 for more information.)
In many cases there are additional information in form of
binary tables that have to be included into the final FITS file.
Boss has a functionality to append binary tables to the
image file automatically, when the following conditions are satisfied:
1) The
file containing the binary table must be ready by the time the image file is
ready
2) It
is saved under $INS_ROOT/$INS_USER /DETDATA
3) It
has the same name as the imagefile but extention ‘_btbl.fits’.
4) The
file containing the binary table is a proper fitsfile, i.e. contains the binary
tables as extentions.
The best is to create the binary
tables using module oslx. See manpage of oslxFITS_EXT.
e.g. : myfile.fits will be merged
with myfile_btbl.fits
Note that in case of VLTI instruments binary tables (names
as: ‘<imgname> .bin<subsystem>’) created by ISS are
automatically merged together with the image file.
The archiver process handles the supplementary files (*.arf)
generated by the main process containing information about which files are to
be merged together.
These files are stored under INS_ROOT and removed after
their successful handling, unless the process has been started up in a debug
mode.
The files to be merged, deleted or archived are appear as a
list of files after specific keywords, e.g.: APPENDEXT, APPENDBIN, MERGE, APPEND,
ARCHIVE, DELETE.
The communication between the main process and archiver, the
format of the supplementary file, and the image handling is kept private. In
case more files are necessary to be merged together with the image files the
user are advised to apply the naming scheme and overload functions
CreateBtblFile(), GetSosUserFiles() (see also 9.8.6, 9.6.1,
9.6.2).
For experienced users it is also possible to work directly
with the arf file pointer (See also 10.2 function ApplImageHandleProc()),
however it is advisable to contact the BOSS developer before doing so.
In an unlucky event of the archiver process is killed (due
to e.g. computer crash) there might be unhandled (and un-archived) image files
left under INS_ROOT. In this case it is possible to restore these files after
restarting the process. For each *.arf file under INS_ROOT/SYSTEM/DETDATA, running
the following command:
msgSend “” bossArchiver_xxo ARCHIVE “-file
imageFilename_00XY.arf”
See also section 6.1, 9.1, 10.1 on the archiver process.
The bossSERVER class has a pointer to one instance of the
bossEXPOSURE class (See Figure 3).
The bossSERVER class as well as the bossEXPOSURE class have
access to the list of subsystems (see Figure 3).
The bossEXPOSURE class is responsible to keep track of the
current and past exposures. Boss keeps track of up to 20 exposures. The ‘old’
exposures are removed from the table.
The bossEXPOSURE class keeps track of the current and
previous exposures.
The exposures are collected in table at the following databasepoint:
<alias>xxo:exposure.currExposureTbl
where xx is the two-letters instrument code.
Table 9 Exposure table
|
expoId
|
Mode
|
Subsystems
|
Inspath
|
Detector
|
filename
|
State
|
expstrt
|
|
expo-1
|
Undefined
|
|
BLUE
|
TCCD
|
myTCCD1.fits
|
COMPLETED
|
done
|
|
expo-2
|
GUIDING
|
|
BLUE
|
TCCD
|
myTCCD2.fits
|
ABORTED
|
|
|
expo-3
|
IR_IMAGING
|
|
RED
|
IRDCS
|
myIR.fits
|
INTEGRATING
|
tcs,ics
|
|
|
|
|
|
|
|
|
|
|
|
|
|
|
|
|
|
|
The exposure
table shows the main properties characterizing the exposures that are
identified by the expoId.
The last property
in the table is the expstart flag that is used by BOSS internally. This flag
indicates whether there are processes running that must be finished before the
final image can be created. (These processes are typically the EXPSTRT
processes that prepare additional information that must be placed in the
header.) The expstart flag is emptied when there are no such processes left,
and switched to ‘done’ when the final image is created.
The id of the last exposure, the last inactive exposure,
and the last invalid exposure are also represented under the database points:
<alias>info.lastExposure - last exposure (with the highest expoId)
<alias>info.lastInacivExp - last exposure that has been set up but has not yet
been started
(Set
to –9999 when there is no inactive exposure to be started)
<alias>info.invalidExp - exposure that has been automatically set to invalid,
because
of a consequent setup of a new exposure
(e.g.
trying to setup 2 exposures on the same CCD simultaneusly without starting
any)
Initially (at startup) all these values are set to –9999.
The expoId of the last exposure and last inactive exposure
are updated during setup and start command sent to the OS.
When there is no more inactive exposures left the
lastInacivExp is set to –9999
The expostatus values are collected in the table below for
reference:
|
Exposure
status
|
Value
|
|
inscEXP_UNDEFINED
|
0
|
|
inscEXP_INACTIVE
|
1
|
|
inscEXP_PENDING
|
2
|
|
inscEXP_INTEGRATING
|
4
|
|
inscEXP_PAUSED
|
8
|
|
inscEXP_READING_OUT
|
16
|
|
inscEXP_PROCESSING
|
32
|
|
inscEXP_TRANSFERRING
|
|
|
inscEXP_COMPL_SUCCESS
|
128
|
|
inscEXP_COMPL_FAILURE
|
256
|
|
inscEXP_COMPL_ABORTED
|
512
|
On FIERA and TCCD there are additional expostatus values
defined as shown in the table below:
|
|
Value
|
|
|
1024
|
|
ccdEXP_LOOP_INFINITE
|
2048
|
|
ccdEXP_DONE
|
ccdEXP_COMPLETED |
ccdEXP_FAILED | ccdEXP_ABORTED
|
|
ccdEXP_RUNNING
|
ccdEXP_PENDING |
ccdEXP_INTEGRATING | ccdEXP_PAUSED | ccdEXP_READING | ccdEXP_PROCESSING |
ccdEXP_TRANSFERING
|
|
ccdEXP_LOOP
|
ccdEXP_LOOP_FINITE |
ccdEXP_LOOP_INFINITE
|
BOSS interprets the exposure status values as
described in the table below. In addition, boss also has some additional
expostatus values:
|
Exposure
status boss
|
Value
|
|
|
UNDEFINED
|
0
|
At the beginning when OS
started up, no exposure has been defined.
Or when status of DCS is
undefined.
|
|
INACTIVE
|
1
|
Exposure has been setup but
has not yet been started
|
|
FAILURE
|
256
|
Exposure failed. (Can be
caused by many reasons, e.g. archiver process does not exists, expend process
failed, exposure on dcs failed)
|
|
ABORTED
|
512
|
Exposure is aborted by the
user. (considered as error)
|
|
bossEXP_RUNNING
|
1024
|
From the moment exposure is
started till the end of the expend processes
Until archiver process is
informed that exposure is finished
|
|
bossEXP_FINISHED
|
2048
|
Exposure has been finished
successfully, header data for merging has been collected.
|
|
ossEXP_CANCELLED
|
4096
|
An exposure that has been
set up, but has not yet been started is cancelled by the user (sending
command END). Global status is set to ABORTED.
|
Note: When boss BOSS encounters a complex exposure status
(e.g. ccdEXP_RUNNING) it is
interpreted as follows:
If it includes a FAILED member -> FAILED, if it includes
a ABORT member -> ABORT
If it includes a PAUSED member -> PAUSED, otherwise
RUNNING.
When more then one exposure is running (semi-parallel or
parallel) the global exposure status is calculated.
The bossEXPOSURE class includes functions that operate on
the exposures, and exposure tables. These are used internally. Below the
functions, which retrieve useful information about an exposure, are listed.
ccsCOMPL_STAT
GetLastExpoId(vltINT32 *expoId);
vltUINT32
GetGlobalExpoStatus();
char
* ExpoStatus2Str(vltUINT32 expoStatus);
ccsCOMPL_STAT
GetExposure(int expoId, char *mode, char *subsystems, char *inspath,
char *detector, char *filename, char *state, char *expstrt);
vltLOGICAL
IsDefined (int expoId);
vltINT32
NoExposures();
ccsCOMPL_STAT
GetSubsystems(vltINT32 expoId,char *subsystems)
ccsCOMPL_STAT
GetDetector(vltINT32 expoId,char* detector)
ccsCOMPL_STAT
GetFileName(vltINT32 expoId,char *filename)
ccsCOMPL_STAT
GetInsPath(vltINT32 expoId,char *inspath)
ccsCOMPL_STAT
GetExpstartFlag(vltINT32 expoId,char *expstrt)
vltLOGICAL
CheckDetector( vltINT32 expoId, char *detId);
vltLOGICAL IsDetectorOnDetectorList(
vltINT32 expoId, char *detId);
vltINT32 GetNumberOfDetectors(vltINT32
expoId);
For more information on other functions, see manpage of
bossEXPOSURE.
An exposure consists of the following main steps:
a) Setup
of an exposure
Each exposure is identified by a
unique number (expoId) during the setup.
b) Start
of an exposure
- Preparation for starting
the image
(e.g. setting the image file name)
-
‘expstart action’: Exposure
start action during which ICS and TCS (on the subsystem list) are informed that
an exposure is about to start.
c) Observation
-
boss monitors the events (e.g. exposure status) generated by the
subsystems.
d) End
of exposure process
-
‘expend action’: ICS and TCS (on the subsystem list) are
informed that exposure has been finished. (Note that when exposure is aborted,
STOP command is sent to ICS, otherwise EXPEND command is sent).
-
‘merge action’: Preparation for merging the header files
together
with the
image file (informing the archiver process which files to merge)
-
‘image handling action’: handling and archiving the
imagefile (done by a separate process,
but synchronsed with the
main process)
-
Reply is sent to pending wait commands
The steps of the exposures re also reflected by the substate
of OS. (see also 6.4).
The substate of the OS is monitored through the database
point: '<alias>xxo:state.substateui' :
The substate values are:
|
Substates
of BOSS
|
Value
|
|
UNKNOWN
|
0
|
|
NOT_RUNNING
|
1
|
|
LOADED
|
2
|
|
IDLE
|
4
|
|
BUSY
|
8
|
|
SETUP
|
16
|
|
OBSERVING
|
32
|
|
PAUSED
|
64
|
|
OBSERV/BUSY
|
40
|
|
OBSERV/SETUP
|
48
|
|
OBSERV/PAU
|
98
|
|
OBS/PAU/SET
|
114
|
|
OBS/EXPSTRT
|
160
|
|
OBS/EXPEND
|
288
|
|
OBS/MERGE
|
544
|
Complex sub-state values are formed from OBSERVING|SETUP to
represent the situation when setup is sent during a running exposure. Sub-states OBS/EXPSTRT, OBS/EXPEND and OBS/MERGE
represents the situation when OS executes an action while the exposure is
running. (Note that often expend and merge action are still running after DCS
has been finished the exposure. In this cases the sub-state indicates that the
OS is still carries out actions concerning the exposure).
The complex sub-state OBSERV/BUSY denotes the case when OS
handling a command while observation is running.
The complex sub-state OBSERV/PAU happens during
semi-parallel exposures when one of the exposure is running and the other is
paused. If a setup command is sent at this time the sub-state should change to OBS/PAU/SET.
The various actions (expstart,
expend, merge, explained in the previous section 9.7.4) during the exposure must be handled with care as they are dependent on each other, on the exposure status and new data event. BOSS keeps track of the status of these steps and events via an internal synchronization
class, which can be enquired for information at any time.
This internal class checks also the
conditions whether an action regarding to an event is executable or not. The
following conditions apply to the various steps:
Expstart action: The
expstart action is executed before (as default) or after START command is sent
to the DCS. It can be executed when DCS is idle, i.e. when previous exposure if
any has been already finished, failed or aborted. If this condition does not
apply error is returned.
Expend action: This action
is executed when expstart action has been carried out successfully and READING_OUT
status has been reached or passed. Error is returned if expstart action has
previously failed. (Internal error is reported should the merge action occur before
this step.)
Merge action: This action
is executed after expend is done and the exposure finished successfully and new
image file has been created. This synchronization is necessary to make sure
that when exposure has finished successfully the new image file is ready. This
can happen when integration time is very short.)
When a subsystem status changes
or it creates a new image file the event is captured by the OS and checks
whether the prerequisites of the corresponding actions are satisfied. If yes it
executes the action otherwise sets a flag to mark that the action must be
executed later. At the end of the start procedure a special check is included
to handle short exposures (i.e. when due to short integration time the exposure
is already finished).
The synchronization makes sure
that the actions are only carried out once.
SOS is an OS which controls other OS-es.
The example in Figure 6 shows an SOS which controls two instruments XXXX and YYYY (i.e. two OS-es) besides its own ICS and the Telescope.

Figure 6 Example for SOS
SOS behaves similary to a normal OS, but it has some
peculiarity, which is described in this chapter.
Start up of SOS
First start up the subsystems and finally the SOS.
Structure of SOS
It is not recommended to design an SOS with a direct
connection to DCS.
It is the user’s responsibility to ensure that there is only
one TCS/VLTI (with access mode normal) in the whole SOS structure.
It is suggested to place the TCS at top level, but other
arrengments are also possible. For test purpose or standalone operation of the
sub OS-es, it is allowed to include TCS in the configuration of more then one
OS-es, however their access mode have to be set to ‘ignored’ when SOS is in
charge of the controlling the system.
SOS exposures
It is allowed to take test exposures with the sub-OS-es
before SOS has been started up. Exposures should not be taken directly by the
sub-OS–es while SOS is ONLINE.
Should you wish to test a sub-OS without its Super OS, set
the SOS to STANDBY or shut it down. SOS cleans up its sub-OS-es when its state
is set to ONLINE.
Parallel exposures
are not supported at SOS level. This means that when parallel exposures are
required they has to be specified as semi-parallel exposures.
The configuration of an OS subsystem follows the pattern of
the configuration of other subsystems (Chapter 7.). See example below:
# Configure the XXXX
instrument
OCS.OS1.NAME "XXXX" #
name of the OS subsystem
OCS.OS1.ACCESS "NORMAL" #
access mode of the OS subsystem
OCS.OS1.ENVNAME
"wbos" # environment where proc.
is running
OCS.OS1.PROCNAME "xxoControl" #
name of the OS process
OCS.OS1.KEYWFILT "OCS1.*.*.*.*.*.*"
# keywords to be forwarded to subsyst
OCS.OS1.TIMEOUT 6000
# timeout for the process
OCS.OS1.DBSTATE "<alias>xxo:status.state"
# db address of 'state'
# Configure the YYYY
instrument
OCS.OS2.NAME "YYYY" #
name of the IRACE detector
OCS.OS2.ACCESS "NORMAL" #
access mode of the IRACE detector
OCS.OS2.ENVNAME "wbos"
# environment where proc. is running
OCS.OS2.PROCNAME "yyoControl" #
name of the IRACE detector process
OCS.OS2.KEYWFILT "OCS2.*.*.*.*.*.*" #
keywords to be forwarded to subsyst
OCS.OS2.TIMEOUT 6000
# timeout for the process
OCS.OS2.DBSTATE "<alias>yyo:status.state" #
db address of 'state'
# Configure the Instrument
modes
OCS.MODE1.NAME
"SOS_TEST" # name of the
instrmode
OCS.MODE1.SETUP
"-function OCS1.INS.MODE IR_IMAGING" # setup the mode
OCS.MODE1.SUBSYST "XXXX"
# subsystems involved in the given
mode
OCS.MODE1.PATH ""
# instrument path
OCS.MODE2.NAME "TWO_OS"
# name of the instrmode
OCS.MODE2.SETUP "-function
OCS1.INS.MODE IR_IMAGING OCS2.INS.MODE YY_TEST" # setup the mode
OCS.MODE2.SUBSYST "XXXX
YYYY" # subsystems
involved in the given mode
OCS.MODE2.PATH ""
# instrument path
In the SETUP command (which
are sent to the SOS) the keywords must be given hierarchically. All keywords
that are intended to setup a parameter of a subsystem of a subsystem must have
a prefix: OCSi.
The index of this prefix must correspond to the index of the
category of the given OS as declared in the configuration file!
For example when the instrument
XXXX is assigned by the OS1 category in the configfile, i.e.
OCS.OS1.NAME "XXXX" ,
then to set up the integration
time of the DET1 subsystem of the XXXX instrument the keyword
OCS1.DET1.DIT
must be used in the setup
command.
In principle to set up an SOS parallel exposure, one can
send the following setup command to the SOS process (note that this is not yet
supported):
SETUP -expoId 0 -function INS.MODE
TWO_OS OCS1.OCS.DET.IMGNAME xxxx.fits OCS1.DET1.DIT
2 OCS2.OCS.DET.IMGNAME yyyy.fits OCS2.DET1.WIN1.UIT1
10.0
The SOS (or more precisely the interfaces of the XXXX and
YYYY instruments) then will cut off the prefixes and send to XXXX:
SETUP –expoId <id>
-function OCS.DET.IMGNAME xxxx.fits DET1.DIT 2 INS.MODE IR_IMAGING
and to YYYY:
SETUP –expoId <id>
-function OCS.DET.IMGNAME yyyy.fits DET1.WIN1.UIT1 10.0 INS.MODE
YY_TEST
As long as only the hierarchical keywords and the standard
configuration keywords are used, there is no need to supply additional
dictionary at SOS level.
The exposure controlled by an SOS has the same main steps (9.7.4) as a normal OS, however because of the hierarchical structure the interactions are more complex.
Figure 8 shows the interaction diagram of command START, when SOS controls three OS-es, one ICS and the TCS and in the given mode all subsystems are on the subsystem list. Two of the OS subsystems (OS1 and OS2) have one
detector and an ICS connected to them, while OS3 controls only an ICS. (Figure 7 shows the structure of the SOS.)
Figure 9 shows the image data ready event for the same instrument as shown in …., however in a different mode. In the mode depicted OS2 is not on the subsystem list, therefore it does not take role.
The image taking OS is OS2, and data is collected from OS3.
Figure 7 SOS controlling three
OS-es, one ICS and the TCS.
STEP 1. Declare the additional
command 'NEWCMD' in the CDT of the OS instrument.
The application specific CDT (e.g. xxo/CDT/xxoControl.cdt
for the template instrument) must always include the standard CDT declared in
BOSS, i.e. 'bossServer.cdt'.
#include "bossServer.cdt"
COMMAND= NEWCMD
FORMAT= A
PARAMETERS=
PAR_NAME= expoId
PAR_TYPE= INTEGER
PAR_OPTIONAL= YES
STEP 2.: Define a symbolic constants (optional)
Define a symbolic constants for the new command in the
header file 'xxoBOSS/xxo/include/xxoPrivate.h' .
#define xxoNEW_CMD "NEWCMD"
STEP 3.: Add callback for the new command
inside the InitPostProc function.
xxoSERVER::InitPostProc()
{
// Install callback(s)
for command(s)
evhMSG_TYPE_KEY
key(msgTYPE_COMMAND);
evhOBJ_CALLBACK callback
(this);
evhHandler->AddCallback( key.Command(xxoNEW_CMD),callback.Proc(
(evhCB_METHOD)&xxoSERVER::NewCmdCB));
}
STEP 4. Implement a callback to handle
command 'NEWCMD'
evhCB_COMPL_STAT xxoSERVER::NewCmdCB(msgMESSAGE &msg, void
*userData)
{
}
It could be useful to take a look at the implementation of
commands in the bossSERVER class, that are similar to the specific command
'NEWCMD'. The callbacks for standard commands are implemented in the following
files:
boss/src/
bossExpoCtrl.C: ABORT, CONT, PAUSE, START, END
bossAddFits.C: ADDFITS
bossExitCB.C : EXIT
bossExpCB.C: EXPEND, EXPSTART
bossStateCtrl.C: OFF, ONLINE, STANDBY
bossSelftst.C : SELFTST
bossSetupCB.C: SETUP
bossCommentCB.C: COMMENT
bossStateCB.C : STATE
bossStatusCB.C: STATUS
bossForwardCB.C: FORWARD
if
(Send(Cmd.GetCommand(), Cmd.GetMsgBuf()) != SUCCESS)
{
//#= Handles error
return (FAILURE);
}
There can be many reasons why the callbacks of the standards
commands would need to be modified.
Eg. : Save some data in database.
Send an additional message to a subsystem.
Change the other of the processes in case of START.
Add additional prerequisite (e.g. modes).
It is advisable to use the empty pre- and postprocessing
functions of the given command callback. See also section 9.4.2, and 9.4.4 for examples.
Below some useful procedures are introduced .
The argument of the PreProc() and PostProc()
functions are the message (msg) and the exposure id (expoId) .
The example below shows the way to declare the detector of
the exposure (detId), the belonging subsystem interface (detSubsystem),
and the exposure status (expoStatus).
ccsCOMPL_STAT
bossSERVER::ContPreProc(msgMESSAGE &msg, vltINT32 expoId, void *)
{
ExtDbgLog("bossSERVER::ContPreProc()");
// Declare instrument mode of the exposure
VLTBYTES64
mode;
memset((char
*)&mode, '\0', sizeof(mode));
if(exposurePtr->GetInsMode(expoId,(char*)mode)!=SUCCESS)
{
ErrAdd(..);return FAILURE;}
// Declare detector of the exposure
if(exposurePtr->GetDetector(expoId,(char*)detId)
!=SUCCESS)
{
ErrAdd(..);return FAILURE;}
//
declare subsystem interface of the detector
bossINTERFACE_DCS
*detSubsystem=NULL;
detSubsystem=(bossINTERFACE_DCS*)subSystemList.GetSubSystem((char*)detId);
if(detSubsystem==NULL)
{ ErrAdd(..);return FAILURE;}
//
Get exposure status
vltINT32
expoStatus;
expoStatus
=detSubsystem->GetExpoStatus();
if(expoStatus==
inscEXP_UNDEFINED)
{err handling..}
//
implement pre pocessing
// ...
return SUCCESS;
}
Experience showed that control of subsystem bypassing the
OS/SOS is often required.
Typical examples are listed below:
- Start or stop a looping with technical CCD directly from
its panel.
- Commands sent via FORWARD command ( Although the FORWARD
command is sent to OS the command specified by the parameter bypasses the
OS. The OS reports only the reply for the given command.)
- Commands sent directly to subsystems. This occurs in case
of SOS, for example when BOB sends commands directly to the subOS for calibration
while SOS observation takes place on an other subOs simultaneously (e.g.
FLAMES).
These actions result in unexpected events for BOSS. The
events coming from a subsystem that is not directly controlled by the OS or SOS
are ignored. Their status are also not included in the global status either. In
the global status only the status of the ‘active’ DCS or OS subsystems
are included, which has been set up and started by through the OS.
Answer:
See a proper startup example below :
> xxoControl &
> bossArchiver XXXX &
In case of any problem (that cannot be identified by error
or log messages) the highest debug options for the control process should be
set as follows:
xxoControl -v 5 -l 2 > mydebug.report &
Question:
Does the expoId need to be declared all the time in the
commands?
Answer:
In the SETUP command the expoId always has to be declared!
Even in a special case when no detector subsystem is involved in the
instrument.
In the first SETUP command the expoId must be 0. This
returns a new expoId with which one can refer to the given exposure.
In the other commands it is not compulsory to supply the
expoId, nevertheless when there are more then one exposure has been set up at a
time it is strongly recommended to supply either the expoId or the detId.
ExpoId can be omitted when there is only one exposure is set
up at a time, as the following example shows:
>msgSend
"" xxoControl SETUP "-expoId 0 -function DET1.DIT 10 INS.MODE
IR_IMAGING OCS.DET.IMGNAME myfile.fits"
>msgSend
"" xxoControl START ""
>msgSend
"" xxoControl ABORT ""
Question:
Trying to setup and start a single exposure without saving
an image with TCCD such as:
>
msgSend "" xxoControl SETUP "-expoId 0 -function
DET2.WIN1.UIT1 10"
1
>
msgSend "" xxoControl START "-expoId 1 -detId
TCCD"
This returns error saying that
subsystem list is not declared.
How the subsystem list has to be
declared?
Answer:
The subsystem list should be always given for an exposure.
It has to be given by the instrument mode i.e. by keyword INS.MODE. The
subsystem list for the given mode is given by the OCS.MODEi.SUBSYST keyword in
the configuration file. Following solves the problem:
> msgSend "" xxoControl SETUP "-expoId 0 -function
DET2.WIN1.UIT1 10 INS.MODE GUIDING"
1
> msgSend
"" xxoControl START "-detId TCCD"
Note that during start it is sufficient to enter either the
expoId or the detId.
Question:
How can I send a STATUS command to a subsystem through the
OS process?
Can you give me an example: STATUS -expoId <some
value> -function <some value> ...
Answer:
1.) Execute an exposure.
2.) To get information from ICS you can send to the OS
process the status cmd directly:
>msgSend
"" xxoControl STATUS "-expoId 1 -function
INS.DPOR.ST"
MESSAGEBUFFER:
INS.DPOR.ST
"F"
3.) To get information from DCS forward the STATUS command
as follows:
>msgSend
"" xxoControl FORWARD "-subSystem IRDCS -command
STATUS -arguments 1,DET.DID"
MESSAGEBUFFER:
DET.DID
"ESO-VLT-DIC.IRACE-1.0"
In case of technical ccd:
>msgSend
"" xxoControl FORWARD "-subSystem TCCD -command
STATUS -arguments 1,DET.MODE"
MESSAGEBUFFER:
128,DET.MODE 3
The parameter -subSystem is the name of the subsystem (as
declared in the xxmcfgINS.cfg file).
The parameter -arguments is composed from the parameters of
the STATUS command of the ccd.
(i.e. expoId, function in this case)
Take a look at the declaration of the STATUS command in the
CDT of TCCD also
($VLTROOT/ccdconCI.cdt), and the declaration of the FORWARD
command in BOSS cdt ($INTROOT/osbControl.cdt)
Question:
How the ADDFITS command is used?
Can you give me an example: ADDFITS -expoId ....
Answer:
This command can be executed after the exposure has been
setup and while it is running. e.g.:
> msgSend
"" xxoControl SETUP " -expoId 0 -function INS.MODE OPT_IMAGING
OCS.DET.IMGNAME myfile.fits"
3
>msgSend
"" xxoControl ADDFITS "-info OCS.CON.RELEASE
\" My additional info\" "
>msgSend
"" xxoControl START "-expoId 3"
>msgSend
"" xxoControl ADDFITS "-expoId 3 -info
OCS.CON.ORIGIN \" myvalin\" "
These keywords will be than placed in the header of the
image file created. Note that the expoId is not a compulsory parameter for
ADDFITS.
In any of the PreProc() function (START or SETUP) to do the
following:
ccsCOMPL_STAT
xxoSERVER::StartPreProc(msgMESSAGE &msg, vltINT32 expoId,
void *)
{
ExtDbgLog("xxoPreProc::StartPreProc()");
oslxKEYWORD keyword;
keyword.Keyword("INS.SPEC.KW");
keyword.Type(slxSTRING);
keyword.ValueString("XXXX");
bossFITS_HEADER
*headerPtr;
headerPtr=exposurePtr->GetHeader(expoId);
if (headerPtr==NULL)
{
ErrAdd
(bossMODULE_ID, bossERR_GENERAL, __FILE_LINE__, "Could not get header");
return
FAILURE;
}
if(headerPtr ->CreateStoreFits(keyword)!=SUCCESS)
{
ErrAdd(..);
return FAILURE;
}
// other actions if
necessary
// …
return SUCCESS;
}
The keyword must be specified in the dictionary. It is
possible to declare more then one dictionary for a subsystem, e.g.:
OCS.DET2.DICT1
"CCDDCS"; # For dictionary :
ESO-VLT-DICT.CCDDCS
OCS.DET2.DICT2
"CCD"; # For dictionary :
ESO-VLT-DICT.CCD
Caution: in case the setup pre or post processing functions are
overloaded it must be taken into account that the argument expoId in the
function denotes either the next exposure (if ‘-expoId 0’ was specified in the
command) or an exposure that might have been already started. Therefore
probably some additional check for the special action is necessary.
In case of SOS additional keywords can be added
at any level overloading functions in the server class of the SOS or in sub-OS
similarly to a non SOS, e.g.:
ccsCOMPL_STAT fpoSERVER::
ExpEnd(char* filename, vltINT32 expoId, char *detId)
{
ExtDbgLog("fpoSERVER::Expend");
// check the mode or the
detector if necessary (see 10.6.1)
// specify the keyword
to be added
oslxKEYWORD kw;
kw.Keyword("INS.OBSPLATE");
kw.Type(slxINTEGER);
vltINT32 obsplate;
dbRead (&obsplate,
"<alias>fpFlames.fpFitsPlate");
kw.Integer(obsplate);
//retrieve the header
belonging to the exposure
bossFITS_HEADER * hdr;
hdr=exposurePtr->GetHeader(expoId);
if (hdr == NULL)
{
ErrAdd(..);
return
FAILURE;
}
if(hdr->CreateStoreFits(kw)!=SUCCESS)
{
return FAILURE;
}
/* call the original
function*/
return
bossSERVER::ExpEnd(filename,expoId,detId);
return SUCCESS;
}
}
Note that keywords can be added also via command ADDFITS to
SOS as well, as the example below show:
msgSend "" xsoControl ADDFITS "-detId
XXXX -info OCS1.INS.FILT 9"
Question:
On which dictionary should the instrument specific OS be
based?
Answer:
None has to be compulsorily declared. The dictionary of BOSS
(ESO-VLT-DIC.OSB) is always loaded automatically.
Additional keywords can be supplied by loading the
dictionary of your own process. Place the additional keywords (if there are
any) in a separate dictionary named ‘ESO-VLT-DIC.XXXX_OS’,
Where XXXX is the name of the instrument. This dictionary is
automatically loaded if exists.
When you require to declare new keywords, it is strongly
recommended to follow the steps described in section 10.4.
(It is possible that you do not need additional dictionary
at all. In this case you don't have to declare it.)
11.8
Parameter ‘-detId’ in
command
Question:
What should be used for the detId parameter in the START
command i.e. which keyword value and from which *.cfg file should be taken? Can
you give an example?
Answer:
In general, the detId must be the name of one of the DCS (or
OS) subsystems that is declared in the configurations file, e.g.:
OCS.DET2.NAME "TCCD"
Normally you don't have to specify detId, only expoId for
the START command.
Using the –detId parameter can be useful when one cannot
keep track of the expoId.
> msgSend
"" xxoControl SETUP "-expoId 1 -function
INS.MODE GUIDING
> msgSend "" xxoControl START "-detId
TCCD"
The parameter -detId can be also
useful when there are more then one DCS-es involved in the exposure. During the
setup you have to declare the subsystems (by specifying the INS.MODE keyword in
the first SETUP) The subsystem list must include the DCS or DCS-es with which
the exposure is taken. Note that for single exposures there is no reason to
declare more then one DCS on the subsystem list. Nevertheless in case of semi-parallel
exposures all the DCS wich are allowed to be started in the given mode should
appear on the subsystemlist as well)
Please see a complete example below:
1. first remove the existing fits file)
cd $INS_ROOT/SYSTEM/DETDATA
% rm -fr ccdImageLcuSim.fits
2. setup an exposure with
two detectors
% msgSend "" xxoControl SETUP " -expoId
0 -function INS.MODE IR_SPECTROSCOPY
OCS.DET.IMGNAME ccdImageLcuSim.fits"
MESSAGEBUFFER:
4
where the mode IR_SPECTROSCOPY
is specified as follows:
OCS.MODE3.NAME
"IR_SPECTROSCOPY" # name of the instrmode
OCS.MODE3.SETUP
"-function INS.MIRR1.NAME IRED INS.DROT.POSANG 10.0" # setup of
mode
OCS.MODE3.SUBSYST "IRDCS
TCCD ICS UT0" # subsystems involved in the
given mode
OCS.MODE3.PATH
"INFRARED" # instrument path (EXPSTRT,
EXPEND)
3. Start the technical ccd
msgSend "" xxoControl START "-detId
TCCD"
Question:
What is the right place (file) in the 'yyo' module to do
preprocessing of the START command. yyoControl has to write into LCU DB prior
to sending START command to CCD WS process.
Answer: Please place the function ‘yyoSERVER::StartPreProc()’
it in file ‘yyoExpoCtrl.C’ (as the overloaded function ‘bossSERVER::StartPreProc()’
can be found in in ‘bossExpoCtrl.C’).
As default BOSS epects that there is a detector subsystem in
each mode.
When there is no detector in the system overload the StartCB
function to contain only the
-
condition for executing the command.
-
the process that need to be carry out in this case.
Question:
Is it true there will be ONLY ONE newData point in the
database even if there are more than one instrument produces data?
Answer:
Yes all the OS-es use the same newData db point. When an OS has
finished creating an image
It writes the datafile name into this attribute to inform
VOLAC to archive the image.
There is no restriction how many OS writes into this
dbpoint, and whether or not there is connection between the OS-es through a
super OS.
The best is to place the OS-es under a common root. (It is
enough to define OS_ROOT once)
e.g.
INSTRUMENT
|
|-----------newdata
|-----------OS1
| |
|
---subsystems
|
|
| -----ICS1
|
|
|
------FIERA
|
|-----------OS2
|
|
| ---subsystems
| |
| -----ICS2
|
|
|
------IRDCS
|
| -----------SOS
| |
|
---subsystems
| |
| -----OS1
| |
|
-----OS2
Add an Instrument specific action. E.g. when it is required
to send a command to a subsystem each time exposure fails, succeeds or aborted,
overload the empty function:
bossSERVER::ExpoStatusEvtPreProc(msg, expoId,
userData)
The following example shows also how to retrieve this
information about the global status, and the source of the event (specifying
the DCS/OS) and whether or not file imagefilename is specified for the
exposure.
Note:The status values depend on the actual DCS (See also
section 9.7.2 )!
ccsCOMPL_STAT
mySERVER::ExpoStatusEvtPreProc(evtEVENT_MSG &,
vltINT32, void *)
{
ExtDbgLog("bossSERVER::ExpoStatusEvtPreProc()");
//#= Declare the new
status value that generated this message
vltUINT32
newExpoStatus;
const char * cp;
cp =
(msg.EventInfo()).scalar.newValue;
memcpy((char
*)&newExpoStatus,cp,sizeof(vltUINT32)) ;
TestLog ("The new
status is %d",newExpoStatus);
//#= global status
//exposurePtr->UpdateObsStatus(newExpoStatus);
//vltINT32 obsStatus =
exposurePtr->GetGlobalExpoStatus();
//#= declare the name of
the detector which is associated with this message
//vltBYTES64
detId="";
//if(exposurePtr->GetDetector( msg.AttrName(),(char*)detId)!=SUCCESS) {
handle error };
//# declare filename
associated with the exposure
//vltBYTES256
filename="";
//if
(exposurePtr->GetFileName(expoId, (char*)filename)!=SUCCESS) {handle error};
if ( (newExpoStatus
== inscEXP_COMPL_FAILURE) ||
(newExpoStatus == inscEXP_COMPL_ABORTED) ||
(
newExpoStatus == inscEXP_COMPL_SUCCESS ) )
{
// Additional
user declared processes
}
return SUCCESS;
}
Additional SOS Action when Exposure fails, succeeds
or aborted
In case of SOS the same function ‘ExpoStatusEvtPreProc’
can be overloaded , but there other options too depending on the problem.
E.g. ‘ExpendCB’ can be overloaded. When a sub-OS has
finished/failed or aborted SOS sends an EXPEND command to the otherOS-es on the
subslist.
As default when OS receives a command START it sends START
command to DCS and EXPSTART command to ICS/TCS.
When exposure is finished and image is created OS sends
EXPEND and STATUS to ICS. Otherwise when exposure failes/aborted OS sends
EXPEND/STOP command to ICS.
Interface
When the subsystems should not be treated according to DCS
or ICS a new interface has to be created inheriting from class bossINTERFACE ,
e.g.:
mcoINTERFACE_STRAP::mcoINTERFACE_STRAP(const
dbSYMADDRESS dbPoint,
char * srvId) :
bossINTERFACE(dbPoint,
evhDB_COMMAND_CLASS)
{
//#= set the
category to be OS
SetCategory(strap_SUBSYS);
}
A new category for this interface has to be spacified. The
reserved categories are:
#define bossICS_SUBSYS
0x1 // ICS sub-system
#define bossDCS_SUBSYS
0x2 // DCS sub-system
#define bossTCS_SUBSYS 0x4
// TCS sub-system
#define bossOS_SUBSYS
0x8 // OS server
After specifying the new interface, you must add it to the
list of interfaces in the function
SubsystemInterfaces().
Default behaviour
When the subsystem (ie. its interface) does not fall into
the pre-declared categories, BOSS still takes care of the following
automatically:
1) state
of the subsystem is taken into account when global state is evaluated
2) SETUP
keywords that mach the pattern given by the configuration keyword
OCS.<CAT>.KEYWFILT will be forwarded to the subsystem.
Any additional functionality must be included into function
overloads.
Declaration of the subsystem on the configuration file
In the configuration file you might wish to declare a new
keyword category for the subsystem (in which case the keywords must be declared
in the dictionary of the OS)
OCS.STR.NAME "STRAP";
OCS.STR.DICT "STR";
OCS.STR.ENVNAME "wbos";
OCS.STR.PROCNAME "strapControl";
OCS.STR.KEYWFILT "STR.*.*.*.*.*.*";
OCS.STR.TIMEOUT 1000;
OCS.STR.DBROOT "<alias>strap";
OCS.STR.DBSTATE "<alias>strap.opState";
In the above example the dictionary 'STR' must contain the
SETUP keywords that are forwarded to the 'strapControl' process.
Add additional functionality
Send a command during start command to the 'strap' process
Should you need to inform the subsystem about the event when
the exposure is started you must overload the StartPreProc function. (See also
chapter 9.4.4 for the default StartPreProc implementation.)
ccsCOMPL_STAT
mcoSERVER::StartPreProcSpecial(msgMESSAGE &msg, vltINT32 expoId,
void *userData)
{
ExtDbgLog("mco SERVER::StartPreProcSpecial()");
if
(mcoIf->Send("STRAPCMD","") != SUCCESS)
{
ErrAdd
(mcoMODULE_ID, …. );
return
(FAILURE );
}
return SUCCESS;
}
Database
In the configuration file make sure that the database points
for state, exposure status and newdata are correctly set (see 7.6).
OS new data dbpoint has to be created (if not exists) and
refreshed when image file is ready in order SOS carries out the exposure end
processes (if required).
As default SOS requires the
*.arf file generated by the sub-OS to merge imagefile with other files.
When image file is created by
non-BOSS based OS this file does not exists, therefore the ‘exposure end’
process of the SOS must be overloaded.
Interface for non BOSS based OS
A new interface for the OS based om bossINTERFACE_OS has to
be developed.
BOSS ensures that the expoId of the SOS exposure is the same
as the expoId of its sub-OS which is included in the exposure. When the sub-OS
does not follow this strategy the expoId conversion in the interface must be
solved.
Handling of Internal SOS-OS Commands
There are some internal commands to support communication
between SOS and OS. These are : CLEAN and GETHDR.
The designer of the SOS should decide whether these commands
are useful for the non-based sub-OS
In which case implement the callbacks for them.
When these BOSS auxiliary commands can be avoided, the
simplest way to avoid them is to overload the function Send() of the interface
of the sub-OS in the following way:
ccsCOMPL_STAT
xxoINTERFACE_MYOS::Send(const msgCMD command,
const char *parameters, msgLENGTH parametersLen,
vltLOGICAL timeoutFlag, vltLOGICAL paramCheck)
{
ExtDbgLog
("bossINTERFACE_MYOS::Send() command %s to %s ",command, name_);
// do nothing when the
command is CLEAN or GETHDR
if(strcmp(command,bossCLEAN_CMD)==0 ||
command, bossGETHDR_CMD)==0 )
{
return SUCCESS;
}
else
{
return bossINTERFACE:: Send(command,
parameters,
parametersLen, timeoutFlag, paramCheck);
}
}
Question :
What happens if TCS is included more then once in the
configuration files of an SOS structure?
Answer:
It is a pre-condition of SOS that there is only one TCS in
the whole system and only one OS (typically at the top level) has an access to
it.
A ‘stand-alone’ OS can have all sort of TCS access e.g.:
- TCS access NORMAL
- TCS access IGNORED, or
- no TCS declared at all.
It is also allowed (however not recommended) to include TCS
in the configuration of more then one OS-es in the hierarchy of an SOS, with
the limitation that only (maximum) one OS have NORMAL access to TCS (and the rest
must be set to IGNORED).
The side effect of having more then one access to the TCS
would cause that the TELESCOP keyword will appear more then once in the fits
header. An other problem is –that when the TCS appears with the same
configuration name in different configuration file- that the TCS header file is
created more then once (i.e. as many times it appears in the configuration with
normal access) with the same name, merged more then once and later tried to be
deleted more then once, which of course leads to error (as there is only one
file).
Question: when producing the final FITS file which
contains File1+Header1+Bin1, is this done as a copy ?
Answer:Yes. It is a facility of oslxFITS_EXT to
select whether a temporary file is created during LoadImageFile(), i.e. during
an update of a file. For safety (i.e. in order not to loose data in case
something goes wrong) boss creates a temporary copy of the imagefile, and the
original file will be replaced (and the other header files will be removed)
only when the merging was successful.
Question: Is the SOS busy until this copy is complete?
i.e can we start a new exposure while the copying is underway ?
Answer: The time-consuming file merging is always
done by a separate process (bossArchiver_xxo).
Nevertheless since APR2004 it is part of the exposure circle
as default therefore it delays the execution of the next exposure. If this
delay is not acceptable it is possible to run an optimized sequence of command
setting parameter –cond for the WAIT command parameters (see 9.4.5).
Nevertheless even in this optimized case, there is still a
slight (noticeable) delay after the DCS has created the image. OS when informed
that DCS image is ready, gets the header from the other subsystems (given on
the list). Then creates a supplementary file in which it stores the information
about which files are to be merged, and then sends a command to the archiver
process to process this (supplementary) file. Some internal cleaning is also
done, to prepare for the next exposure.
In addition -in case of SOS- headers are also collected from
other OS-es (via command GETHDR). All these are of course also consume time.
Question: Is there enough space reserved in File1 for
Header1 ?
Answer: The fitsfile is
processed by oslxFITS_EXT which is based on 'cfitsio' from NASA. Problem is
solved within cfitsio routines. For more info on cfitsio look up the following
web site: http://heasarc.gsfc.nasa.gov/docs/software/fitsio/fitsio.html
In order to execute your special
ONLINE actions the following three ways are available:
a) Action during startup when global state is online
If you only need to execute a procedure only once during
startup in the case when the system is online overload the function
InitPostProc as follows:
ccsCOMPL_STAT
xxoSERVER:: InitPostProc()
{
/*This is only called
once at startup*/
printf("TEST-InitPostProc\n");
vltINT32 state =
subSystemList.GetOverallState();
if
(state==bossSTATE_ONLINE) // evhSTATE_ONLINE
{
ActionLog(1,"XXXX:InitPostProc:ONLINE
ACTION at START UP*****");
//implement special
online action
}
return SUCCESS;
}
b)Action regarding the change in the global state.
To make sure that every time when the global state changes
to online a special online action is executed overload the function StateEvtCB().
The function StateEvtCB() is executed when the state
of one of the subsystems changes. However this function will not be called when
everything is online and you send an ONLINE command. Note that this function is
also called during startup.
evhCB_COMPL_STAT
xxoSERVER::StateEvtCB(evtEVENT_MSG& event , void *userdata)
{
ExtDbgLog("bossSERVER::StateEvtCB(%s)",
event.AttrName() );
vltINT32 state =
subSystemList.GetOverallState();
printf("STATE_CB\n");
printf("THE STATE
IS:%d\n",state);
if
(state==bossSTATE_ONLINE) // evhSTATE_ONLINE
{
printf("XXXX:
StateEvtCB : ONLINE ACTION \n\n");
// implement special
online action here
}
return
(bossSERVER::StateEvtCB(event,userdata));
}
c ) Procedure as part of ONLINE command
When you need to execute a procedure when ONLINE command is
sent overload the functions
ccsCOMPL_STAT
bossSERVER::OnlinePostProc(msgMESSAGE &msg)
ccsCOMPL_STAT
bossSERVER::OnlinePreProc(msgMESSAGE &, void *)
as explained in earlier chapters.
The boss package is part of the VLT Common Software
Delivery. [RD 05]
BOSS is maintained through SPRs. Should you find any
problems or have any request please submit an SPR specifying the follwing data:
Package : INS-OS base
modules
Module: boss
Please also supply the version of boss used. You can always
check the version by sending command VERSION to an active control process. E.g:
“”
% msgSend “”
xxoControl VERSION “”
In case of problems debug information of boss can be very
useful:
Debug file (containing the name of functions called with
additional data) cen be generated by starting up the server process as follows:
% xxoControl –v 5 –l 2 >
xxo.dbg
% bossArchiver XXXX
Should you need a higher version of boss then included in
the last release, you should always check the information given in the files
below before compiling boss:
1) boss/Changelog
Indicates the changes in the new
versions.
2) boss/BackCompNotes_<RELEASE>
-
Indicates module version
dependency i.e. which other modules you need to retrieve
and install before compiling the
new version of boss.
Should
back incompatible change occur in boss, you will find a note about it in this
file too.
Caution : Never take a version the history logs or the
Changelog of which says ‘under development’ or ‘under test’.
Module versions:
MAR2001: boss 1.35.1.3, osb 1.12, bossvlti
1.2, ixac 1.37, ibac 1.26
MAR2002: boss 1.81, osb 1.20, bossvlti
1.5, ixac 1.43, ibac 1.29
APR2003: boss 1.106, osb 1.24, bossvlti
1.5, ixac 1.45, ibac 1.29
APR2004: boss 1.129, osb 1.28, bossvlti
1.6, ixac 1.46, ibac 1.30
Below only the man pages of the most relevant classes:
bossSERVER, bossARCHIVER, bossEXPOSURE, bossINS_MODE, bossINTERFACE_DCS,
bossINTERFACE_CCD can be found.
The users are welcome to take a look at the manpages of
other classes (see Figure 3) online.
bossControl
NAME
bossControl - Observation
Software Server
SYNOPSIS
bossControl
<INS_NAME> [-v <level>] [-l <level>]
DESCRIPTION
The program 'bossControl'
starts up the default OS server process of the
instrument specified by its
name <INS_NAME>.
This process handles all
the standard OS commands and performs the corresponding
default actions. The
process is fully operational.
Before an instrumnt OS is
started up by 'bossControl' its configuration file,
CDT and database must
exits. (see details in document on BOSS,XXXX)
During the startup boss
creates the default interfaces for the subsystems given
in the configuration file.
For DCS-es the interfaces
are created according to the configurtion kw
OCS.<DETi>.TYPE. For
subsystems with category INSi, interface ICS is created,
and TCS interface is
created for TELESCOPE.
During default startup,
boss declares the default 'database root'
for the OS server process
as: ':Appl_data:<INS_NAME>:OS'.
When the db address of the
OS process is different then the default,
use the OCS.CON.OSDBROOT
configuration keyword to set the appropriate value.
The default database root
for each subsystem interface is:
'<dbRoot>:subsystems:<subsname>'.
Where <subsname> is
the lower case version of the name of the
subsystem as specified by
the keyword "OCS.<CAT>.NAME" in the cfgfile.
E.g. when the NAME of the
susbsytem is IRDCS, the dbaddress of its interface
expected as default is :
'<dbRoot>:subsystems:irdcs'.
Exception:In case of
TCS/VLT systems (The name is e.g. UTi) the default db
address of its interface
is: '<alias>xxo:subsystem:tcs'.
When the dbaddress of the
interface is different the default,
use the
OCS.<CATi>.IFDBROOT keyword in the configuration file.
VLTI currently not
supported. Set the ISS access to be ignored during tests,
for the auto start up of
vlti instruments.
Most instruments do have
some additional (non-default) properties.
The 'default startup'
functionality can be used to check errors in the
overloaded functionality.
FILES
Configuration files are
stored under directory:
$INS_ROOT/SYSTEM/COMMON/CONFIGFILES.
During start up the
configuration file identified by <INSNAME>
(i.e.by the INS.CON.ID
configuration keyword) is loaded.
(see documentation on
ctooCONFIG for more information)
EXAMPLES
Normal startup (using
default values) n");
% bossControl XXXX
% bossArchiver XXXX
For debugging (creating
debugfiles with highest debug level)
% bossControl XXXX -v 5
-l 2 > xxo.dbg &
% bossArchiver -n
bossArchiver_xxo -dbRoot '<alias>xxo'-v 5 -l 2 > xxoarf.dbg &
(The archiver process
really need debaugging.)
### generated by docDeroff
###
bossSERVER
NAME
bossSERVER - Instrument
server main class
SYNOPSIS
#include
"bossSERVER.h"
bossSERVER myServer;
PARENT CLASS
bossDB_TASK --> evhTASK
-->evhSIMPLE_TASK
-->
fndOBJECT,eccsERROR_CLASS
DESCRIPTION
This class gives a default
implementation of the features of an instrument
server (e.g. Observation
Software) which is in charge of handling the
requests from outside and
control one or more sub-system servers. This
includes:
o handling the standard
commands: ABORT, ADDFITS, COMMENT, CONT, END,
FORWARD, OFF, ONLINE,
PAUSE , SETUP, STANDBY, START, STATE, STATUS,EXIT, PING,
and WAIT. The
commands DEBUG, VERBOSE are also
handled by
inheritance from ixacTASK (see ixacTASK(4)).
o handling incoming
Setup Files and setup keywords, checking of
individual keyword
(correctness of values) and of the whole keywords
(completeness and
consistency) and forwarding them to the appropriate
sub-system,
o handling Application
Configuration File to configure and set-up
preferences for
Server,
o handling of
instrument modes,
o handling of states
and sub-states, state transitions, as well as state
alignment according
to the sub-systems,
o handling of
sub-system communication: sending synchronous and
asynchronous
commands, synchronization of replies,
This class is the core
class for building OS servers.
The OS-es must have a class
inheriting this class, and oveloading the functions
to declare their special
behavior. There are functions that are designed to be
overloaded (see below).
Note: most of the commands
supported by bossSERVER class have a <subSystem>
parameter, which is used to
forward the command towards software (i.e
sub-systems) implicated in
the control of the instrument. The structure
of this parameter is
similar to a Short-FITS keyword i.e fields delimited by
the character '.', where
each field corresponds to the name of one
sub-system. In this way,
the <subSystem> parameter is representative of the
sub-system hierarchy of the
instrument. The general scheme of the parameter
<subSystem> used by
BOSS is:
<subSystem
1>.<subSystem 2>.<subSystem 3>....
Thus, when the
<subSystem> parameter is specified, the command is sent to
the <subSystem N>
which will send the command to the <subSystem N+1>, and so
on. Each time the command
is forwarded, the <subSystem> parameter is
modified to suppress the
field which corresponds to the name of the
sub-system to which the
command is sent. An example of this scheme is
"OS1.ICS", where
the command is first sent to 'OS1' sub-system, which will
send it to its 'ICS'
sub-system. The command is forwarded in this way:
1. The command
'<command> -subSystem "OS1.ICS" ...' is received.
2. The command
'<command> -subSystem "ICS" ...' is sent to the 'OS1'
sub-system.
3. Then, the command
'<command> ...' is sent by 'OS1' sub-system to the
'ICS' sub-system.
The identification of a
sub-system is based of its name which is returned by
the GetName() method of the
bossINTERFACE(4) class.
The HasDestSubSystem() and
GetDestSubSystem() can be used to manipulate the
<subSystem>
parameter.
Some other command have the
parameter -detId which is used to identify detectors.
! Please note that it is
not yet developed for super OS. And therefore it is not (yet)
alike to the parameter
-subSystem.
PUBLIC METHODS
bossSERVER(const
dbSYMADDRESS dbPoint,
const
char *version = "No module version set");
virtual ~bossSERVER();
Constructor/Destructor.
virtual ccsCOMPL_STAT Init(char
*dictionary, char *alias, char *instrumentId,
char *keyDbMap);
Performs initialization
of the Instrument server, it mainly includes:
o loading of dictionary
and alias table of the server.
o loading of the
Keyword<-->DB map file
o installation of
specific server callbacks
o configuration of the
server (see Configure() method below)
o install callback to
handle state alignment (if required).
virtual ccsCOMPL_STAT
bossSERVER:: InitPostProc()
this function is an empty
function designed to be overloaded
when additional
initilaisation of the system is required
virtual ccsCOMPL_STAT
Configure(char *instrumentId=NULL);
Loads configuration file
and configure instrument server accordingly i.e.
configures the
sub-system interfaces, loads sub-system dictionaries,
defines instrument modes,
then calls keyword handler and the calls
AppConfigure() method.
When no file name is
specified, the previous configuration file is
re-loaded.
virtual ccsCOMPL_STAT
AppConfigure(ctooCONFIG *appConfig);
This method should be
overloaded by the application classes which inherit
from bossSERVER, so as to
perform specific application configuration
according to the keywords
loaded from configuration file and stored in
ctooCONFIG instance. By
default, this method does nothing.
virtual char
*GetOsVersion();
Returns the version
number of the Instrument Server.
virtual ccsCOMPL_STAT
SetMaintenanceMode (vltLOGICAL newValue);
Switches on or off
maintenance mode.
virtual vltLOGICAL
IsMaintenanceModeActivated ();
Returns true (ccsTRUE) if
the maintenance mode is set.
virtual ccsCOMPL_STAT
SetAlignState(vltLOGICAL newValue);
virtual vltLOGICAL
IsAlignedState();
Handles state alignment
with sub-system states.
virtual evhCB_COMPL_STAT
CheckStates (const char *command);
Checks if the command can
be executed in the current state and sub-state.
It returns SUCCESS when
command is allowed (see table below) and FAILURE
otherwise. It may be
overloaded in a subclass if it is necessary to modify
command execution
checking.
+----------+---------------------------------------+
| Command |
Validity |
+----------+---------------------------------------+
| ABORT |
Online |
| ADDFITS |
Online |
| COMMENT |
Online |
| CONT |
Online |
| END |
Online |
| EXIT | Not in
On-line/Observing |
| FORWARD |
Always |
| OFF | Not in
On-line/Observing |
| ONLINE | Not in
Off |
| PAUSE |
Online |
| PING |
Always |
| SELFTST |
Always |
| SETMODE |
Always |
| SETUP |
Online/Idle |
| STANDBY | Not in
On-line/Observing. |
| START |
Online |
| STATE |
Always |
| STATUS |
Online |
| VERBOSE |
Always |
| VERSION |
Always |
| WAIT |
Online |
+----------+---------------------------------------+
virtual ccsCOMPL_STAT
NewExpoId(vltINT32 *expoId);
Created a new exposure
ID. It simply consits by calling the NewExpoId
method of the
bossEXPOSURE instance.
virtual ccsCOMPL_STAT
CheckExpoId (msgMESSAGE &msg, vltINT32 *expoId);
Retrieves the exposure Id
from the command parameter list. If no exposure
Id has been specified,
then it gets the current one. If it is equal to 0, and
the command is the SETUP
command, it sets a new exposure Id, otherwise it gets
the current one. And then
it check if the exposure Id is valid.
Note that the NewExpoId()
and CheckExpoId() methods call the methods
NewExpoId() and
CheckExpoId() of the bossEXPOSURE instance. If the server
has to support specific
features (e.g. when new
exposure Id is set) then
these methods have to be overloaded.
virtual ccsCOMPL_STAT
CheckExpoStatus(const char *command,
vltINT32 expoId,char * det=NULL);
Check if the command can
be executed according to the exposure status on the
given detector (if specified),
otherwise on the list of detectors specified by
the exposure with the
given 'expoId".
It returns SUCCESS when
command is allowed (see table below) and FAILURE
otherwise. It may be
overloaded in a subclass if it is necessary to modify
command execution
checking.
+----------+---------------------------------------+
| Command | Valid
exposure status |
+----------+---------------------------------------+
| ABORT | PENDING
or INTEGRATING or PAUSED or |
| |
READING_OUT or PROCESSING or |
| |
TRANSFERRING or RUNNING |
| CONT |
PAUSED |
| END | Same as
ABORT |
| PAUSE | Same as ABORT
(except PAUSED) |
| START | UNDEFINED
or INACTIVE or SUCCESS or |
| | FAILURE
or ABORTED or FINISHED |
+----------+---------------------------------------+
In case of a list of
detectors function return success when cmd can be
executed on all the
detectors.
virtual evhCB_COMPL_STAT
AbortCB(msgMESSAGE &msg, void *userData);
Callback to handle ABORT
command.
virtual evhCB_COMPL_STAT
AddFitsCB (msgMESSAGE &msg, void *userData);
Callback to handle ADDFITS
command.
virtual evhCB_COMPL_STAT
CommentCB (msgMESSAGE &msg, void *userData);
Callback to handle
COMMENT command.
virtual evhCB_COMPL_STAT
ContCB(msgMESSAGE &msg, void *userData);
Callback to handle CONT
command (see also ExpoCtrlCmdProc).
virtual evhCB_COMPL_STAT
EndCB(msgMESSAGE &msg, void *userData);
Callback to handle END
command (see also ExpoCtrlCmdProc)
virtual evhCB_COMPL_STAT
ExitCB(msgMESSAGE &msg, void *userData);
Callback which is
executed whenever the EXIT command is received.
virtual evhCB_COMPL_STAT
ForwardCB (msgMESSAGE &msg, void *userData);
Callback to handle
FORWARD command.
virtual evhCB_COMPL_STAT
OffCB(msgMESSAGE &msg, void *userData);
Callback to handle OFF
command.
virtual evhCB_COMPL_STAT
OnlineCB(msgMESSAGE &msg, void *userData);
Sets the state of the
local task or of the specified subsystem to ONLINE.
virtual evhCB_COMPL_STAT
PauseCB(msgMESSAGE &msg, void *);
Callback to handle PAUSE
command (see also ExpoCtrlCmdProc)
virtual evhCB_COMPL_STAT
SelftstCB(msgMESSAGE &msg, void *userData);
Callback to handle
SELFTST command.
virtual evhCB_COMPL_STAT
SetModeCB(msgMESSAGE &msg, void *);
This function handles the
access mode to all or specified sub-system
and the maintenance mode.
virtual evhCB_COMPL_STAT
SetupCB(msgMESSAGE &msg, void *userData);
Callback to handle SETUP
command.
virtual evhCB_COMPL_STAT
StandbyCB(msgMESSAGE &msg, void *userData);
Callback to handle
STANDBY command.
virtual evhCB_COMPL_STAT
StartCB(msgMESSAGE &msg, void *);
Callback to handle START
command (see also bossExpoCtrlCmdProc(4))
virtual evhCB_COMPL_STAT
StateCB(msgMESSAGE &msg, void *userData);
Returns the current value
of the state or sub-state of the local task or
of the specified
sub-system.
virtual evhCB_COMPL_STAT
StatusCB(msgMESSAGE &msg, void *);
Callback to handle STATUS
command.
virtual evhCB_COMPL_STAT
TestCB(msgMESSAGE &msg, void *userData);
Callback to handle TEST
command.
virtual evhCB_COMPL_STAT
WaitCB(msgMESSAGE &msg, void *userData);
Callback to handle WAIT
command.
virtual evhCB_COMPL_STAT
VersionCB(msgMESSAGE &msg, void *userData);
Callback to handle WAIT
command.
virtual ccsCOMPL_STAT
ContPreProc (msgMESSAGE &msg, vltINT32 expoId,
void *userData);
virtual ccsCOMPL_STAT
EndPreProc (msgMESSAGE &msg, vltINT32 expoId,
void *userData);
virtual ccsCOMPL_STAT
OffPreProc (msgMESSAGE &msg, void *userData);
virtual ccsCOMPL_STAT
OnlinePreProc (msgMESSAGE &msg, void *userData);
virtual ccsCOMPL_STAT
PausePreProc (msgMESSAGE &msg, vltINT32 expoId,
void *userData);
virtual ccsCOMPL_STAT
SelftstPreProc (msgMESSAGE &msg, void *userData);
virtual ccsCOMPL_STAT
StandbyPreProc (msgMESSAGE &msg, void *userData);
virtual ccsCOMPL_STAT
StartPreProc (msgMESSAGE &msg, vltINT32 expoId,
void *userData);
virtual ccsCOMPL_STAT
TestPreProc (msgMESSAGE &msg, void *userData);
Pre-processing functions.
Implementation of all methods are dummies to be
overloaded by an
bossSERVER subclass.
virtual ccsCOMPL_STAT
ExpoCtrlCmdProc(msgMESSAGE &msg, void *);
Handles commands which
control execution of exposure i.e. START/END and
PAUSE/CONT commands.
virtual ccsCOMPL_STAT
StateCtrlCmdProc(msgMESSAGE &msg, void *);
Handles commands which
control state transitions i.e. OFF, STANDBY and
ONLINE commands.
virtual ccsCOMPL_STAT
TestCtrlCmdProc(msgMESSAGE &msg, void *);
Handles commands which
control test of the instrument functions i.e. TEST
and SELFTST commands.
virtual vltLOGICAL
HasDestSubSystem(ixacCMD_PARAM &cmd);
Returns true (ccsTRUE) if
a destination sub-system (i.e. '-subSystem'
parameter) is specified.
virtual COMPL_STAT
GetDestSubSystem(ixacCMD_PARAM &cmd,
bossINTERFACE **subSystemPtr,
vltLOGICAL &lastDestProc);
Retrieves the name of the
destination sub-system ('-subSystem' command
parameter), find it into
the sub-system list and if found, suppresses the
field which corresponds
to its name from the command parameter.
The 'lastDestProc' is set
to true if the destination process is the last
(see above sub-sytem
naming scheme).
virtual evhCB_COMPL_STAT
ExpoCtrlSyncReplyCB(msgMESSAGE &, void*);
Callback to be executed
when replies for the command sent by
ExpoCtrlCmdProc() are
received.
virtual evhCB_COMPL_STAT
SetupSyncReplyCB(msgMESSAGE &, void*);
Callback to be executed
when replies for the command sent by
SetupCB() are received.
virtual evhCB_COMPL_STAT
StateCtrlSyncReplyCB(msgMESSAGE &, void*);
Callback to be executed
when replies for the command sent by
StateCtrlCmdProc() are
received.
virtual evhCB_COMPL_STAT
TestSyncReplyCB(msgMESSAGE &, void*);
Callback to be executed
when replies for the command sent by
TestCtrlCmdProc() are
received.
virtual ccsCOMPL_STAT
SetLogLevelCB (oslxKEYWORD &keyword, void *);
virtual ccsCOMPL_STAT
SetVerboseLevelCB(oslxKEYWORD &keyword, void *);
virtual ccsCOMPL_STAT
SetActionLevelCB (oslxKEYWORD &keyword, void *);
virtual ccsCOMPL_STAT
SetTimerLevelCB (oslxKEYWORD &keyword, void *);
Function triggers used to
handle keyword events to set logging levels for
the different type of
logs (standard, verbose, action and timer).
virtual evhCB_COMPL_STAT
ExpoStatusEvtCB(evtEVENT_MSG &msg, void *);
Handles the event
messages sent when the database attributes, where the
exposure status are
stored, change.
virtual evhCB_COMPL_STAT
StateEvtCB(evtEVENT_MSG &msg, void *);
Handles the event
messages sent when the database attributes, where the
sub-system states are
stored, change.
virtual ccsCOMPL_STAT
ExpoStatusEvtPreProc(evtEVENT_MSG &msg,
vltINT32 expoId,
void *userData);
Pre-processing functions
for DB events. Implementation of all methods are
dummies to be overloaded
by an bossSERVER subclass.
virtual ccsCOMPL_STAT
ArchiveImage(vltINT32 expoId);
Send image to the
archiver process.
virtual ccsCOMPL_STAT
AddSubSystem (bossINTERFACE *subSystemPtr);
Adds the specified
sub-system to the list of sub-systems which are under
control of Instrument
Server.
virtual bossINTERFACE_LIST
*GetSubSystemList();
Gets pointer to the list
of 'slave' sub-systems.
virtual ccsCOMPL_STAT
GetAndDeleteParameterDetId(msgMESSAGE &msg, char * detId )
declares in the given
message 'msg' the parameter 'detId' if ts is exists
and removes it from the
message.
virtual void SetOsName(char
* osname);
virtual char * GetOsName();
Sets/gets the name of the
specific OS application.
virtual
AllowSetupWhileExpRunning(vltLOGICAL isAllowed)
Set a flag to allow setup
commands while exposure is running.
Best to be placed in the
constructor of the overloaded bossSERVER class.
virtual ccsCOMPL_STAT
ParseAppOptions(vltINT32 argc, vltINT8 *argv[],
vltINT32 *optind);
Parses the XXXX_OS
Observation Software command-line options.
ccsCOMPL_STAT RunFunctionOnDetectors(char
* detectors, vltINT32 expoId,void *info,
ccsCOMPL_STAT (* func) (vltINT32,char*,void*,
bossINTERFACE_DCS*,ccsERROR*))
Runs static function
'func' on all the detectors given by the list of 'detectors'.
The parameter 'detectors'
must contain the name of the detectors as comma separated list.
Paremeters expoId and info
are passed to the function 'func'.
Note: Adding errors to
stack (last param in func) is not yet solved, use WarningLog
(instead of errAdd.)
PROTECTED METHODS
virtual void
SendReply(msgMESSAGE &msg, vltLOGICAL lastReply = ccsTRUE);
Send reply to the calling
process.
PROTECTED DATA MEMBERS
oslxALIAS
*aliasPtr;
Pointer to the alias
table object
oslxDICTIONARY
*dictionaryPtr;
Pointer to the dictionary
object
ctooCONFIG
*appConfigPtr;
Pointer to the
application configuration object
bossINS_MODES
*insModesPtr;
Pointer to the instrument
modes object
bossEXPOSURE
*exposurePtr;
Pointer to the exposure
control object
oslxSETUP
*setupPtr;
Pointer to the setup
object
ibacTIMER_LOGS
timerLog;
Pointer to the timer log
instance
ixacKEY_DB_MAP
keyDbMap;
Pointer to the keyword<->DB
map instance
ixacKEYW_HANDLER
*keywHandlerPtr;
Pointer to the keyword
trigger instance
bossINTERFACE_LIST
subSystemList;
List of 'slave'
sub-systems which are under control of Instrument Server
PRIVATE DATA MEMBERS
slxFILENAME insConId_;
Instrument ID.
The configuration file is
identified by the instrument ID.
The instrument ID is set
in the configuration file by the
keyword INS.CON.ID, e.g.:
INS.CON.ID "XXXX";
(for more info see
document on ctoo, ctooCONFIG)
dbSYMADDRESS dbRef;
Database root point used
by the Instrument Server.
const char
*version;
Version of the server.
LINE DATABASE
The following database
branch is necessary to the instance of bossSERVER:
CLASS bossDB_TASK bossSERVER
BEGIN
//
ATTRIBUTE logical
maintenance 0 // Maintenance mode (0=OFF, 1=ON)
ATTRIBUTE logical
alignedState 1 // State aligned with subsystem states
// (0=FALSE, 1=TRUE)
ATTRIBUTE bossINS_MODES
insModes
END
//
COMMANDS
Following commands are
handled by this class:
ABORT, ADDFITS, COMMENT,
CONT, END, EXIT, OFF, ONLINE, PAUSE,
SETUP, STANDBY, START,
STATE, STATUS and VERSION.
SEE ALSO
bossExitCB(4),
bossAbortCB(4), bossAddFitsCB(4), bossCommentCB(4),
bossContCB(4),
bossEndCB(4), bossPauseCB(4), bossStartCB(4),
bossExpoCtrlCmdProc(4),
bossExpoCtrlSyncReplyCB(4), bossSetLogLevelCB(4),
bossSetVerboseLevelCB(4), bossSetActionLevelCB(4),
bossSetTimerLevelCB(4),
bossSetModeCB(4),
bossSetupCB(4),
bossSetupSyncReplyCB(4),
bossSetAlignState(4),
bossIsAlignedState(4),
bossStateEvtCB(4), bossStateCB(4), bossOffCB(4),
bossStandbyCB(4),
bossOnlineCB(4), bossStateCtrlCmdProc(4),
bossStatusCB(4),
bossTestCB(4), bossSelftstCB(4),
bossTestCtrlCmdProc(4),
bossTestCtrlSyncReplyCB(4)
### generated by docDeroff
###
bossAbortCB
NAME
bossAbortCB, bossContCB,
bossEndCB, bossPauseCB, bossStartCB,
bossContPreProc,
bossEndPreProc, bossPausePreProc, bossStartPreProc,
bossExpoCtrlCmdProc,
bossExpoCtrlSyncReplyCB, bossExpStart, bossExpEnd,
bossExpoStatusEvtCB,
bossNewDataFileEvtCB, bossExpoStatusEvtPreProc,
bossNewDataFileEvtPreProc -
functions for handling the exposure control
commands
SYNOPSIS
evhCB_COMPL_STAT
AbortCB(msgMESSAGE &msg, void *userData);
evhCB_COMPL_STAT
ContCB(msgMESSAGE &msg, void *userData);
evhCB_COMPL_STAT
EndCB(msgMESSAGE &msg, void *userData);
evhCB_COMPL_STAT
PauseCB(msgMESSAGE &msg, void *userData);
evhCB_COMPL_STAT
StartCB(msgMESSAGE &msg, void *userData);
ccsCOMPL_STAT ContPreProc(msgMESSAGE
&msg, vltIN32 expoId,
void *userData);
ccsCOMPL_STAT
EndPreProc(msgMESSAGE &msg, vltIN32 expoId,
void *userData);
ccsCOMPL_STAT
PausePreProc(msgMESSAGE &msg, vltIN32 expoId,
void *userData);
ccsCOMPL_STAT
StartPreProc(msgMESSAGE &msg, vltIN32 expoId,
void *userData);
ccsCOMPL_STAT
ExpoCtrlCmdProc(msgMESSAGE &msg, vltIN32 expoId,
void *userData);
ccsCOMPL_STAT
AbortPostProc(msgMESSAGE &msg, vltINT32 expoId,
void *userData);
ccsCOMPL_STAT
ContPostProc(msgMESSAGE &msg, vltINT32 expoId,
void *userData);
ccsCOMPL_STAT EndPostProc(msgMESSAGE
&msg, vltINT32 expoId,
void *userData);
ccsCOMPL_STAT
PausePostProc(msgMESSAGE &msg, vltINT32 expoId,
void *userData);
ccsCOMPL_STAT
StartPostProc(msgMESSAGE &msg, vltINT32 expoId,
void *userData);
ccsCOMPL_STAT
ExpStart(const char *filename, vltINT32 expoId);
ccsCOMPL_STAT
ExpEnd(char* filename, vltINT32 expoId,char* detId);
evhCB_COMPL_STAT
ExpoStatusEvtCB(evtEVENT_MSG &msg, void *);
evhCB_COMPL_STAT
NewDataFileEvtCB(evtEVENT_MSG &msg, void *);
ccsCOMPL_STAT
ExpoStatusEvtPreProc(evtEVENT_MSG &msg,
vltINT32 expoId,
void *userData);
ccsCOMPL_STAT NewDataFileEvtPreProc(evtEVENT_MSG
&msg,
vltINT32 expoId,
void *userData);
ccsCOMPL_STAT
UpdateObsStatus();
vltUINT32
GetObsStatus();
ccsCOMPL_STAT
UpdateSubState(vltUINT32 obsStatus);
DESCRIPTION
These functions handle
commands which control execution of exposure i.e.
START/END, PAUSE/CONT and
ABORT commands. By default, the command is
forwarded to the DCS
sub-systems on the subsystemlist. The subsystemlist
for a given exposure is
specified by the mode (see INS.MODE keyword).
When expoId is not
specified, as default the latest expoId is applied.
Detector can be spacified
by the detId parameter.
The following options are
supported:
-expoId
<expoId> specify the exposure id.
-detId
<detId> name of detector as specified in the configuration
-at
<time> specify the time when the exposure must be
started, suspended or resumed (default is now).
This
option is not relevant for END and ABORT
commands. The time format is (ISO8601):
[[CC]YY[-]MM[-]DD[T| ]]HH[:]MM[[:]SS[.TTT]]
Note: this parameter is handled by 'DCS' sub-system(s).
Callbacks for handling
commands check command execution according
the current state before
calling pre-processing method, and then
ExpoCtrlCmdProc() method.
virtual evhCB_COMPL_STAT
StartCB(msgMESSAGE &msg, void *userData);
Callback for command
START.
virtual evhCB_COMPL_STAT
PauseCB(msgMESSAGE &msg, void *userData);
virtual evhCB_COMPL_STAT
ContCB(msgMESSAGE &msg, void *userData);
Callbacks for command
PAUSE and CONT.
virtual evhCB_COMPL_STAT
AbortCB(msgMESSAGE &msg, void *userData);
Callback for handling
ABORT command, which aborts the current exposition
immediately. It sends
ABORT command to all DCS sub-systems or only to the
specified one and waits
replies before forwording reply to the calling
process. During ABORT
STOP command is sent to ICS-es.
virtual evhCB_COMPL_STAT
EndCB(msgMESSAGE &msg, void *userData);
Safely finish the
exposure. Image file is completed as normally.
When sent to a looping
CCD, boss replaces the END command with STOP command.
At SOS level the detector
can be specified hierachically, e.g:
END -detId XXXX.IRDCS
Reply from wait command
arrives immediatly after reply from detector has arrived.
Send a WAIT command after
END command to make sure that the exposure is finished
before the next one is
started.
END command sent to an
'inactive exposure' - i.e. to an exposure that has been
setup but has not yet
been started - would result in cancelling the exposure.
After cancellation the
exposure cease to exist. Therefore exposure is no longer valid,
i.e. cannot be started,
setup.
virtual ccsCOMPL_STAT
ContPreProc(msgMESSAGE &msg, vltINT32 expoId,
void *userData);
virtual ccsCOMPL_STAT
EndPreProc(msgMESSAGE &msg, vltINT32 expoId,
void
*userData);
virtual ccsCOMPL_STAT
PausePreProc(msgMESSAGE &msg, vltINT32 expoId,
void *userData);
Pre-processing functions.
Implementation of all methods are dummies to be
overloaded by an bossSERVER
subclass.
irtual ccsCOMPL_STAT
StartPreProcMain(msgMESSAGE &msg, vltINT32 expoId,
void *userData);
irtual ccsCOMPL_STAT
StartPreProc(msgMESSAGE &msg, vltINT32 expoId,
void *userData);
irtual ccsCOMPL_STAT
StartPreProcSpecial(msgMESSAGE &msg, vltINT32 expoId,
void *userData);
These functions are called
during the execution of the StartCB. StartPreProcMain
calles function
StartPreProc when imagefile is to be saved. When there is no imagefile
is to be saved the
function StartPreProcSpecial is called.
The StartPreProc function
-as default- takes care of the expstart process
(i.e. sends the EXPSTART
function to ICS(-es) and calls the appropriate function of
the TCS/VLTI as well.)
When the users are overloading this function they must take
into account its original
implementation. See document VLT-MAN-ESO-17240-2265.
The function
StartPreProcSpecial() is an empty function to be overloaded by the users
when required.
When there is a special
mode when neither ICS nor TCS declared on the subsystemlist
users are suggested to
overload the function StartPreProcMain().
virtual ccsCOMPL_STAT
ExpoCtrlCmdProc(msgMESSAGE &msg, vltINT32 expoId,
void
*userData);
Handles commands which
control execution of exposure i.e. START/END and
PAUSE/CONT commands. It
consists to check exposure id and to send
command to the OS and DCS
sub-systems involved in the control of the
exposure identified by
expoId. Them it sends a reply to the calling
process according to the
execution command status.
The following functions are
used to inform sub-system about status of
exposure and to generate an
ASCII file with the FITS header keyword. In
general, the ExpStart() has
to be called in the pre-processing function of
the START command, and the
ExpStart() by the callback attached the exposure
status DB attribute.
virtual ccsCOMPL_STAT
ExpStart(const char *filename, vltINT32 expoId);
Inform sub-system that an
exposure is about to start by calling ExpStart()
of the bossINTERFACE
class (which has to be overloaded by each subclass)
and prepares FITS header.
The FITS header file will be created in
directory
$INS_ROOT/$INS_USER/DETDATA by ExpEnd() method. If it already
exists it is previously
deleted.
virtual evhCB_COMPL_STAT
ExpoStatusEvtCB(evtEVENT_MSG &msg, void *);
Handles the event
messages sent when the database attributes, where the
exposure status are
stored, change.
virtual evhCB_COMPL_STAT
NewDataFileEvtCB(evtEVENT_MSG &msg, void *);
Handles the event
messages sent when the database attributes, where the
new data file name are
stored, change.
virtual ccsCOMPL_STAT
ExpoStatusEvtPreProc(evtEVENT_MSG &msg,
vltINT32
expoId,
void *userData);
virtual ccsCOMPL_STAT
NewDataFileEvtPreProc(evtEVENT_MSG &msg,
vltINT32 expoId,
void
*userData);
Pre-processing functions
for DB events. Implementation of all methods are
dummies to be overloaded
by an bossSERVER subclass.
virtual ccsCOMPL_STAT
ArchiveImage(vltINT32 expoId)
Send ARCHIVE commad to
the archiver process, informing which
data are to be merged. A
stand alone OS (that is not controlled by SOS)
automatically archives
the image (i.e. inform VOLAC).
In case of SOS always the
top level OS merges the data as default.
virtual ccsCOMPL_STAT
AddTelescopKwToFitsHdr(bossINTERFACE_DCS * dcsSubSystemPtr)
Support function to add
TELESCOPE keyword to the fitsheader of the imagefile
created by the given DCS
(i.e. by argument dcsSubSystemPtr) when TCS is ignored.
The TELESCOP keyword is
normally added by the TCS subsystem when
it is not ignored. In
case the TCS subsystem is ignored or not
available but given on
the subsystemlist of a selected mode,
the TELESCOPE keyword
still has to be included in the fitsheader.
The value of the TELESCOP
kewyord is set according to the configuration
keyword OCS.TEL.ID. This
function takes care of this.
RIVATE
ccsCOMPL_STAT
AddExpstartFlag(vltINT32 expoId,char * flag);
ccsCOMPL_STAT
DeleteExpstartFlag(vltINT32 expoId,char * flag);
void AuxImageDataPrepared(vltINT32
expoId);
hese functions help to
control the actions for Short exposure.
SEE ALSO
bossSERVER(4)
### generated by docDeroff
###
bossEXPOSURE
NAME
bossEXPOSURE - class for
handling an exposure
SYNOPSIS
#include
"bossEXPOSURE.h"
bossEXPOSURE newExposure;
PARENT CLASS
eccsERROR_CLASS
DESCRIPTION
The bossEXPOSURE provides
methods to handle either single exposure or parallel
exposures. An exposure is
identified by a positive integer number (i.e expoId).
The exposures are stored in
a table in the database at the following location:
<alias>xxo:exposure.currExposureTbl
where <alias>xxo is
the base point of the instrument OS and
xx is the two letter
instrument code
An exposure is
characterised by the following items:
expoId:
identification number
mode: instrument
mode associated with the exposure
the
instrument mode is set by INS.MODE keyword in the setup.
The
instruments mode are declared in the configuration file.
subsystems: subsystems
taking part in the exposure
declared by
instrument mode (INS.MODE) in the first setup
(in
configuration file kw OCS.MODEi.SUSBSYST specifies the subsystems
belonging to
the given mode)
inspath: instrument
path given by the INS.PATH keyword or as part of the
selected
instrument mode
detector: detector
subsystem with which the exposure is taken
from the
given subsystemlist it is automatically declared
filename: the name of
file where the image is saved. Given by the OCS.DETi.IMGNAME
keyword. Note
if sequence naming is selected the given filname is extended
by a 4 digit
number starting with 0000, e.g. myfile_0000.fits
status: the status of
the exposure. e.g. inactiv, integrating, finished, aborted,..
The bossEXPOSURE class is a
member class of the bossSERVER class and
initialised in the
constructor function of the bossSERVER.
PUBLIC METHODS
bossEXPOSURE(const
dbSYMADDRESS dbPoint);
virtual ~bossEXPOSURE();
Constructor &
Destructor.
virtual ccsCOMPL_STAT
SetExpoType(char *expoType);
virtual char
*GetExpoType();
Get/Set exposure type.
See DICB for currently supported types.
The given parameter
(expoType) is saved into the private variable of the class
and also written into the
databasepoint <dbPoint>.expotype
Where dbPoint is the
root point for the exposure.
virtual ccsCOMPL_STAT
SetExpoCategory(char *expoCategory);
virtual char
*GetExpoCategory();
Get/Set exposure
category. See DICB for currently supported categories.
virtual ccsCOMPL_STAT
SetExpoTechnique(char *expoTechnique);
virtual char
*GetExpoTechnique();
Get/Set exposure
technique. See DICB for currently supported technique.
virtual ccsCOMPL_STAT
GetDetector( const char *dbAttr,char * detector);
Declares the name of the
detector associated with the expostatus or newdata
database point 'dbAttr'
given as argument.
Memory for detector must
be allocated by the user.
virtual ccsCOMPL_STAT
GetDetector(vltINT32 expoId,char* detector);
Declares the detector of
the given exposure identified by its expoId.
The data is retrieved
from the exposure table, threfore it is advised
to check for error.
Memory for detector must be allocated by the user.
ccsCOMPL_STAT
GetFileName(vltINT32 expoId,char *filename)
virtual ccsCOMPL_STAT
GetInsMode(vltINT32 expoId,char * insmode );
virtual ccsCOMPL_STAT
GetInsPath(vltINT32 expoId,char* path);
virtual ccsCOMPL_STAT
GetExpstartFlag(vltINT32 expoId,char *expstrt);
virtual ccsCOMPL_STAT
GetExposureStatus(vltINT32 expoId,char *status );
These function retrieve
information about the exposure identified by
its expoId. The data is
read from the database table.
Memory for the second
argument must be allocated by the user.
ltLOGICAL
bossEXPOSURE::IsDefined (int expoId)
ltLOGICAL
bossEXPOSURE::IsDefined (char* expoIdString)
Returns true if exposure
with given expoid has been already setup
and therefore declared
in the exposure table.
ltINT32
bossEXPOSURE::NoExposures()
Returns the number of
exposures in the exposure table.
virtual ccsCOMPL_STAT
GetLastExpoId(vltINT32 *expoId);
Retrieves the exposure
the last expoId
virtual char
*GetExpoIdStr(vltINT32 expoId=0);
Return the current
exposure ID as a string.
virtual ccsCOMPL_STAT
CheckExpoId(vltINT32 expoId);
Returns SUCCESS if the
exposure with the given expoId has been defined.
Same as function
IsDefined(vltINT32 expoId);
virtual char
*ExpoStatus2Str(vltUINT32 expoStatus);
Returns the exposure
status given as argument in the format of a string.
virtual vltUINT32
bossEXPOSURE::GetGlobalExpoStatus()
Get the global
exposure status as declared by the UpdateObsStatus().
It reads the status
from the databasepoint <alias>xxo:exposure.expStatus
PRIVATE METHOD
ALthough the functiona
below are public they are intended for private use inside
the boss module. OS-es
calling these functions must be very careful not to break
down the internal behavior
of boss.
virtual ccsCOMPL_STAT
NewExpoId(vltINT32 expoId = 0);
Set new exposure ID. It
is the number which characterises the setup which
leads to the exposure. If
the specified 'expoId' is null, then the
the exposure ID is set to
the last exposure ID increased by 1.
virtual void
SetLastExpoId(vltINT32 expoId);
Sets the expoId;
virtual ccsCOMPL_STAT
GetIdOfTheLastExposureInTbl(vltINT32 *lastExpoId);
Declarres the laste
exposure in the database table.
virtual ctocsCOMPL_STAT
bossEXPOSURE::AddExposure (int expoId, char *mode,
char *subsystems, char *inspath,
char *detector, char * filename,
char *state, char *expstrt)
virtual ccsCOMPL_STAT
bossEXPOSURE::DeleteExposure (int expoId)
virtual ccsCOMPL_STAT bossEXPOSURE::DeleteExposure
(char * expoIdString)
Functions to add/remove
exposures to/from the exposure tables.
Exposures are added
automatically to the exposure tables during the setup.
Exposures are removed
from table when there is a setup fails, except
when setup is sent to a
running exposure.
virtual ccsCOMPL_STAT
DeclareDetectors(char *subSystems, char * detectors);
Selects the detecto
subsystems from among the subSystems.
'subSystems' and
'detectors' are comma separated list of the subsystems.
Memory must be allocated
by the user for argument 'detectors'.
irtual ccsCOMPL_STAT
CopyLastExposure(vltINT32 expoId);
During the repetition of
an exposure, (i.e. when a new setup has no -function
or -file parameter) the
last exposure in the table is simply copied over.
No setup is sent to the
subsystems. (See bossSetupCB)
csCOMPL_STAT
bossEXPOSURE::CancelInactivExposures()
When END command is sent
to an exposure that has not yet been
started but has been
setup, the exposure will be cancelled, i.e. the status
of it will be set to
'CANCELLED'. (See bossExpoCtrl)
irtual ccsCOMPL_STAT
bossEXPOSURE::RefreshTable()
Removes old
finished/failed/aborted exposures from the exposure table.
Leaving always the last
10 exposures in the table.
The remaining exposures
are moved to the the top of the table.
This function is called
after every 20-th exposures.
virtual ccsCOMPL_STAT
bossEXPOSURE::CleanTable()
clears the exposure
table. This function is called at the startup of OS.
virtual ccsCOMPL_STAT
SetObsStatus();
Sets the observation
status, i.e. the global status of all exposures. The
observation status is
updated by the server automatically (when exposure
status of the detectors
change)
virtual ccsCOMPL_STAT
UpdateObsStatus();
Update the observation
status according to the status of all active
exposures (see
EnableExposure() and DisableExposure() methods of DCS
subsystem interfaces).
Observation status is
calculated as follows:
inscEXP_INACTIVE when
all exposures are still idle
bossEXP_RUNNING when
there is at least one exposure that is running
bossEXP_FINISHED when
all exposure has been finished
bossEXP_ABORTED when
one of the exposure has been aborted (and there
is
no other running exposure)
PRIVATE DATA MEMBERS
dbSYMADDRESS dbRef_;
Root database point
eccsDB_TABLE<bossEXPOSURE_TABLE_ENTRY>
* exposureTbl;
pointer to the exposure
table.
dbSYMADDRESS
expoGlobalStatusDbAttr;
Db attr. where exposure
status stored.
bossINTERFACE_LIST
*subSystemListPtr;
pointer to the list of
subsystem interfaces declared by bossSERVER.
vltINT32 lastExpoId_;
vltBYTES256 expoType_;
Exposure type
LINE DATABASE
The information about the
exposures are stored under <alias>xxo:exposure.
Here the '.currExposureTbl'
contains information about the current and the last
upto 10-20 exposures. In
the table the expoId,instrument mode,subsystems,inspath,
detector,filename,exposure
status and the expstart flag
(indicating if process is
in action) or not.
CLASS BASE_CLASS
bossEXPOSURE
BEGIN
ATTRIBUTE
BYTES256 expoCatg // Exposure category
ATTRIBUTE
BYTES256 expoType // Exposure type
ATTRIBUTE
BYTES256 expoTech // Exposure technique
// Exposure status. This
attribute can be used by OS to maintain an 'global'
// exposure status
according to the status of each invidual exposure.
ATTRIBUTE
UINT32 expStatus inscEXP_UNDEFINED
ATTRIBUTE Table
currExposureTbl(60,
BYTES64
expoId, // expoid in a format of string 'expo-xx'
BYTES64
mode, // Mode name
BYTES256
subsystems, // List of the subsystems
BYTES64
inspath, // ins Path
BYTES64
detector, // detector of the exposure
BYTES64
filename, // inspath
BYTES64
state, // state of the exposure taken by the given detector
BYTES64
expstrt // flag showing the whether the expstrt has finished
)
### generated by docDeroff
###
bossINS_MODES
NAME
bossINS_MODES - provides
tools for handling instrument modes
SYNOPSIS
#include
"bossINS_MODES.h"
PARENT CLASS
public fndOBJECT,
eccsERROR_CLASS
bossINS_MODES insModes
(dbPoint, dictionary, aliasTable);
DESCRIPTION
The bossINS_MODES class
contains data members and methods to handle
instrument modes. An
instrument mode is defined by a Name and a Setup
parameters. The setup
parameter string can include Setup Files and/or
keywords as '-file
<file1> [<file2> ...] -function <keyword1> <value1>
[<keyword2>
<value2> ...]'.
The class can be used to
define instrument mode and to complete keyword list
for the SETUP command when
an instrument mode is requested. The name of the
current instrument mode is
stored into the database (see DATABASE below).
The method CheckInsMode()
can be used to supervise the keywords defining the
current instrument mode.
The Dictionary associated
with the object as a reference, is used during
definition to check the
consistency of setup parameters associated to the
instrument modes.
An Alias Conversion Table
can also be associated with the object as a
reference to an external
instance of the oslxALIAS class.
PUBLIC METHODS
**** Constructor/Destructor
Methods ****
bossINS_MODES(const
dbSYMADDRESS dbPoint,
oslxDICTIONARY *dictionary = NULL,
oslxALIAS
*alias = NULL);
The constructor receives
as a parameter the symbolic address of the
online database support
point for the object, i.e. the point
where the object can find
instrument modes definition table.
The constructor method
associates optionally a dictionary to the object
and an Alias Conversion
Table.
virtual ~bossINS_MODES()
virtual ccsCOMPL_STAT
Configure(oslxSHORT_FITS &appConfig,
vltLOGICAL update = ccsTRUE);
Configures the instrument
modes according to the application configuration
keywords (see
ESO-VLT-DIC.OSB dictionary).
An instrument mode is
defined by a NAME, a SETUP ( SHORT-FITS keywords),
a subsystemlist, and
instrument path. The keyword 'OCS.MODEi.NAME' defines the
name of the instrument
mode. The keyword 'OCS.MODEi.SETUP' defines the
associated setup
parameters. Setup parameters are checked according to the dictionary
and the alias conversion
table.The keyword OCS.MODEi.SUBSYST declares the list of
subsystems that take
place in the given mode. The keyword OCS.MODEi.PATH declares
the path for the
instrument. The instrument modes are stored in the
database table.
If <update> is
FALSE, the database table is first cleaned, i.e. all
instrument modes are
cleared.
virtual ccsCOMPL_STAT
SetInsModeKeyword (const slxKEYW_LINE keyword);
Sets SHORT-FITS keyword
which define the instrument mode in the SETUP
command.
virtual ccsCOMPL_STAT
HandleInsMode (oslxSETUP &setup, char *insModeName);
Adds setup keywords
corresponding to the instrument mode possibly
specified in the SETUP
command via the SHORT-FITS keyword defined by
SetInsModeKeyword(). If
an instrument mode is specified, the setup
keywords are added to the
current keyword list of the setup object, and
the database attribute
'insModes' (see below) is udapted accordingly.
The second argument gives
back the retrieved insModeName.
virtual ccsCOMPL_STAT
CheckInsMode (oslxSETUP &setup);
Check if the new setup
will influence the current instrument mode, if yes
the instrument mode
status in the database is set to "Undefined".
virtual ccsCOMPL_STAT
ResetCurrInsMode();
Resets the current
instrument mode, i.e set to "Undefined".
PRIVATE METHODS
virtual ccsCOMPL_STAT
AddMode (char *modeName, char *setupParams,
vltLOGICAL update);
Stores the instrument
mode in database table. If <update> is TRUE, the
specified instrument mode
is updated with new values, or added in the
database table if not
previously defined. If <update> is FALSE, this
method checks if the
instrument mode is already defined, and if yes the
request is rejected.
virtual ccsCOMPL_STAT
CleanTable();
Cleans the database table
where the instrument modes are defined.
virtual vltLOGICAL IsDefined(char
*modeName);
Returns true (ccsTRUE) if
the instrument mode is defined in database.
virtual vltINT32
NoInsModes();
Returns the number of
defined instrument modes.
virtual ccsCOMPL_STAT
GetSetupParams (char *modeName, char *setupParams);
Retrieves from database
table the setup parameters of the selected
instrument mode. The
instrument mode name is checked for validity (i.e.
if the mode is defined in
the database table). If no valid mode is found,
it returns an error. If
the mode is found, it returns the setup string
stored in the database.
virtual ccsCOMPL_STAT
GetSubsystems(char *modeName, char *subsystems);
virtual ccsCOMPL_STAT
GetInsPath(char *modeName, char *inspath);
virtual ccsCOMPL_STAT
NewMode (char *modeName, oslxSETUP &setup);
Adds the setup keywords
corresponding to the selected instrument mode.
These setup keywords are
added to the current keywords list of the 'setup'
object.
virtual ccsCOMPL_STAT
DbWriteInsModeName(char *modeName);
Write the new mode name
into the database.
void InsModeSet(vltLOGICAL
isset);
vltLOGICAL InsModeSet();
Set or return wether
insmode is set already. By default insmodeset is set to FALSE
at startup or when setup
has failed or when global state has changed.
PRIVATE DATA MEMBERS
dbSYMADDRESS
dbRef;
oslxDICTIONARY
*dictionary;
oslxALIAS
*alias;
Pointers to the
dictionary and alias table
eccsDB_TABLE<bossMODES_TABLE_ENTRY>
*insModesTbl;
Instrument modes
definition database table.
oslxKEYW_FILTER insModeKeywFilter;
Filter to extract
Instrument Mode Keyword from setup keywords.
LINE DATABASE
The following database
branch is necessary to the instance of
bossINS_MODES:
CLASS BASE_CLASS
bossINS_MODES
BEGIN
//
ATTRIBUTE BYTES32
insMode "" // Current instrument mode
ATTRIBUTE Table
insModesTbl
(64,
BYTES32 name, // Mode name
BYTES256 setupParams) // Setup paramaters
END
//
SEE ALSO
oslxSETUP(3),
ixacAPP_CONFIG(4)
### generated by docDeroff
###
bossINTERFACE_DCS
NAME
bossINTERFACE_DCS -
dedicated interface class to DCS sub-system
SYNOPSIS
#include
"bossINTERFACE_DCS.h"
bossINTERFACE_DCS
myInterface (dbPoint, 1);
PARENT CLASS
bossINTERFACE
DESCRIPTION
The bossINTERFACE_DCS is
dedicated interface to DCS. It inherits the basic
comunication (and
syncronization) facilities provided by bossINTERFACE, but
enhances it with specific
features needed by DCS such as:
PUBLIC METHODS
bossINTERFACE_DCS(const
dbSYMADDRESS dbPoint, char * srvId)
Constructor. It set the
subsytem category to bossDCS_SUBSYS (see
SetCategory() method).
See also bossINTERFACE(4).
virtual
~bossINTERFACE_DCS()
Destructor
sCOMPL_STAT
SetDbAddressStatus(char* dbAddressStatus)
ets the database attribute
where the exposure status flag is stored.
virtual vltUINT32
GetExpoStatus();
Returns exposure status
read from the database (see function
SetDbAddressStatus()
If no database attribute
has been set or if an error occurs
during the database
reading then inscEXP_UNDEFINED is returned.
virtual ccsCOMPL_STAT
SetExpoStatusEvtCB(evhHANDLER *evhHandler,
evhOBJ_CALLBACK &callback);
Sets callback to handle
status changes of expousre. The callback is
attached to the status
database attribute (See SetDbAddressStatus()
method) of the exposure.
virtual ccsCOMPL_STAT
DisableExpoStatusEvt();
Deactivates the sending
of event messages on exposure status changes.
virtual ccsCOMPL_STAT EnableExpoStatusEvt();
Enables the sending of
event messages, previously disabled.
virtual ccsCOMPL_STAT
SetDbAddressFileName(char *dbAttr);
Sets the database
attribute where the new data file is stored. This
attributes is updated by
DCS to inform about availability of a new data
file.
virtual ccsCOMPL_STAT
SetNewDataFileNameEvtCB(evhHANDLER *evhHandler,
evhOBJ_CALLBACK &callback);
Sets callback to handle
the new data file change. The callback is
attached to the new data
database attribute (See
SetNewDataFileNameDbAttr() method) of the exposure.
irtual ccsCOMPL_STAT
DisableNewDataFileNameEvt();
Deactivates the sending
of event messages on new data file changes.
virtual ccsCOMPL_STAT
EnableNewDataFileNameEvt();
Enables the sending of
event messages, previously disabled.
virtual ccsCOMPL_STAT
EnableExposure();
virtual ccsCOMPL_STAT
DisableExposure();
Enable(Disable) the
exposure. This consists to enable(disable) the
exposure and new data
file events, and to update the exposure control
state. When an exposure
has been enabled, its status is take into account
when observation status
is updated (see UpdateObsStatus()).
virtual ccsCOMPL_STAT
IsActive();
Return true if the
exposure is active (see EnableExposure() and
DisableExposure()
methods).
vltLOGICAL
ImageFileExits(char *fileName);
Return true if the image
file already exits in the directory
$INS_ROOT/$INS_USER/DETDATA, and false otherwise.*
virtual ccsCOMPL_STAT
StoreNewDataFileName(const char *fileName);
virtual vltINT32
NoOfNewDataFileName();
virtual char
*GetNewDataFileName(vltINT32 fileNo);
Methods to handled list of
data file produced during an exposure. This
list is reset by
ResetData() method.
ccsCOMPL_STAT
bossINTERFACE_DCS::SetNextFileName(vltLOGICAL checkFile)
ccsCOMPL_STAT
bossINTERFACE_DCS::ClearFileName()
vltINT32
bossINTERFACE_DCS::GetNamingType()
ccsCOMPL_STAT
bossINTERFACE_DCS::SetNamingType(vltINT32 namingType)
ccsCOMPL_STAT bossINTERFACE_DCS::SetReqFileName(char
*newFileName)
ccsCOMPL_STAT
bossINTERFACE_DCS::SetSeqBaseName(const char *baseName)
ccsCOMPL_STAT
bossINTERFACE_DCS::SetSeqIndex(vltUINT32 seqIndex)
vltUINT32
bossINTERFACE_DCS::GetSeqIndex()
ccsCOMPL_STAT
bossINTERFACE_DCS::SetNextSeqName()
char *
bossINTERFACE_DCS::GetFullFileName()
char *
bossINTERFACE_DCS :: GetSimpleFileName(const char* completeName,char* fname)
These functions support the
filenaming according to the selected type
("Request-Naming"
or "Sequence-Naming") in the SETUP.
If filenaming is not set by
the keyword OCS.DETi.NAMING the default setting is
"Sequence-Naming".
When "Sequence-Naming" is applied,
the filename is
supplemented with 4 digits. When filename with the given basename
does not yet exist the
first file will be named as <basename>_0000.fits .
### generated by docDeroff
###
bossINTERFACE_CCD
NAME
bossINTERFACE_CCD -
dedicated interface class to CCD sub-system
SYNOPSIS
#include
"bossINTERFACE_CCD.h"
bossINTERFACE_CCD
myInterface (dbPoint, 1);
PARENT CLASS
bossINTERFACE
DESCRIPTION
The bossINTERFACE_CCD is
dedicated interface for CCD-s. It inherits the basic
comunication (and
syncronization) facilities provided by bossINTERFACE, but
enhances it with specific
features needed by TCCD and FIERA.
This special feature is to
couple the local expoId of the CCD and OS ExpoId.
(as CCD set its own
expoId-s). Note that the CCD does not just have a
local expoId (which only
created at START ), but also a 'refId' with values:
0 for currentnly
running exposure,
-1 for not yet
running next exposure
which has to be used in the
SETUP commands.
Some commands use expoId
while others refId and there are command for which
no expoId or refId can be
given. (All these are taken cared of by this interface.)
PUBLIC METHODS
bossINTERFACE_CCD(const
dbSYMADDRESS dbPoint, char * srvId)
Constructor. It set the
subsytem category to bossCCD_SUBSYS (see
SetCategory() method).
See also bossINTERFACE(4).
~bossINTERFACE_CCD()
Destructor
SetupError(msgMESSAGE
&msg)
When there is error reply
received from the CCD this function has to be called
to clean up the previous
settings wwhen necessary.
subsMsgModify (const msgCMD
command, msgMESSAGE &msg)
Modify the the expoId of
the given message according to the command sent.
(It is called before the
the message has been sent)
subsMsgProcess(const msgCMD
command)
Action carried out after
reply from the subsystem arrived.
(Sets the local expoId of
the CCD when START command returns its value.)
ccsCOMPL_STAT
SetCcdName(char *ccdname);
char * GetCcdName();
Sets/gets ccdName as
declared in the configuration file.
PRIVATE METHODS
deleteExpoId (const msgCMD
command, msgMESSAGE &msg)
modifyExpoId (const msgCMD
command, msgMESSAGE &msg)
### generated by docDeroff
###
bossArchiver
NAME
bossArchiver - server
process used for merging and sending data to archive
SYNOPSIS
bossArchiver
<InsName>
bossArchiver [-n
<procName>] [-l level] [-v <level>] [-h]
[-dbAction
<dbPoint>] [-dbRoot <dbPoint>]
[-a
<level>] [-version] [-noDate] [-noFileLine] [-noExit]
DESCRIPTION
The program creates and
initialise a simple instance of the bossARCHIVER class,
which is responsible for
merging the partial header files together
with the imagefile. (See
bossARCHIVER(4) manual for more details).
The recommended way to
start up the so called 'Archiver' process is:
% bossArchiver
<InsName>
where <InsName> is
the name of the instrument as specified by the
keyword INS.CON.ID in the
configuration file. <InsName> always has to be specified.
The name of the process
created is: bossArchiver_<pr>o
where <pr> is the two
letter instrument id as specified by the keyword
INS.CON.PREFIX in the
configuration file.
The other way of starting
up the 'Archiver process' is kept for back
compatibility and debug
resons. This is described below:
The process name (with wich
the process is registered to the message system)
can be specified by the
command line option: -n procName
This name will have to be
used to send messages to instead of the executable's name.
When the database root
point for action log is set (command line option
-dbAction), the archiver
process reports its current activities in the specified point.
The following options are
supported:
-n <procName> name
used to register process to the message system.
-l <level> set
standard log level (max 2)
-v <level> set
verbose log level (max 5)
-a <level> set
action log level
-t <level> set
timer log level
-h print this
help
-version print the
version number of the software
-noDate turn off
the display of date in verbose log
messages
(written to stdout)
-noFileLine turn off
the display of file name and line number
in verbose
log messages (written to stdout)
-noExit when
applicable, avoid that application exits in
case of a
problem when starting it up.
-dbAction <dbPoint>
name of the
database root point used for logging
the current
action (see ibacLog(3)).
-dbRoot <dbPoint>
The dbroot
point of the indtrument OS to wich this
archiver
process belong.
SEE ALSO
bossARCHIVER(4),
bossControl(1)
### generated by docDeroff
###
Appendix
Appendix 1:Example of configuration file
##*****************************************************************
## xxmcfgINS.cfg
## The keywords for which
default values are used are written by italic letters.
## Below only the keywords
that are retrieved by OS from this cfg file are listed.
## The keywords that are required for the configuration
for ICS or startup tool are not listed.
#general information
INS.CON.ID "XXXX";
# Instrument identifier
INS.ID "XXXX/$Revision:
1.53 $"; # Instrument identifier
INS.CON.PREFIX "xx";
# Name prefix for modules and servers
OCS.CON.RELEASE "2000-06-16";
# Release date "yyyy-mm-dd"
OCS.CON.ORIGIN "TEST";
# Origin
OCS.CON.LOGLEVEL 0; #
Log level
OCS.CON.OSDBROOT “<alias>xxo”; #
dbroot point of the OS
OCS.DET.NUM 3; #number
of detectors
# subsystem 1: IRACE DCS
OCS.DET1.NAME "IRDCS"
# name of the IRACE detector
OCS.DET1.TYPE "IRACE"; #
type of the detector
OCS.DET1.DICT "IRACE" #
dictionary : ESO-VLT-DIC.IRACE
OCS.DET1.ENVNAME "wxxxx" #
environment where proc. is running
OCS.DET1.PROCNAME "iracqServer" #
name of the IRACE detector process
OCS.DET1.KEYWFILT "DET1.*.*.*.*.*.*"
# keywords to be forwarded to
subsyst
OCS.DET1.TIMEOUT 6000 #
timeout for the process
#OCS.DET1.DBEXPSTS "<alias>iracq:exposure.expStatus"
; # db address of 'exposure status' (default)
# subsystem 2: TCCD
OCS.DET2.NAME "TCCD"
# name of the
TCCD detector
OCS.DET2.TYPE "ACE";
# type of the
detector
OCS.DET2.DICT "CCDDCS" #
dictionary : ESO-VLT-DIC. CCDDCS
OCS.DET2.ENVNAME "wxxxx"
# environment where TCCD proc.
is running
OCS.DET2.PROCNAME "ccdconCI_tccd" #
name of the TCCD detector process
OCS.DET2.KEYWFILT "DET2.*.*.*.*.*.*,DET.*.*.*.*.*.*"
# keywords to be
forwarded to subsyst
OCS.DET2.TIMEOUT 6000 #
timeout for the process
OCS.DET2.DBROOT "<alias>tccd";
# db address of
subsystem
#OCS.DET2.DBIFROOT "<alias>xxo:subsystems:tccd";
# db address of the interface
#OCS.DET2.DBSTATE "<alias>tccd.opState";
# db address of 'state'
#OCS.DET2.DBNEWDT "<alias>tccd:exposures:exposure_1:transfer.fileNameUnComp";
#OCS.DET2.DBEXPSTS "<alias>tccd:exposures:exposure_1.expStatus";
#subsystem 3: FIERA
OCS.DET3.NAME "FIERA"
;
OCS.DET3.TYPE "FIERA";
OCS.DET3.DICT "FCDDCS";
OCS.DET3.PROCNAME "fcdconCI_fiera";
OCS.DET3.KEYWFILT "DET3.*.*.*.*.*.*";
OCS.DET3.DBROOT "<alias>fiera";
#OCS.DET3.DBIFROOT
"<alias>xxo:subsystems:fiera";
#OCS.DET3.DBSTATE "<alias>fiera.opState";
#OCS.DET3.DBNEWDT "<alias>fiera:exposures:exposure_1:transfer.fileNameUnComp";
#OCS.DET3.DBEXPSTS "<alias>fiera:exposures:exposure_1.expStatus";
#OCS.DET3.WIPING F; #
start wiping when T
#OCS.DET3.STOP T;
# leave it online when F
# subsystem: ICS
OCS.INS.NAME "ICS"; #
Name of ICS
OCS.INS.DICT1 "XXXX_ICS"; #
dictionary
OCS.INS.ENVNAME "wxxxx"
; #
environment
#OCS.INS1.DBROOT "<alias>XXXX:ICS"; #
db root ( default)
#OCS.INS1.DBIFROOT "<alias>xxo:subsystems:ics"; #
interface db address (default)
#OCS.INS1.DBSTATE "<alias>XXXX:ICS:PROCESSES:WS:icsControl.state"; #
db address of state (default)
OCS.INS.KEYWFILT "INS.*.*.*.*.*.*"; #
keyword filter
# subsystem: TCS
OCS.TEL.NAME "UT0";
# Telescope name ('UT1','UT2','UT3' or
'UT4')
OCS.TEL.FOCUS "NA"; #
Telescope focus
OCS.TEL.DICT "TCS"; #
dictionary
#OCS.TEL.DBROOT "<alias>TCS";
# db root (default)
#OCS.TEL.DBIFROOT "<alias>xxo:subsystems:tcs";
# interface db root (default)
#OCS.TEL.DBSTATE "<alias>TCS:tcsState.tcsState";
# db address of state (default)
OCS.TEL.KEYWFILT
"TEL.*.*.*.*.*.*"; # keyword filter
OCS.TEL.TIMEOUT 180000;
# timout in seconds
OCS.TEL.ID "Tel
name not set"; # value for TELESCOP kw
('ESO-VLT-Ui')
OCS.OS.NUM 0; #number
of OS subsystems
# Instrument modes
# mode 1
OCS.MODE1.NAME "IR_IMAGING";
# name of the instrmode
OCS.MODE1.SETUP "-function
INS.MIRR1.NAME IRED INS.DROT.POSANG 90.0"; # setup the mode
OCS.MODE1.SUBSYST "IRDCS
UT0 ICS"; # subsystems involved in the
given mode
OCS.MODE1.PATH "INFRARED";
# instrument path (EXPSTRT, EXPEND)
OCS.MODE2.NAME "GUIDING";
# name of the instrmode
OCS.MODE2.SETUP "-function
INS.DROT.POSANG 10.0 -file ccd.det"; # setup mode
OCS.MODE2.SUBSYST "TCCD
ICS UT0"; # subsystems
involved in the given mode
OCS.MODE2.PATH "OPT_TCCD";
# instrument path (EXPSTRT, EXPEND)
OCS.MODE3.NAME "IR_SPECTROSCOPY";
# name of the instrmode
OCS.MODE3.SETUP "-function
INS.MIRR1.NAME IRED INS.DROT.POSANG 10.0"; # setup of mode
OCS.MODE3.SUBSYST "IRDCS
TCCD ICS UT0"; # subsystems involved in the given mode
OCS.MODE3.PATH "INFRARED";
# instrument path (EXPSTRT, EXPEND)
OCS.MODE4.NAME "OPT_IMAGING";
# name of the instrmode
OCS.MODE4.SETUP "-function
INS.MIRR1.NAME OPTIC INS.DROT.POSANG 180.0"; # setup of mode
OCS.MODE4.SUBSYST "FIERA
ICS UT0"; # subsystems
OCS.MODE4.PATH "OPT_SCCD";
# instrument path
# --- oOo ---
##****************************************************************
## xxmcfgSTART.cfg
## Below only the keywords
that are retrieved by OS are listed.
OCS.DET1.ACCESS "NORMAL"; #
Sub-system access mode.
OCS.DET2.ACCESS "NORMAL"; #
Sub-system access mode.
OCS.DET3.ACCESS "NORMAL"; #
Sub-system access mode.
OCS.INS1.ACCESS "NORMAL"; #
Sub-system access mode.
OCS.TEL.ACCESS "IGNORE"; #
Sub-system access mode.
#************************************************************************
# ___oOo___
Appendix 2: Dictionary of BOSS
The dictionary used by BOSS consists of the following
keywords:
#
# configuration kws
OCS.CON.RELEASE
OCS.CON.ORIGIN
OCS.CON.LOGLEVEL
OCS.CON.OSDBROOT
# DCS configuration keywords
#
------------------------------------
OCS.DET.NUM
OCS.DETi.NAME
OCS.DETi.ENVNAME
OCS.DETi.PROCNAME
OCS.DETi.ACCESS
OCS.DETi.DICTi
OCS.DETi.DBROOT #
dbroot of the subsystem
OCS.DETi.DBEXPSTS # db
adrress of 'exposure status'
OCS.DETi.DBNEWDT # db
adrress of 'new data'
OCS.DETi.DBSTATE #
db adrress of 'state'
OCS.DETi.DBIFROOT # db
root of the subsystem interface
OCS.DETi.MINFREE #
space required by the image (optional)
OCS.DETi.KEYWFILT
OCS.DETi.TIMEOUT
OCS.DETi.TYPE
OCS.DETi.WIPE
OCS.DETi.STOP
# ICS configuration keywords
#
------------------------------------
OCS.INS.NUM
OCS.INSi.NAME
OCS.INSi.ENVNAME
OCS.INSi.PROCNAME
OCS.INSi.ACCESS
OCS.INSi.DICTi
OCS.INSi.DBROOT
OCS.INSi.DBSTATE
OCS.INSi.DBIFROOT
OCS.INSi.TIMEOUT
OCS.INSi.KEYWFILT
# TCS configuration keywords
#
------------------------------------
OCS.TEL.NAME
OCS.TEL.ENVNAME
OCS.TEL.PROCNAME
OCS.TEL.ACCESS
OCS.TEL.DICTi
OCS.TEL.DBROOT
OCS.TEL.DBSTATE
OCS.TEL.DBIFROOT
OCS.TEL.TIMEOUT
OCS.TEL.KEYWFILT
# OCS configuration keywords
#
------------------------------------
OCS.OS.NUM
OCS.OSi.NAME
OCS.OSi.ENVNAME
OCS.OSi.PROCNAME
OCS.OSi.TIMEOUT
OCS.OSi.ACCESS
OCS.OSi.DICTi
OCS.OSi.DBROOT
OCS.OSi.DBSTATE
OCS.OSi.DBIFROOT
OCS.OSi.KEYWFILT
# Instrument mode cfg
keywords
#
------------------------------------
OCS.MODEi.NAME
OCS.MODEi.SETUP
OCS.MODEi.SUBSYST
OCS.MODEi.PATH
# SETUP keywords
#
------------------------------------
OCS.DETi.IMGNAME # set
the image name
OCS.DETi.IMGEXT #
image file name extention
OCS.DETi.NAMING #
set request or sequential naming
OCS.PATH #
set the path (see EXPEND/EXPSTRT cmd)
Appendix 3: CDT of BOSS
The CDT that is part of the package and must be included by
the apllication’s CDT consists
of the following keywords.
1: ABORT -expoId
<INTEGER> -detId <STRING>
replies:
-done <STRING>
2: ADDFITS -expoId
<INTEGER> -detId <STRING> -info <STRING>
replies:
-done <STRING>
3: COMMENT -expoId
<INTEGER> -detId <STRING> -string <STRING>
-clear
<LOGICAL>
replies:
-done <STRING>
4: CONT -expoId
<INTEGER> -detId <STRING> -at <STRING>
replies:
-done <STRING>
5: END -expoId
<INTEGER> -detId <STRING>
replies:
-done <STRING>
6: FORWARD -subSystem
<STRING> -command <STRING> -arguments <STRING>
replies:
-reply <STRING>
7: OFF -subSystem
<STRING>
replies:
-done <STRING>
8: ONLINE -subSystem
<STRING>
replies:
-done <STRING>
9: PAUSE -expoId
<INTEGER> -detId <STRING> -at <STRING>
replies:
-done <STRING>
10: SETUP -expoId
<INTEGER> -file <STRING> -function <STRING>
-noMove
<LOGICAL> -check <LOGICAL> -noExposure <LOGICAL>
replies:
-expoId <INTEGER>
11: STANDBY -subSystem
<STRING>
replies:
-done <STRING>
12: START -expoId
<INTEGER> -detId <STRING> -at <STRING>
replies:
-done <STRING>
13: STATE -subSystem
<STRING>
replies:
-state <STRING>
14: STATUS -expoId
<INTEGER> -function <STRING>
replies:
-status <STRING>
16: WAIT -expoId
<INTEGER> -detId <STRING> -first <LOGICAL> -cond <STRING>
-all
replies:
-expStatus <INTEGER>
17: ACCESS -subSystem
<STRING> -mode < STRING > -info
replies: <STRING>
-o- -o- -o-