Small Form Factor, Near-Silent, Low-Power Personalized Computer
In the spring of 2010 I decided to build a powerful, yet near-silent work-station
that could fit in the corner of my desk.
Requirements:
- Small Form Factor w. Mini-ITX mainboard
- Cooling with just one large fan
- Powerful CPU w. DDR3, but near-silent at idle/low load
- Nvidia VDPAU capable at least at the level of Nvidia Ion for 1080p video playback
As an enthusiast project I put (almost) no constraints on:
- Time to assemble
- Number of suppliers of the chosen components
- Price
- DFI LanParty MI P55-T36 Mini-ITX Mainboard (has DDR3 + proper PWM fan control. Needs stand-alone graphics card)
- Intel Core i5-670, 32nm @ 3.46GHz (Fastest CPU in lowest TDP class, 73W)
- Silverstone Petit SST-PT09B case (Good case, has space for stand-alone graphics card 25mm thick, on the front/top side)
- Intel Postville 80GB SATA SSD 2,5". But see below
- HyperX KHX1600C8D3K2/4GX ( 2 x 2 GB ) RAM (Listed by DFI as OK for the mainboard. Overclocking capable, caring only for stability I have never overclocked anything, but I might make a few OC experiments)
- Point of View Nvidia GeForce 8400 GS (G98) 512MB (Passively cooled, low TDP, low profile). But see below.
- Scythe Slip Stream SM1425SL 12LM-P fan (The only 140mm PWM fan I could find, it is delivered with the Scythe Grand Kama Cross heatsink, which does not fit a SFF case). But see below
- Thermalright AXP-140 heatsink w. LGA1156 Bolt-Thru-Kit (The largest possible heatsink that fits the case, it rules out graphics cards with GPU heatsink on their back side).
- LG Internal slimline DVD RW 8x GT20N (I do not actually need an optical drive, but with the AXP-140 and a 25mm x 140mm fan it just fits)
- Slimline combined SATA + power cable (The drive did not arrive with one, nor did the case)
- Arctic Silver 5 thermal grease (The base of my AXP-140 was not perfectly flat, compensate by using what appears to be high quality thermal grease)
- Three 40mm x 4mm bolts with two nuts each (to support the fan right below the case lid)
Comments on the Initial Hardware Configuration:
- Fan: The case with graphics card leaves no space for a sideways blowing 120mm X 25mm fan, only for a 92mm fan - with questionable airflow for the GPU heatsink.
So with the single-fan requirement, a top-down blowing fan will provide the best airflow.
The good people at Scythe agreed to sell me two of their 140mm PWM fans for a reasonable price (for this somewhat experimental setup, I bought a spare).
The Scythe GKC fan is 25mm x 140mm with holes fitting a 120mm mount.
According to its label, the GKC fan has a sleeve bearing and draws 0.22A @ 12V (2.64W) for a resistance of 55Ω, thus at 5V it consumes 0.46W. Full on it spins at ca. 1355 RPM at 12V, and at 5V ca. 390 RPM.
At first I powered the fan with 5V only, instead of cutting the cord of my precious Scythe fan, I plugged it into a 4-PIN PWM Xilence Y-Cable rewired to 5V from the PSU.
The case top air vent is 120mm by 165mm which is not ideal for a 140mm fan. As an alternative I considered a pair of Arctic Cooling F9 Pro PWM 92x92x34 mm fans, which would fit the top air vent well. Their more difficult mounting, the risk of interference from two spinning fans and the fact that the 140mm fan is in fact inaudible at low RPMs caused me to drop this alternative.
- CPU heatsink: With a top-down blowing 25mm thick fan, the height of the CPU heatsink can be up to 85mm. Smaller alternatives to the 550g AXP-140 include:
- 475g: Nexus LOW-7000
- 460g: Dynatron P555
- 355g: Scythe SCSK-1100 Shuriken Rev.2
- 200g: Xigmatek DURIN D982 Heatpipe Cooler
- RAM: With a height of 30mm the RAM modules have enough clearance that they can be mounted and unmounted without removal of the AXP-140. Replacement of the RAM modules can thus be done by first removing the PC front plate and clearing the mainboard ATX-connector. This is probably also the simplest way to get access to the mainboards second fan connector.
- PSU: The stock 19V powered 120W PSU supplies only 6A on the 12V rail. However, initial tests showed this to be sufficient, with the power consumption on the 220V side to reach 100W using BCLK=142MHz at full load: 4 processes counting primes and one playing 10Mb/s H.264 video. The additional power consumption by the video playback was 6W, i.e. up to about 94W for the CPU load alone.
- Graphics Card: The low profile and the cross-wise (as opposed to length-wise) fins allow air to flow from the top of the case and down over the GPU heatsink and out of the side air outlet. Although the GF 8400GS is adequate for HD playback, a later upgrade could use a passively cooled, low-profile, low-TDP Nvidia Geforce 210 based card.
- Cable Management: To not obstruct the airflow over the mainboard and for easier assembly, the 12V power cable and the P4 cable are placed below the mainboard. A new hole for the 12V plug is thus drilled in the backplane, in the lower corner next to the GF 8400GS (a bit of the graphics card bracket had to be filed away to allow for this). The audio and USB cable from the mainboard to the case front are placed low on the mainboard in the gap between the GF 8400GS and the RAM modules. The SATA cables are brought up in the gap between the AXP-140 and the GF 8400GS and then forward to their drives. This largely blocks the airflow through the foremost half of the gap between the AXP-140 and the GF 8400GS.
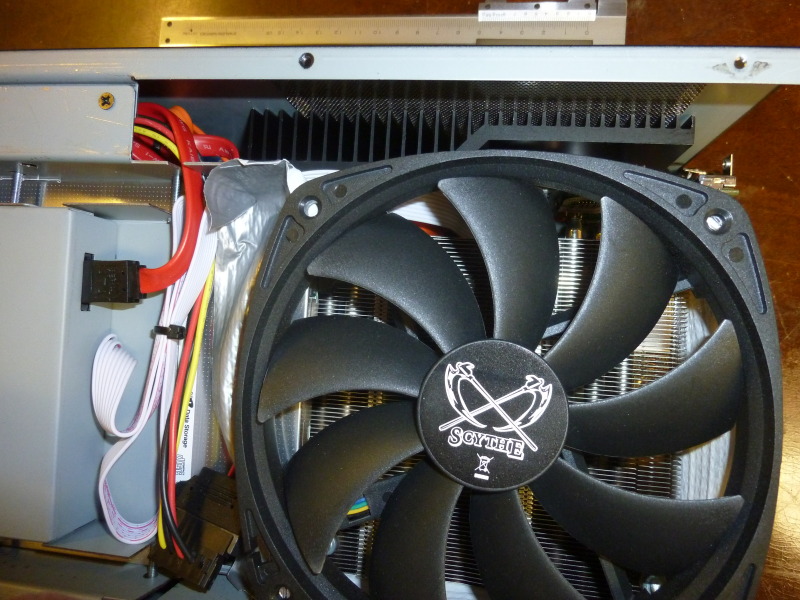
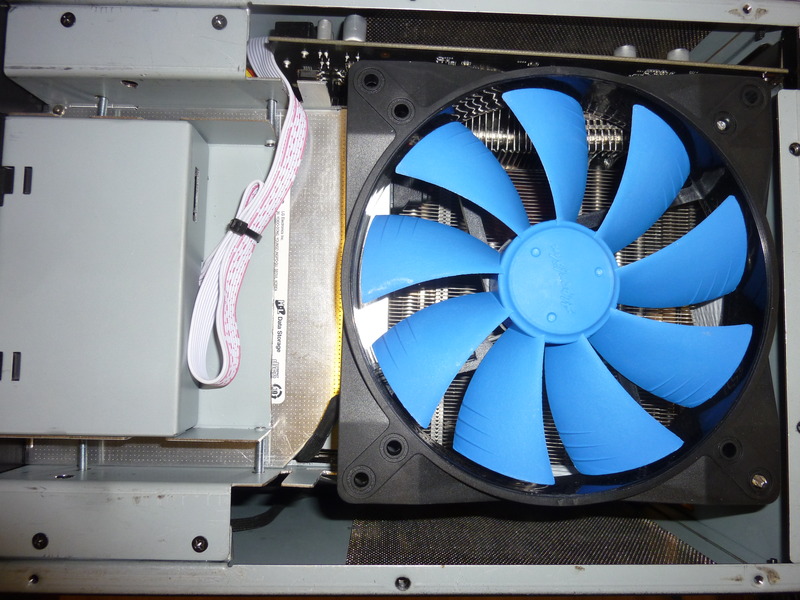
- Fan mount: The fan is placed just below the case lid air intake with one side resting on the slimline DVD drive using the DVD power cord as spacer. Apart from providing space for the DVD drive, this placement 15mm above the CPU heatsink also allows a reasonable airflow to pass over the GPU heatsink. One of the four fan mounting holes has its lower side covered by the DVD slimline plug. Through each of the other three holes a 4mm x 40mm bolt is inserted from below and fixed to the fan with two nuts. The head of each bolt then rests on the AXP-140 (with a bit of soft rubber as spacing to dampen any vibration from the fan).
- Back plane connector opening: For improved airflow away from the PCH and MOSFETs I decided not to mount the mainboard bracket for the back plane connectors.
- LED POST codes: The mainboard has a dual seven-segment LED display for hexadecimal displaying of BIOS POST codes. With the densely packed PC fully assembled I did not expect to be able to see those codes. However, with the DVD tray open and empty one can get a good, direct view of the LED display. Photo below.
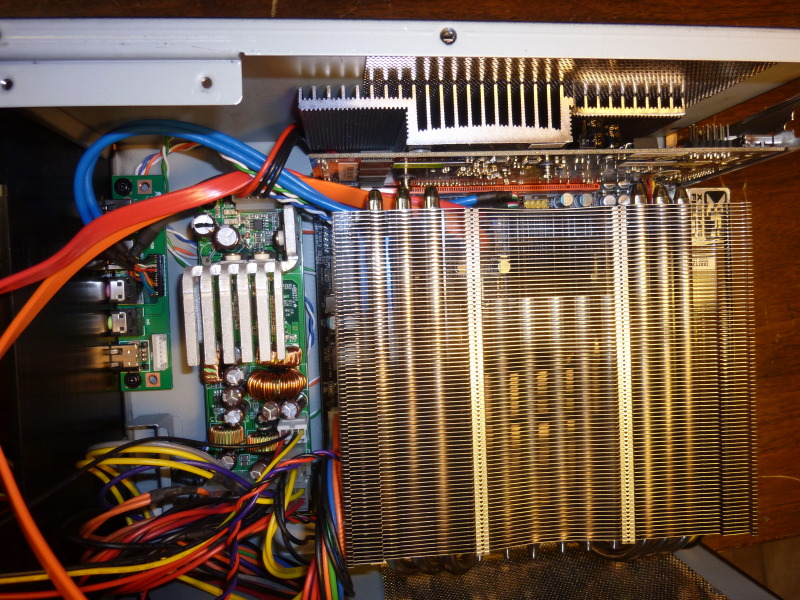
Stock PSU, AXP-140, GF 8400GS.
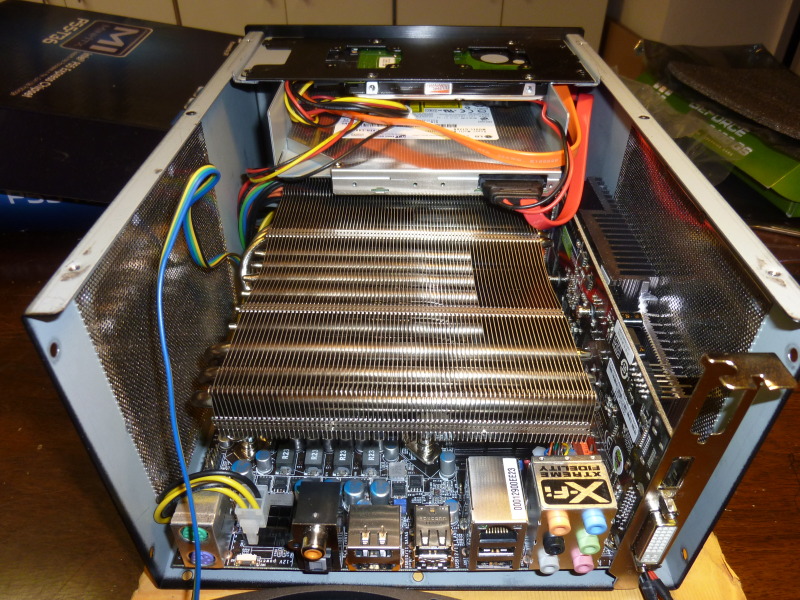
AXP-140, GF 8400GS, Slimline DVD w. top mounted SSD. Note P4 + PSU cable placement.
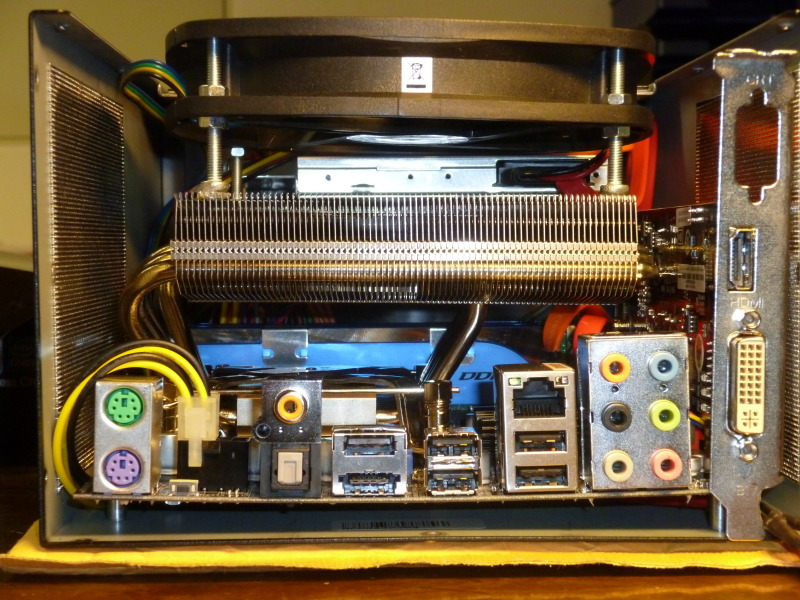
AXP-140, Slimline DVD, GF 8400GS (with filed bracket and PSU plug), Fan mount.
Test of Initial Hardware Configuration:
The system was first tested with memtest86+, running the fan on 5V (up to 390RPM), using no airduct between the fan and the heatsink and without the case lid. With the Base Clock (BCLK) set to 160MHz (up from 133MHz) on no other BIOS changes, the system was stable for 7 hours and did not overheat, drawing 75W from the stock PSU (running at 4.16GHz up from 3.46GHz presumably using a single core).
Booting Linux with BCLK = 160MHz the system was however not able to correctly count prime numbers on all four cores with this single overclocking-change to the BIOS.
At BCLK=142Mhz and the fan spinning at 390RPM the system could reliably count primes on all four cores for more than ten hours, drawing about 94W (on the 220V side). The MOSFETs and the PCH did however get very hot, the MOSFET almost 70C above ambient temperature, the PCH somewhat less. (The ambient temperature was 18C +/- 0.5C).
The i5 CPU has a "Digital Thermal Sensor" (DTS) with an unusual read-out. Immediately after powering up the PC the BIOS would briefly show the ambient temperature (18C) for both the PWM and PCH sensors, while the CPU temperature would initially read out at an impossibly low 4C. As such I reconfigured the temperature read-outs under Linux to add 14C to the reported CPU temperature by writing a /etc/sensors.d/sensors.conf. All CPU temperatures below are based on this 14C correction (making at least readouts around 18C reasonable accurate).
The GPU is tested with qvdpautest (under Linux), the GF 8400GS can decode 1920x1080 H.264 at 61 frames/s (no over-clocking), which is about 20% faster than Nvidia ION (on an Intel Atom system).
Some memory bandwidths measured with Memtest86+ (RAM clock multiplier: 8):
| BCLK [MHz] | Memory Bandwidth [MB/s]
|
| 160 | 10171
|
| 150 | 10025
|
| 148 | 9892
|
| 145 | 9692
|
| 133 | 9397
|
Although the MOSFET and PCH temperatures were lower and perhaps acceptable for non-overclocked usage, I decided to take the system apart and improve the MOSFET and PCH cooling.
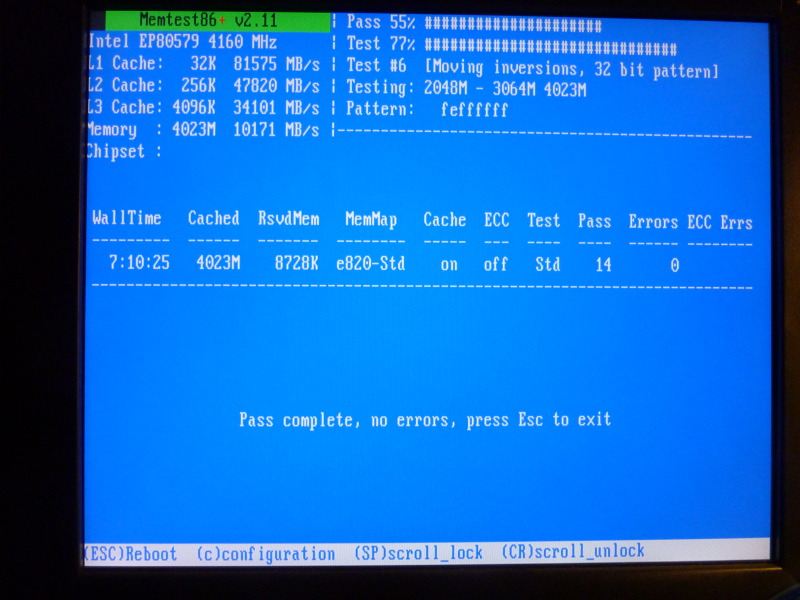
Memtest86+ screendump: CPU @ 4.16GHz (BCLK=160MHz, DRAM clock multiplier: 8), Memory Bandwidth: 10171 MB/s.
Second Hardware Configuration:
- PCH Heatsink: The AXP-140 leaves very little space for additional heatsinks. The largest replacement for the tiny stock PCH heatsink I could find was the 32mm tall Zalman ZM-NB32K Northbridge Chipset Heatsink. With some cutting, most of the 47mm tall ZM-NB32J should fit as an alternative. For the mounting I filed away part of the mounting clip, but with the flexibility of the mounting system this proved unnecessary. The ZM-NB32K and the nearest AXP-140 heatpipe has about 1mm clearance.
- MOSFET Heatsink choice: For the cooling of the very hot MOSFETs I wanted to try something more than just an aluminium heatsink and set my eyes on the Thermalright HR-09 Type 4, which is a compact MOSFET heatsink with a single heatpipe. The challenge with this choice is that the mainboard has no matching mounting holes and to make matters worse a pair of capacitors prevent contact between the MOSFETs and the HR-09. I first thought about trying to make a pair of mounting clips that could share the two nearest mounting holes for the AXP-140. This seemed however to be quite difficult and since the HR-09 weighs only 45g it also seemed unnecessary.
- HR-09 bottom modification: The solution was to attach the HR-09 to the MOSFETs using a combination of sticky thermal grease (Arctic Silver 5) and silicone, which is both heat-resistant and adhesive. This means that the ends of the heatsink base were no longer needed for the mounting. I first drilled away the part of the (left) heatsink base that was in the way of the neighboring capacitor, but then I realized that the heatsink base would also conflict with the nearest AXP-140 heatpipe, so I cut off all of the left base extension. This two-step approach is the reason for the uneven cut in the left side of the photo. The excess base on the right was carefully cut away with a small knife.
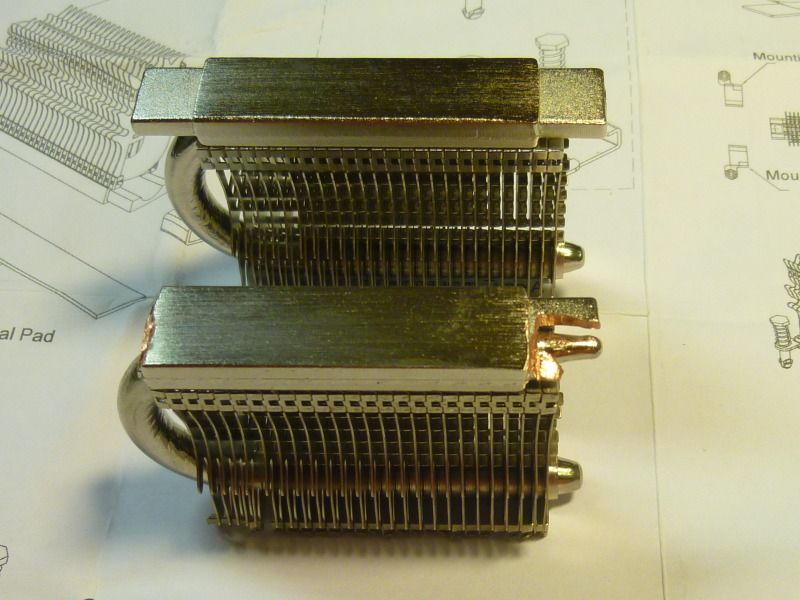
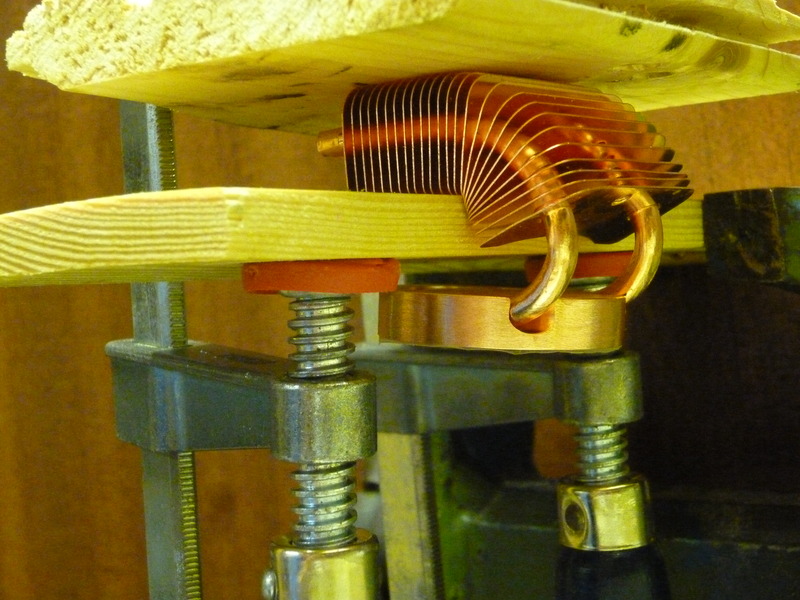
- HR-09 top modification: One final problem with the HR-09 is that it is a few mm too tall to stand below the AXP-140. The solution to that problem was to carefully saw off the top of each the the 25 aluminium profiles that cool off the heatpipe. In doing so I learned that the 5 aluminium profiles closest to the heatpipe curve are not actually soldered on the the top half of the heatpipe and since I happened to saw those off last the sawing almost ripped them off. More important is to not rupture the actual heatpipe, since this renders the heatsink useless. Not trusting myself to do this modification right the first time I had bought two HR-09s, and although I was not too proud of my modifications, they were good enough that I kept the spare. Photos below.
- HR-09 Mounting: The modified HR-09 was fastened onto the four MOSFETS using thermal grease (Arctic Silver 5) on the MOSFET top surfaces and silicone in between. To limit the amount of silicone needed, I placed some cable insulation in the space between the MOSFETs. (This blocks any airflow from the side of the MOSFETs, but this is deemed insignificant). Together with some rubber tubing and a SCUBA lead block, the HR-09 info card was used keep the HR-09 in place while the silicone hardened. The info card also kept any excess thermal grease and silicone from flowing towards the CPU socket. The HR-09 and the AXP-140 have about 1mm - 2mm clearance. The clearance between the HR-09 and the nearest CPU heatsink bolt is only about 1/2mm (mounting the HR-09 in the opposite direction would likely lead to greater clearance). Photo below.
- BIOS: Since the BIOS would accept settings that would literally fry parts of the mainboard I also decided to flash the BIOS to the latest version available, since this version should be safe against such mistakes (and since there is a bit of a thrill in knowing that a mistake during the flashing process can brick the mainboard :-). Using UNetbootin, Freedos 1.0 and a 2GB USB memory stick I created a bootable run-time environment for the firmware update utility. The actual flashing is done using the BIOS factory settings. Although the BIOS upgrade went well, I later became unsure if it was a good idea, see below.
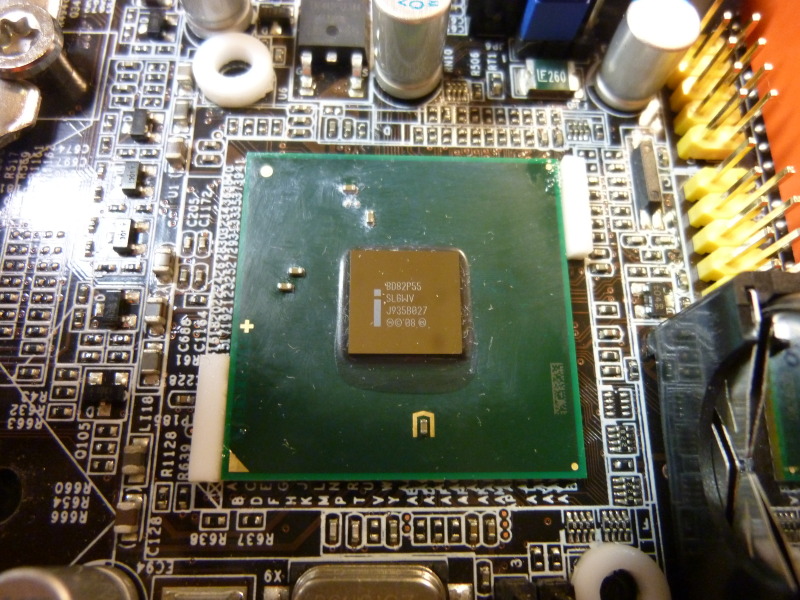
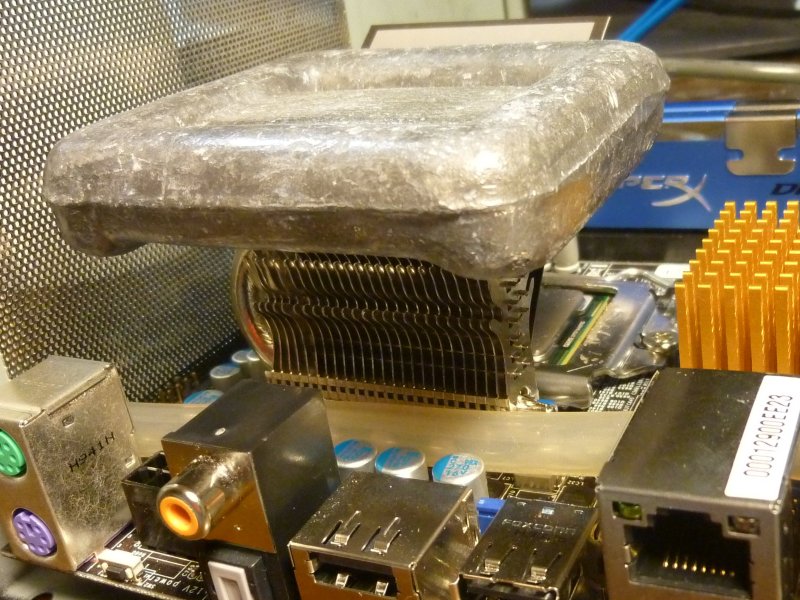
The P55 PCH with the heatsink removed.
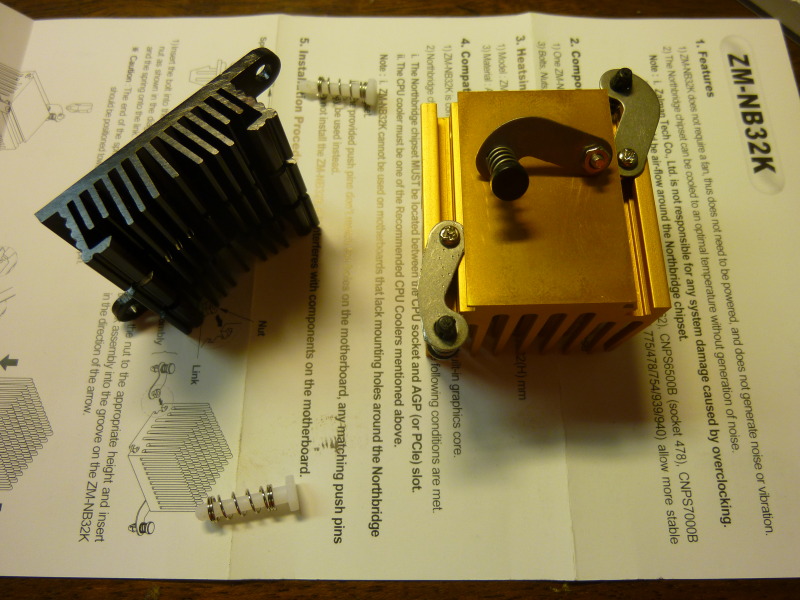
The stock and the Zalman ZM-NB32K Northbridge heatsinks.
The HR-09 Type 4 MOSFET Heatsink bottom modified and its unmodified back-up.

The HR-09 Type 4 MOSFET Heatsink top+bottom modified and its unmodified back-up.
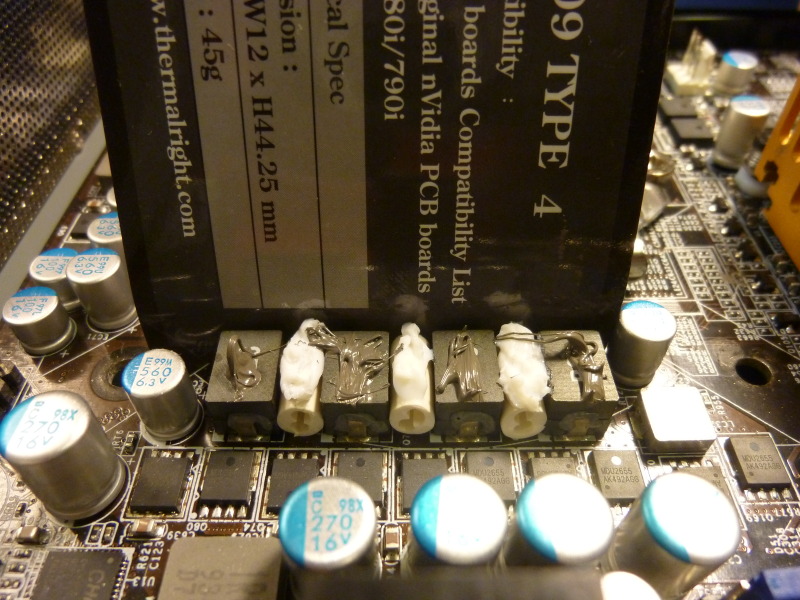
Ready to fasten the HR-09 to the MOSFETs: The MOSFETs with cable insulation as spacing, (grey) sticky thermal grease on top and (white) silicone in between. The HR-09 info card was used keep any excess thermal grease and silicone from flowing towards the CPU.
While the silicone hardens the modified HR-09 is kept in place by the HR-09 info card on the back, a piece of rubber tubing on the front and a one kilogram SCUBA Diving lead block on top.
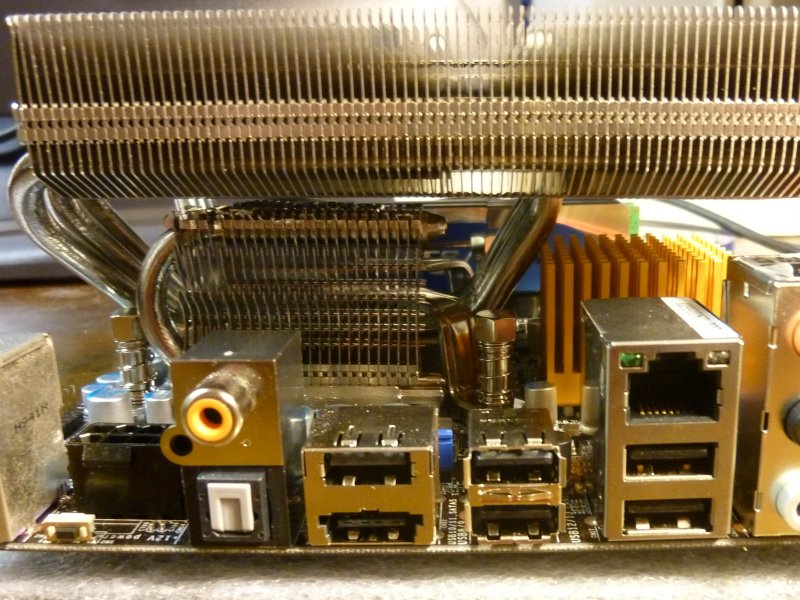
The AXP-140 remounted with the modified HR-09 MOSFET heatsink and the Zalman ZM-NB32K Northbridge heatsink underneath.
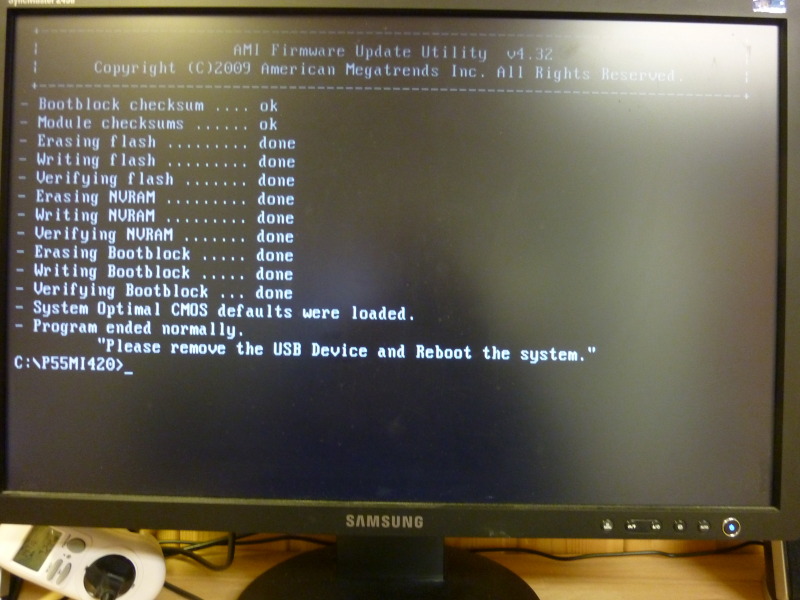
Successful flash of BIOS P55MI420 using UNetbootin, Freedos 1.0 and a 2GB USB Memory Stick.
Test of Second Hardware Configuration:
The 2010-02-05 BIOS had an unexpected limitation: The BCLK is now limited to 150MHz.
The same is true both for the 2010-04-20 BIOS and the oldest (2009-12-31) BIOS available from the DFI website. The BIOS was therefore flashed with the most recent 2010-04-20 version.
The initial CPU load experiment (BCLK=142MHz, the fan spinning at 390RPM, no air duct between the fan and the CPU heatsink, without the case lid) was redone, again drawing up to 94W (on the 220V side). The system reliably counted primes on all four cores for several hours. This time the PWM temperature stabilized itself at 49C above the ambient (19C) temperature and the PCH temperature stabilized itself at 45C above the ambient temperature.
Under these conditions the improved MOSFET cooling thus reduced the PWM temperature with 20C, with the less critical PCH temperature being reduced almost as much!
To evaluate the GPU cooling, the CPU load experiment was extended with repeated runs of qvdpautest (which puts a load on the GPU). With 390RPM, no lid and without the air duct, the GPU temperature would reach 51C above ambient (19C).
Third Hardware Configuration:
- Air duct I: To fully utilize the airflow, a primitive air duct is created using duct tape. First an air duct that forced all the air from the fan through the AXP-140 was created. With the lid on the case, this would cause the GPU to overheat also with the system in idle.
- Air duct II: To lead some air from the fan over the GPU heatsink a 10cm x 5cm flexible plastic sheet was slid in between the top of the GPU heatsink and the side case air outlet, and the top of the sheet was affixed to the fan with duct tape. The other sides of the fan were sealed off with duct tape as with the first air duct. Air can also pass freely in between the rearmost half of the ca. 15mm gap between the AXP-140 and the GF 8400GS, increasing the airflow over the PCH heatsink.
- Internal PSU: Although the stock PSU had worked fine, I replaced it with the compact 200W PW-200-M, a P4 DC-DC ATX 12V Power Supply from MINI-Box. The PW-200-M can deliver 12A on the 12V rail, i.e. a factor two improvement. Furthermore, it both plugs directly into the mainboard ATX-connector saving the pesky ATX-cable and it avoids the 19V to 12V converter (presumably producing less heat). It also allows for an extra long graphics card, something which I have not (yet) exploited.
- External PSU: The PW-200-M is matched with a 200W 220V AC to 12V DC external PSU, the Mean well 12V DC 16.5A, fanless switching mode PSU, 80% efficiency. See also below.
- PSU P4 wiring: The P4 cable of the PW-200-M was too short to run below the mainboard and was replaced with a 30cm P4 extension cord with the female plug + 2cm wire cut off. The P4 cable was soldered onto the downward facing component side of the PSU.
- PSU 12V supply cables: In resoldering the P4 cable, I noticed that the PW-200-M circuit board has extra large holes for its 12V supply cables. To really personalize this part of the PC, I decided to replace the 12V supply cables with a length of some old speaker cables, Hitachi SSX-102K LC-OFC with the outer, black insulation layer removed. (I believe the CPU benefits from electrons coming through Oxygen Free Copper about as much as I believe that High Fidelity benefits from OFC cables :-). Some rational justification for this modification include: With peak load (including USB powered devices) the internal PSU can easily draw 10A (120W) and the stock 12V supply cables looked a little thin for that; for optimum cable placement the supply cables should in any case be resoldered onto the component side; the stock 12V PSU plug did not fit in the new hole in the backplane and needed to be replaced anyway. At one point this modification looked like a bad idea: This soldering proved to be very difficult not only because of my limited soldering skills, but also because the strands of the speaker cable were very stiff and absorbed a lot of heat from the soldering iron and the space on the circuit board was very limited with less than 1mm to a component on a different circuit.
- Ammeter: To add another touch to the PC I decided to decorate its front plate with a 20A ammeter I had found on ebay. The ammeter would show the current supplying the PSU. Unfortunately, the ammeter turned out to be missing its shunt resistor, but with some experimenting I made a new one, consisting of about 12cm 1.5mm2 copper wire neatly coiled up. On ebay I also found a pair (four actually) of gold plated cable shoes for my ammeter. Including shipping they set me back almost three Euros, but having personalized my computer with gold plated cable shoes was worth it.
- Card reader: In the drive bay between the slimline DVD and the case lid there is 25mm vertical clearance. Since the mainboard has both an as yet unused internal USB-connector and a ditto SATA connector, I decided to use this drive bay space for a USB card reader with an eSATA port. A friend who has a proper metal workshop and knows how to use it helped me cut out the rectangle above the DVD slot out of the 3mm aluminium front plate of the Silverstone Petit SST-PT09B case. The bottom plate of the card reader was way too long (about 150mm) to fit, but since part of it was not necessary I cut it down to about 80mm, reducing the number of holes for the mounting bolts from six to four. The drive bay is wider than the card reader, so to mount the card reader I drilled four holes in the drive bay and used four 16mm x 3mm bolts for the mounting. I drilled two additional holes in the drive bay, so a screw driver can access the two screws that hold the card reader metal cover. Since plugging the third SATA cable and the USB cable into the mainboard with the AXP-140 in place seemed very difficult, I had actually connected those cables while I modified the MOSFET and PCH cooling and just left them and the whole card reader (wrapped in plastic, without its case) in the drive bay until I got ready to properly mount the card reader. Photo below.
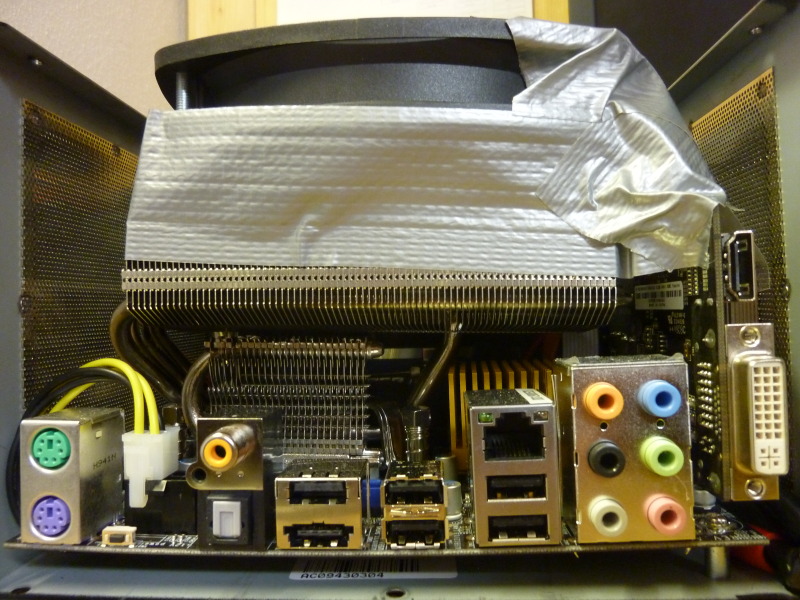
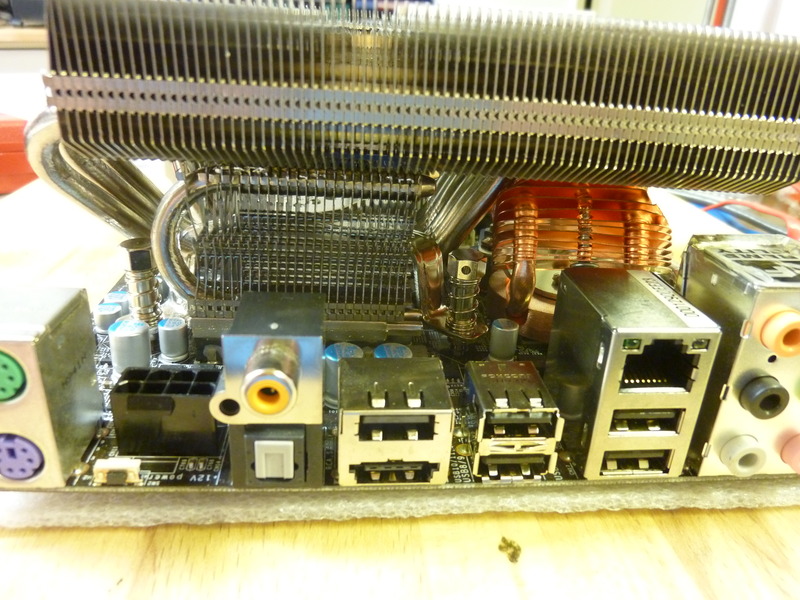
Rear view w/o lid, back plane and PCIe bracket: Air duct II with free flow through rearmost half of gap between AXP-140 and GF 8400 GS. A piece of the plastic sheet over the GF 8400GS can be seen on the right.
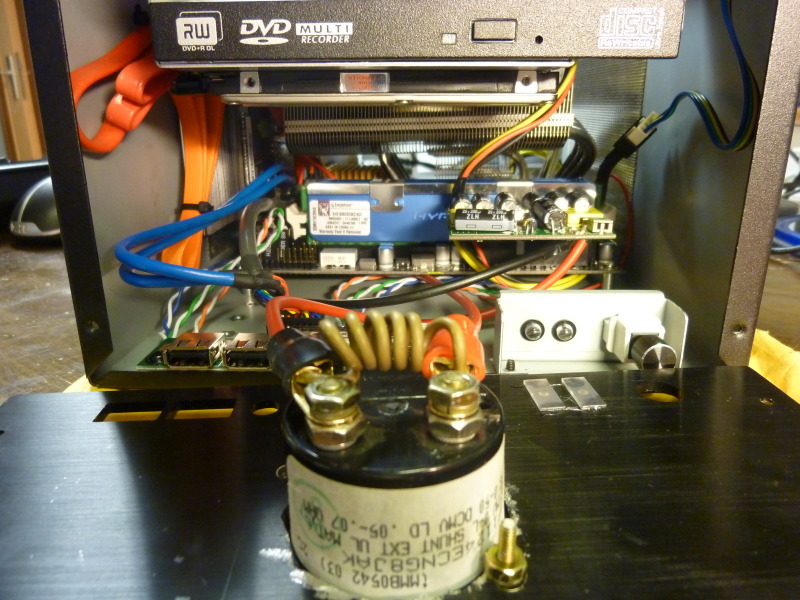
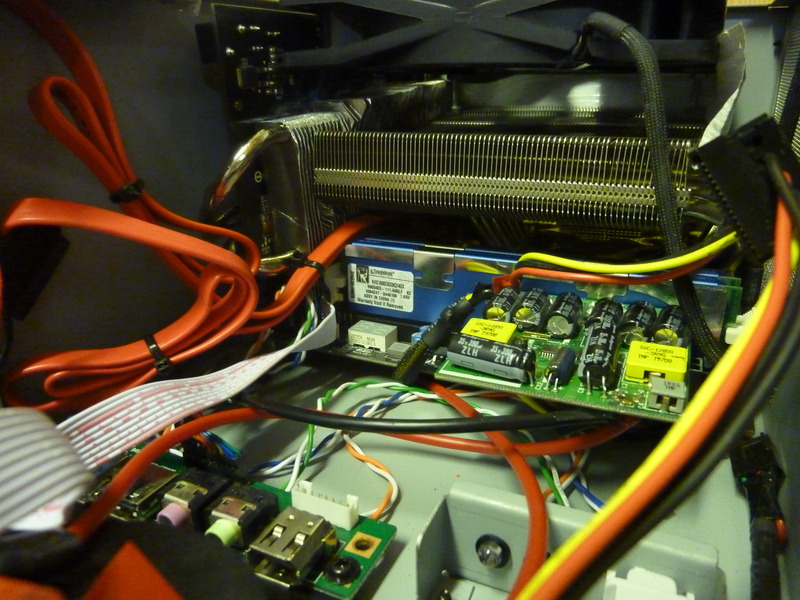
The assembled system with the front plate tilted down: The wonderfully compact 200W PW-200-M PSU with 30cm P4 cable soldered onto component, upper side, (black) modified Xilence Y-Cable with 5V for PWM fan and SDD+DVD power supply soldered onto lower side, Hitachi SSX-102K LC-OFC speaker cable soldered onto lower side of PSU for 12V supply. In the very front the 20A ammeter with the "shunt" resistor (ca. 12cm 1.5mm2 copper wire coiled up). Above the slimline DVD with the SDD below.

Top front view w/o case lid+front plate showing card reader without its front plate and metal cover. Front and rear 16mm x 3mm bolts visible.
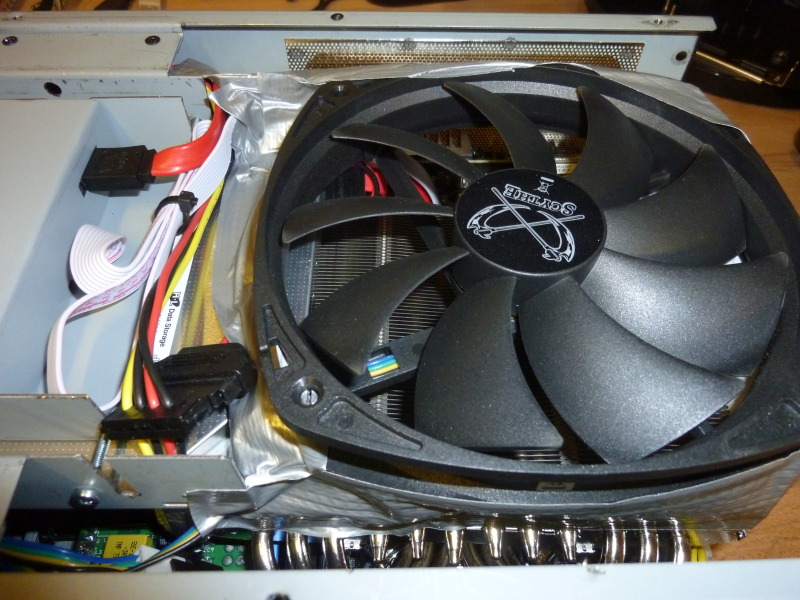
Top view w/o case lid showing rear part of card reader and the air duct with direct air flow from the fan to the GPU heatsink. Towards the back the drive bay has a hole so a screw driver can get to the screw holding the card readers metal cover. To the right of that hole a slit in the drive bay has been cut for a SATA + 5V power cable. Another visible detail is the notch cut into the end of the bolt(s) that come up through the fan, which makes it easier to adjust the fan height.
Test of Third Hardware Configuration:
- The GPU + CPU load experiment with the fan spinning at 390RPM was redone only this time with the air duct and with the case lid in place. This heated the GPU to 42C above ambient, 9C cooler than without the lid and without the air duct.
- Fan voltage: The initial CPU load experiment (BCLK=142MHz, the fan spinning at 390RPM) was also redone, again drawing up to 94W (on the 220V side - but see below) but this time with the air duct and with the case lid in place. This heated the PWM temperature up to 60C above ambient (19C), the PCH to 47C above ambient, while the CPU appeared to be 59C above ambient. Since the fan is inaudible up to about 500RPM, I decided stop undervolting it and reconnected it to its nominal 12V. Redoing the CPU load experiment with the fan at 600RPM reduced the PWM temperature to 40C above ambient (19C) and the PCH temperature to 37C above ambient, while the CPU appeared to be 43C above ambient. At 600RPM the fan is still inaudible, but the airflow itself becomes audible.
- The CPU + GPU load experiment was redone with the fan at 600RPM, with the case lid and with the air duct. This kept the GPU at 34C above ambient, 8C down from spinning the fan at 390RPM.
- The maximum power draw by the PC is about 130W (but see below), about two thirds of the 200W that the external PSU can deliver. A couple of extra 12V standard plugs is therefore connected to the Mean Well PSU, to power the occasional external USB disk.
A bit of Overclocking:
The options for overclocking are quite restricted with the updated BIOS. The PC was not able to POST with the CPU clock multiplier reduced from 26. With the CPU core voltage (Vcore) unmodifiable as well, the base clock could not be increased by much.
These are the few changes I did:
- The default DRAM settings are according to the JEDEC standard programming of the HyperX KHX1600C8D3K2/4GX modules: 1.50V and latency timings of 9-9-9. The manufacturer has however tested the RAM modules at 1.65V with latency timings 8-8-8. So I reduced the latency timings to 8-8-8 and increased the DRAM voltage by 140mV (this voltage can be adjusted in increments of 20mV), with this increase the BIOS measures the actual DRAM voltage to 1.648V.
- The DRAM clock multiplier was increased to 10.
- Vtt should apparently be at most 0.5V below the DRAM voltage, to ensure that I increased Vtt by 60mV.
- With BCLK = 150Mhz trying to load GRUB from the SSD would cause a reboot, while it worked fine from a USB stick. Since the SATA is handled by the PCH, I decided to increase the PCH voltage a notch (100mV to 1.15V).
With this Memtest86+ can be reliably run at BCLK=150MHz and qvdpautest and hpcc also runs OK. Running the above CPU load test would however causes processes to segfault. This problem persisted with hyperthreading disabled.
Reducing BCLK to 146MHz (for a Memtest86+ bandwidth of 10315MB/s), the system would be completely stable under intense (over)load, intended to stress CPU+memory, GPU and PCH:
Four processes counting primes, one rsyncing two USB disks, one repeatedly running qvdpautest, one running an f-spot slideshow and to really make sure the GPU was busy an additional (occasionally non-smooth) 10Mb/s H.264 video playback. To assess the responsiveness of the PC I was at the same editing this web-page via sshfs while listening to (smoothly played) MP3.
The HyperX RAM modules are actually rated at 12800MB/s and can reputedly go significantly faster, so with the current BIOS settings I am not getting even the nominal capacity of those extra fast RAM modules.
With the fan spinning at 625RPM (not audible due to the spinning USB disks used for testing) the PC draws up to 134W (on the 220V side - but see below), and the temperature increases over ambient (19C) are:
- CPU: 41C
- PWM: 41C
- PCH: 36C
- GPU: 31C
Performance
Using the above BIOS settings (and BCLK decremented to 145MHz to provide some margin in stability) I made some additional performance measurements on the PC.
While idle the PC consumes 60W (but see below) and with the fan spinning at 455RPM the temperature increases over ambient (19C) are:
- CPU: 13C
- PWM: 29C
- PCH: 30C
- GPU: 23C
Memtest86+ memory bandwidth: 10245MB/s
Since the GPU runs at its default settings, the output of qvdpautest is largely unchanged, except for the surface put/get bits which is up by 12-13%.
As hinted above the HPC Challenge Benchmark is now available as a standard package (hpcc) in Ubuntu.
So simply by installing (sudo apt-get install hpcc openmpi-bin) and running hpcc (mpirun -np 2 hpcc) I benchmarked my new PC with the venerable 'High Performance Linpack' (HPL) at over 14GFLOPS.
(For comparison the standard Dell Optiplex 755 in my office reaches 4.4GFLOPS).
Using a single CPU on my PC the HPL runs at 8GFLOPS and with four (relying on Hyper-threading) the HPL runs at 15GFLOPS.
(I speculate that the modest gain with Hyper-threading is because the memory-bound HPL has been optimized to avoid cache misses).
I find it truly amazing to have this kind of computing power sitting silently in the corner of my desk, since I once used new supercomputers to get this level of performance.
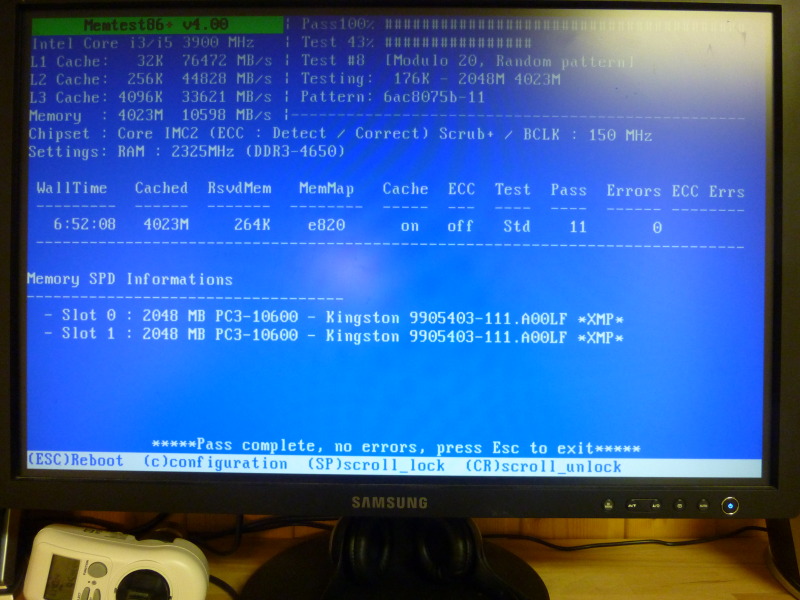
Memtest86+ screendump: CPU @ 3.92GHz (BCLK=150MHz, DRAM clock multiplier: 10), Memory Bandwidth: 10598 MB/s.
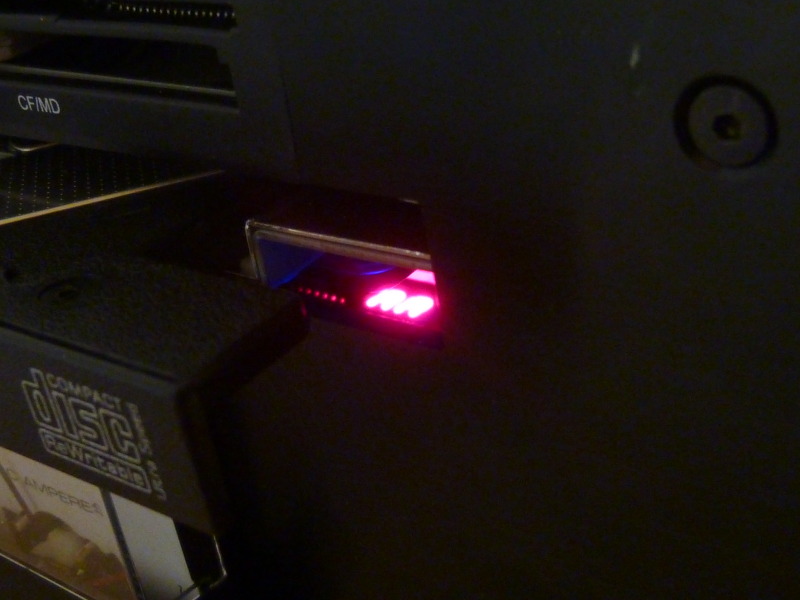
Front view with mainboard BIOS POST code (AA) LED visible through the open DVD slot.
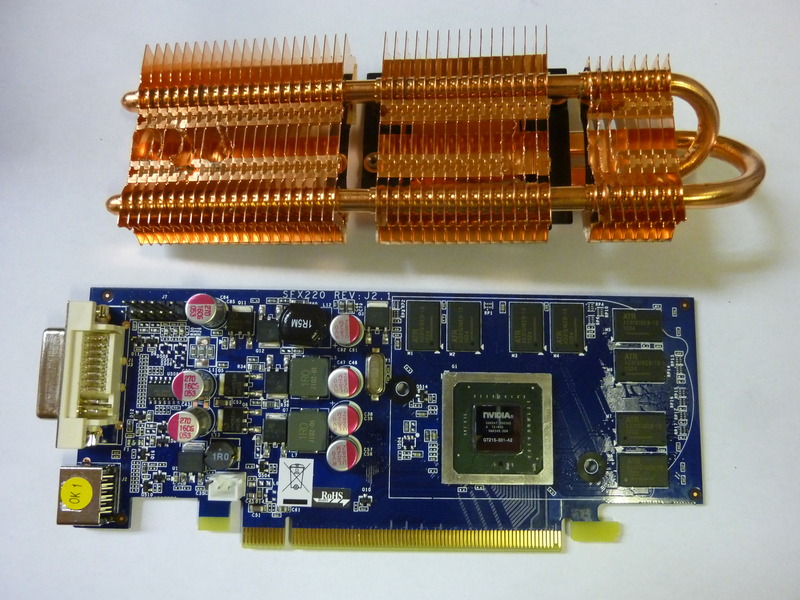
Since the GF 8400GS graphics card does not support WQHD I needed to upgrade the graphics card as well. As mentioned above a Geforce 210 based card would suit my space and low-power requirements. The only passively cooled, low-profile, single-slot, GF 210 based card I could find was the ECS Silent Series NSG210C-512QR-H, which is extra interesting because it uses DDR3 memory. Unfortunately it is difficult to buy this card at my (EU) location.
However, having already crossed the boundary of sawing of parts of brand new computer parts, I realized that the passively cooled, low-profile EVGA GeForce 210 could be used.
The heatsink of the EVGA GF 210 is about 8-9mm too tall for the SST-PT09B case. However, since the TDP of the GF 210 is comparable to the TDP of my GF 8400GS, it should be no problem to keep the GF 210 cool with a heatsink reduced to the size of that of the GF 8400GS.
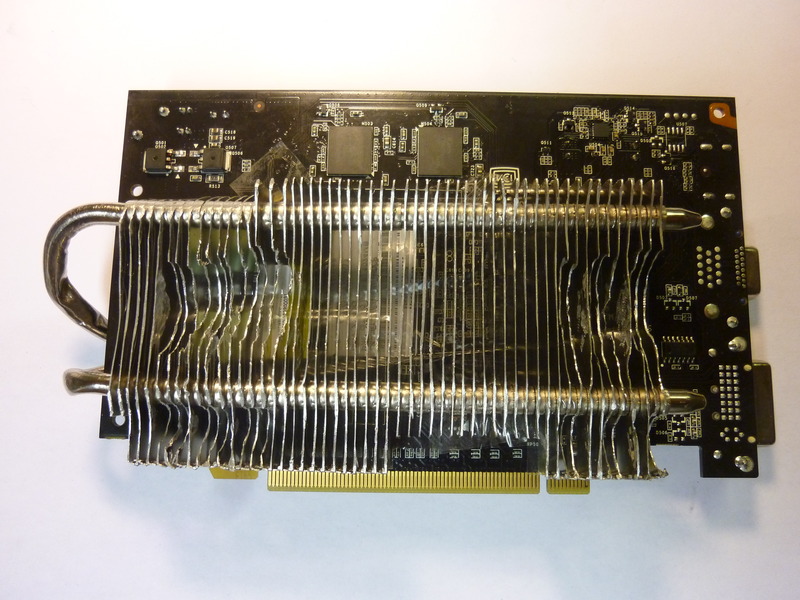
The EVGA aluminium heatsink weighs about 210g and consists of 30 fins protruding from a 5mm thick base. Fifteen of the fins have their base close to the circuit board (with thermal contact to the GPU), these fins have a height of about 26.7mm. For the other 15 fins the base is raised away from the board, those fins are about 13.0mm tall. Reducing the height of the fins by 8mm is thus a significant reduction of the overall heatsink surface. (Although the weight reduction is only about 30g).
Some practical notes on the EVGA GF 210 heatsink pruning:
- It is a good idea to first verify that the card works in a different PC: If the card turns out to be non-functional after the heatsink has been modified, an RMA will likely not work.
- Unscrew the heatsink from the graphics card before starting the sawing/filing.
- To save time a standard hacksaw with a bi-metal blade can be used to cut off about 6 or 7mm of the fins, depending on how accurately the saw is used.
- A file should be used for removing the last part of the fins, to create a new smooth and even levelled surface of the heatsink fins.
- Ideally the fins should all be reduced by exactly the same length (and the reduction of the EVGA GF 210 should be about 8mm to 8.5mm). This will allow the filed ends of the fins get in good thermal contact with the perforated side air outlet.
- To maximize the thermal contact between the heatsink and the case I considered applying thermal grease to the filed ends of the fins, but I decided against it, since I would have probably ended up smearing thermal grease all over the side air outlet.
- When the fins have been filed down by the right amount, it is important to remove every little piece of aluminium grain left on the heatsink. Unlike normal dust, the aluminium grains from the filing are electrically conductive and could thus wreak havoc if allowed to deposit themselves somewhere inside the PC.
- After remounting the heatsink on the circuit board (and don't forget the thermal grease), insert the graphics card. A submillimeter clearance between the heatsink and the case side can be removed by loosening the four screws that hold the mainboard and then shift the whole mainboard until the heatsink is in contact with the case side.
- As for the GF 8400GS the bracket needs some filing to allow for the alternative placement of the 12V connector. It turned out that the POV bracket fit well enough, so I just reused that one.
Performance of the Fourth Hardware Configuration:
While idle the PC consumes 54W, i.e. the GF 210 gives a 6W (@ 220V) reduction in power consumption over the GF 8400GS.
With the fan spinning at 455RPM the temperature increases over ambient (20C) are pretty much unchanged, except for the GPU which now runs 5C cooler:
- CPU: 14C
- PWM: 30C
- PCH: 30C
- GPU: 18C
The qvdpautest benchmark (with BCLK=145MHz) shows comparable surface bandwidth and decoding speed, while in the mixer part the GF 210 is significantly faster than GF 8400GS.
Also with the GF 210, playback of 10Mb/s H.264 video causes an increase in power consumption of about 6W (@ 220V).
Redoing the above (over)load test with the GF 210 and the fan spinning at 625RPM consumes 125W down from 134W with the GF 8400GS - but see also below.
Under this load the temperature increases over ambient (20C) are:
- CPU: 40C
- PWM: 40C
- PCH: 32C
- GPU: 29C
In spite of the significant reduction of the GPU heatsink surface, the graphics card upgrade has lead to a small (2C) decrease of GPU temperature and also to an as yet unexplained (4C) reduction of the PCH temperature.
The pruned EVGA GF 210 in place. (Bracket and air duct still to be mounted).
- A Samsung 256GB 2.5" MLC SSD SATA replaces the Intel Postville 80GB SATA SSD.
- An ECS Silent Series NSG210C-512QR-H replaces the EVGA GF 210. (I got the ECS card from Australia - but with shipping and import tax to the EU this is not generally recommandable).
- The (pruned) heatsink of the EVGA GF 210 card can be mounted on the ECS GT 210 card. The stock ECS heatsink has a larger surface (at least per unit weight), but the profiling of the EVGA heatsink may be better suited for the air flow in the Silverstone case - and the pruned EVGA heatsink outweighs the stock ECS heatsink with 180g versus 110g. A test of the pruned EVGA heatsink on the ECS card showed that it was no better than the stock ECS heatsink. So the stock ECS heatsink was remounted (with Arctic Silver 5).
- With help from Jean Delvare of the lm-sensors project I completed the voltage section of the sensors configuration, /etc/sensors.d/sensors.conf (see above).
- With the new sensor configuration (see above), I could see that the voltage on the 12V rail would drop by 640mV when the power consumption of the PC increased (by 4A) from idle to fully loaded. After a few experiments I concluded that the voltage drop was depending on the electrical resistance between my internal PW-200-M PSU and my external 12V PSU. By replacing the 12V power cord with a thicker and shorter cable, the drop was reduced to 128mV. (The voltage of the 12V rail changes in 64mV increments).
- Additionally, the sensor showed that the 12V rail was undervolted, with an idle voltage of 11.776V. I therefore adjusted the 12V output of my Mean well external PSU until the Pc sensor showed 12.032V on the 12V rail (The voltage of the 12V rail changes in 64mV increments).
- For good measure I also upgraded the 4 pin 12V P4-cable from the PW-200-M with an 8 pin cable. (To be exact, I found an 8 pin extension cable with two separate, male 4 pin connectors, so I kept the existing P4 extension cord, and soldered the second half of the new 8 pin cable onto the PW-200-M). This change had no effect on the voltage drop during the load test mentioned above.
- Although not strictly part of the PC I created some overhead light by connecting to the Mean Well 12V PSU a 1.4m strip with 84 white SMD LEDs yielding about 240 lumen drawing about 6W.
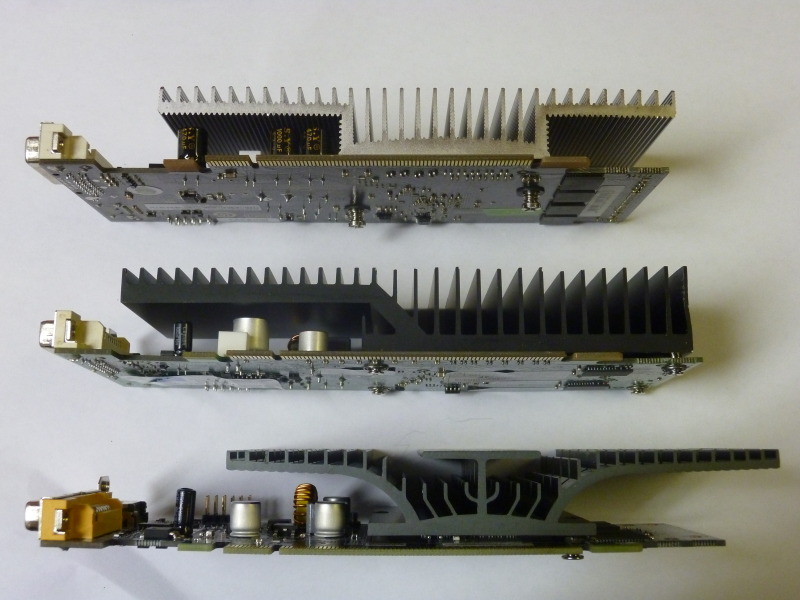
From top to bottom: the PoV GF 8400 GS, the pruned EVGA GF 210 and the ECS GF 210. (Brackets and VGA connectors removed).
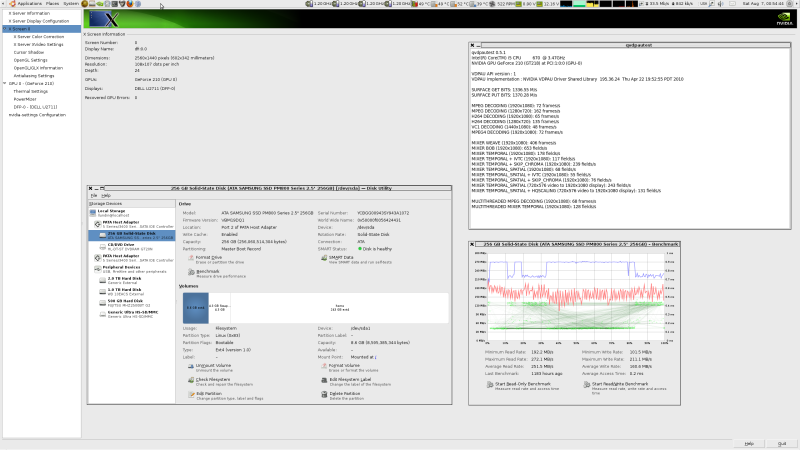
WQHD screendump w. Nvidia-settings, qvdpautest, disk utility and sensors (Click image for full size).
Performance of the Fifth Hardware Configuration:
- The above experiments with the MINI-Box PW-200-M 12V DC to 12V DC power supply show that the voltage of the 12V rail depends on the electrical resistance of the cable between the PW-200-M and the external 220V AC to 12V DC PSU. With a 4A increase of current on the 12V rail, the voltage drops by 128mV, suggesting that the 12V "sees into" a resistance of 32mΩ. The fact that the voltage drop is seen between the PW-200-M and the external PSU suggests that the 12V rail of the PW-200-M is unregulated. The producers knowledgebase confirms that the 12V rail of the PW-200-M is indeed unregulated.
- Having adjusted and improved the 12V supply, I redid the above overclocking experiments, with no change in the outcome.
- With the adjusted and improved 12V supply, the power consumption was reduced significantly. The idle consumption dropped to just below 4A at 12.22V (53W at 220V). With the fan spinning at 455RPM the temperature increases over ambient (20C) are:
- CPU: 13C
- PWM: 24C
- PCH: 24C
- GPU: 19C
- Similarly in the above (over)load test the consumption peaks at just under 8A at 11.97V (around 115W at 220V) with the fan spinning at 633RPM and these temperature increases over ambient (20C):
- CPU: 42C
- PWM: 38C
- PCH: 28C
- GPU: 32C
- The qvdpautest benchmark (with BCLK=145MHz) shows comparable surface bandwidth and decoding speed between the DDR2 and DDR3 based GF 210 cards, while for the various video mixer tests the DDR3 based card is up to 50% faster presumably due to the 50% higher bandwidth of the on-board memory.
- With the DDR3 based ECS GF 210, playback of 10Mb/s H.264 video causes an increase in power consumption of up to 12W (@ 220V), which is surprising since the power increase for the DDR2 based EVGA GF 210 is only 6W.
- In addition to qvdpautest, I decided to benchmark the GPU with a First-person Shooter game. I chose Nexuiz, because it is a standard package in Ubuntu, my Ubuntu 10.04 comes with Nexuiz version 2.5.2. The following settings were modified from the default: Screen resolution set to 2560 x 1440, the frames/second indicator was enabled, and the frame rate was measured while moving around in level 2. Depending on the setting of the video effects the framerate are:
- Normal: typical: 43, extremes: 33-53
- High: typical: 12, extremes: 9-15
- Ultra: typical: 4, extremes: 1- 9
Since the power draw with a properly adjusted power supply is less than 8A, there is plenty of capacity for a GPU upgrade. The currently installed GeForce 210 card has a TDP of 30W. The GeForce 240 has a TDP of 69W, i.e. about 40W more. The next step up would be a GeForce GTS 250 with a TDP of 150W, i.e. an increase of up to 120W which would probably be too much both in terms of power draw and in impact on the cooling. Also, the GeForce GTS 250 is based on a 55nm process, while the GeForce 240 is based on a 40nm process, so the GeForce GTS 250 would not use the extra power that efficiently.
- The Sparkle SXT2401024S3L-NMP is a GeForce 240 based card with DDR3 memory and cooling via two heat-pipes that dissipate their heat on the back-side of the card. This card replaces the previous GF 210 based card from ECS.
In trying to mount the Sparkle card the end-points of the CPU-heat-pipes collide with the GPU cooler. This can be
fixed grinding away a bit of the GPU cooler. The next obstacle is that the end-point of the lower Sparkle heat-pipe collides with casing of the motherboard analogue audio socket. Instead of cutting away part of this casing on the expensive motherboard, the "U-turn" part of the heat-pipes can be bent a bit instead. The grinding of the cooler should be done only after unmounting the cooler from the graphics card and after peeling off the adhesive insulation from the heat-sink. Otherwise the electrically conductive tiny pieces of ground off cooler may later short-circuit parts of the graphics card.
Performance of the Sixth Hardware Configuration:
With the above mentioned bending and grinding, it was still difficult to mount the card completely vertically. Additionally, I was also more interested in a GeForce 240 card with memory faster than DDR3. For this reason I decided to benchmark the PC without the improvised air duct and therefore without (comparable) temperature readings. Instead I decided to get a GDDR5 based GeForce 240 card, see below.
- The qvdpautest benchmark (with BCLK=145MHz) shows comparable surface bandwidth and decoding speed between the DDR3 based GF 210 and GF GT 240 card, while for the various video mixer tests the GT 240 based card is faster by a factor 2.2 to 3.8.
- The frame rates in the above Nexuiz test are:
- Normal: typical: 140, extremes: 85-195
- High: typical: 31, extremes: 21- 41
- Ultra: typical: 12, extremes: 8- 21
- In the above (over)load test the consumption peaks at around 9.5A at 11.97V (around 135W at 220V), i.e. an increase of about 20W compared to the DDR3 based GF 210 card.
The Sparkle SXT2401024S3L-NMP with VGA connector and bracket removed and the cooler unmounted. Parts of the cooler has been ground off to make space for the end points of the CPU heat pipes.
The solution is to replace the cooler with a heat-sink cooler that fits in the narrow space between the CPU cooler and the back-side of the graphics card with heat-pipes that pass from the front to the back side of the card in the same fashion as the Sparkle SXT2401024S3L-NMP. The mounting holes of the cooler from the Sparkle SXT2401024S3L-NMP are not compatible with those of the Sparkle X240G card. I therefore looked for an older graphics card with a heatsink that would fit my purpose.
One such cooler that looks promising is that of the Sapphire ATI HD 2600 XT Ultimate, another is that of the MSI R3650 Radeon HD 3650. After only a few days I purchased a used MSI card on ebay for about 20 Euro (incl. shipping).
Although the mounting holes of the MSI card are compatible with the Sparkle X240G card, the following issues must be resolved:
- The mounting bracket of the MSI card is too small for the holes of the Sparkle X240G card.
- The MSI cooler extends above the graphics card, i.e. collides with the cover of my Silverstone case.
- The MSI cooler is too thick causing it to collide not only with the end-points of heat-pipes of the CPU-cooler, but also with the CPU cooler itself.
- The upper MSI heatpipe makes its "U-turn" too high, causing it collide with the Silverstone drive bracket. This is fixed by carefully bending the heat-pipes where the make their "U-Turn".
- A couple of fins of the "lowered" MSI cooler collide with the closing mechanism of the RAM slots.
- Other fins of the "lowered" MSI cooler collide with the plugs going into the internal USB-connectors.
- Only two of the three SATA connectors can be used since the third connector would collide with the lower MSI heatpipe.
Substantial parts of the fins of the MSI cooler are removed using a jigsaw, a file, sand paper and various milling cutters mounted in a drill press. On the bright side this reduces the weight of the cooler so much that a mounting bracket is no longer required, and the cooler can thus be mounted closer to the graphics card. To prevent the cooler from creating short-circuits on the graphics card, the side of the cooler that faces the graphics card is covered with adhesive insulation, as Sparkle do it with their SXT2401024S3L-NMP.
The heatpipes must be bent with great care: If a heat-pipe ruptures or collapses completely the whole cooler is ruined. As long as a heat-pipe does not collapse, it is less important if its cross-section area is reduced in places. What is important is that the circumference of the heat-pipe is not reduced, since the liquid phase of the coolant flows along the inner surface of the heat-pipe.
The cooling capability of the heat-pipes after the modification is verified by heating the mounting plate and checking that the ends of boths heat-pipes become warm.
With only two SATA connectors available the SATA cable of the card reader is not used, leaving the eSATA port of the card reader inactive.
Performance of the Seventh Hardware Configuration:
- The idle consumption is just below 4A at 12.22V (58W at 220V, i.e. just 5W more than with the ECS GF 210). With the fan spinning at 441RPM the temperature increases over ambient (19C) are:
- CPU: 11C
- PWM: 22C
- PCH: 27C
- GPU: 19C
- Similarly in the above (over)load test the consumption peaks at around 11A at 11.97V (around 154W at 220V) with the fan spinning at 693RPM and these temperature increases over ambient (19C):
- CPU: 41C
- PWM: 47C
- PCH: 48C
- GPU: 45C
- The qvdpautest benchmark (with BCLK=145MHz) shows comparable (slightly higher) surface bandwidth and decoding speed between the GDDR5 and DDR3 based GF GT 240 cards, while for the various video mixer tests the GDDR5 based card is faster by a factor 1.2 to 2.1.
- The frame rates in the above Nexuiz test are:
- Normal: typical: 220, extremes: 160-310
- High: typical: 65, extremes: 50- 87
- Ultra: typical: 25, extremes: 12- 48
This means that the GDDR5 based GF GT 240 card can be used for (some) gaming even with a very large (WQHD) screen resolution.
Comparing the (over)load test with that of the ECS GF 210 shows in increase in power consumption of 36W (3A at 12V). With the fan spinning 10% faster than when benchmarking with the ECS GF 210 card, the CPU is 1C cooler, but the GT215 GPU runs 13C warmer than the GT218. Also the PWM and especially the PCH are significantly warmer, 9C for the PWM and a whopping 20C for the PCH.
The temperature increases for the PWM and PCH can be explained by the fact that they are now cooled exclusively with air that has already been absorbing heat from the CPU and GPU coolers. A second difference is that the air that cools the GPU cooler now flows below the CPU cooler past the PCH cooler.
Sparkle Calibre X240G without bracket and with a heavily reduced heat-sink cooler from a MSI R3650 Radeon HD 3650.
- A Thermaltake Extreme Spirit II heat-pipe cooler with the fan removed replaces the Zalman ZM-NB32K Northbridge Chipset Heatsink.
- An Alpenföhn 140mm Wing Boost PWM-fan replaces the Scythe Slip Stream SM1425SL 12LM-P fan.
- An older, well-built moving iron 10A ammeter with 0.2A markings replaces the 20A ammeter which had only 0.5A markings.
The Extreme Spirit II (ES-II) north-bridge cooler is four years old and no longer that easy to find. But I got one for 25 Euro (incl. shipping) and found its combination of compact size, large surface with 25 fins and massive base appealing. Without the fan and the fan bracket, it consists of 130g copper.
The ES-II is obviously too tall to fit underneath the CPU-cooler but compared with the work required for the GPU cooling that was easily fixed.
I first inserted a long screw into the upper mounting hole for the fan bracket through the 14 upper fins, making them more rigid. I similarly reinserted the screw from the lower mounting hole for the fan bracket through the lower 7 fins making them rigid as well.
I then mounted the upper 14 fins between two thin pine-boards and carefully pressed on the lower 7 fins, causing the heatpipes to bend around the middle 4 fins. I also bent the heatpipes between the base and the lower fins a bit.
This caused the heatpipes with the upper 14 fins to be horizontal instead of vertical, reducing the height of the cooler to 44mm which allows it to fit underneath the CPU cooler, see photo.
The ES-II was mounted with its upper fins (pretty much) parallel to those of the CPU cooler, since this allows the air to flow both down and from the direction of the GPU towards the opposite side air outlet. The mounting works best with the end-points of the heat-pipes pointing towards the RAM. Still, the mounting bolts needed to be shortened by about 3mm and the taller nuts that came with the ES-II replaced with standard eight (and 3mm diameter). Additionally, the edge of the upper fins that face the CPU socket had to be filed down, to not collide with the heat-pipes of the CPU-cooler, see photo.
Unlike the Scythe fan, the Alpenföhn 140mm Wing Boost PWM-fan is a stand alone fan. It it less noisy, perhaps due to a combination of its hydraulic bearings, its rubber-covered frame, and its so called Wing Boost blade design. At 550 RPM it is still inaudible at 1m distance. Additionally, it can spin as slowly as 300 RPM at 12V. Since the frame is fully 140mm by 140mm about 15mm of the drive bracket has to be cut away to fit it.
Although the PC can draw just over 10A at full load, the moving iron ammeter has the advantage 0.2A markers and of a higher spacing of the markers in the typical range of the current from 4A to 8A. The new ammeter has a poor resolution below 3A, but this is below the idle draw. The new and old ammeters were verified to indicate the same current to the 0.5A precision of the old model. See photo.
Performance of the Eighth Hardware Configuration:
- The idle consumption is 3.8A at 12.22V (58W at 220V, i.e. just 5W more than with the ECS GF 210). With the fan spinning at 457 RPM the temperature increases over ambient (19C) are:
- CPU: 13C
- PWM: 29C
- PCH: 31C
- GPU: 21C
- In the above (over)load test the consumption peaks at around 10A at 11.97V (154W at 220V) with the fan spinning at 760 RPM and these temperature increases over ambient (21C):
- CPU: 43C
- PWM: 47C
- PCH: 44C
- GPU: 49C
- With the GF 240, playback of 10Mb/s H.264 video causes an increase in power consumption of about 6W (@ 220V) as with all but one of the previous cards.
Thermaltake Extreme Spirit II without fan bent to fit underneath the CPU cooler.
The bent and filed Thermaltake Extreme Spirit II fitted underneath the CPU cooler. The filing visible on the right side of the ES-II was an experiment and is not necessary for the current mounting.
Front view without case lid and drives and with the front plate tilted down showing the modified GPU cooler and the cables around it. Note how the cables do not obstruct the view (through the open DVD tray) of the BIOS display.
Top view w/o case lid showing rear part of card reader (without SATA cable and therefore an inactive eSATA port), the Sparkle X240G card with its modified cooling and the (spinning!) Alpenföhn fan.
- Samsung 256GB 2.5" MLC SSD SATA (replaces the Intel 80GB SSD)
- Sparkle Calibre X240G card modified with a reduced heatsink cooler from a MSI R3650 Radeon HD 3650 card (replaces the other Nvidia card)
- Alpenföhn 140mm Wing Boost PWM-fan (replaces the Scythe Slip Stream SM1425SL 12LM-P fan)
- Thermaltake Extreme Spirit II northbridge cooler
- Thermalright HR-09 Type 4 MOSFET heatsink
- Silicone for HR-09 mounting
- Duct tape for air duct
- MINI-Box PW-200-M 200W P4 DC-DC ATX 12V internal PSU
- Mean well 200W 220V AC to 12V DC external PSU
- 30cm 8 pin P4-ATX extension cord
- 40cm Hitachi SSX-102K LC-OFC speaker cable for internal 12V PSU
- 10A moving iron ammeter
- Cable shoes for ammeter connection
- Internal 12V socket
- eSATA + USB card reader
- Four 16mm x 3mm bolts for card reader mounting
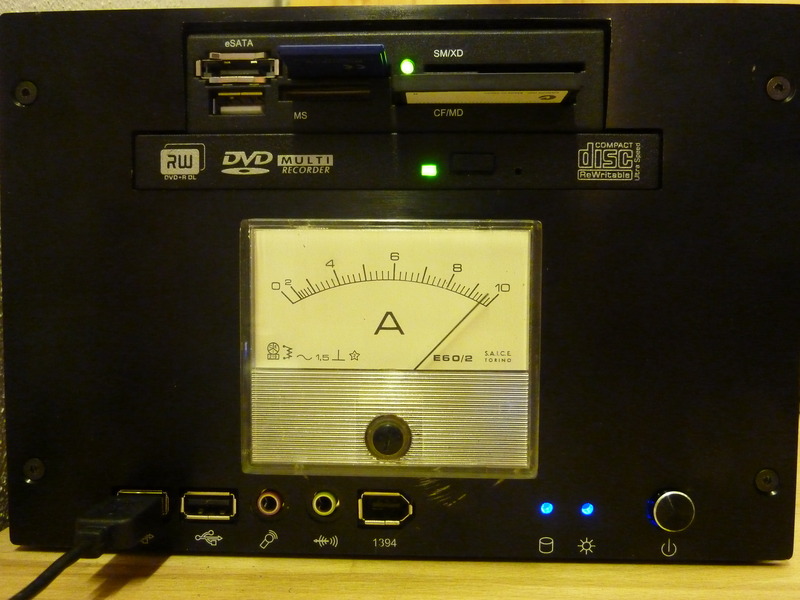
Personalized Computer under full load with moving iron ammeter (at 9.6A), spinning DVD and card reader with SDHC and CF cards.
Possible Modifications/Variations:
- CPU upgrade: The Intel Core i5-670 could be upgraded to an i5-680 (with clock multiplier 27 up from 26).
- GPU downgrade: Since 10Mb/s HD playback works perfectly with the ECS Silent Series NSG210C-512QR-H, the X240G card is only needed for gaming or other GPU intensive applications, such as CUDA. In other cases a downgrade to a GF 210 based card would reduce power-consumption and cooling requirements. I have qvdpautested these cards.
- GPU upgrade: Any successor to the GeForce GT240 with a reasonable TDP would be a candidate for an upgrade. The currently available GeForce 400 series (40nm like the GT240) have TDPs at 49W (GF108) and 106W (GF106).
- Service holes for heatsink removal: For CPU replacement or any other work that requires removal of the AXP-140 heatsink, the PC has to be totally disassembled including removal of the mainboard. Drilling four (10mm) holes in the bottom of the case will allow removal of the AXP-140 without removing the mainboard. I opted not to do this, since the advantage of being able to leave the mainboard in place would be negligible since it would be pretty much the last component left in the case if the AXP-140 had to be removed.
- Find a way to restore the original BIOS to allow more flexibility in over-clocking.
That's it!
Actually, no. This page is a work in progress and will likely be updated with some performance results and hopefully new ideas.
But to conclude on the PC itself: I am very satisfied with my new personalized PC since its performance suits my mathematically inclined computing needs very well, without noise and without taking up too much space.


