This guide describes how to install the ELT Development Environment (a Linux platform).
The guide includes the installation of standard (typically third-party) packages that are
supported in the DevEnv.
The guide does not include the installation of ELT Control System infrastructure software
(e.g. the ELT COmmon Software, ECOS), links to which are provided at the end of this guide.
The ELT Linux DevEnv is based on AlmaLinux (public Linux distribution from the The AlmaLinux
OS Foundation). AlmaLinux is a the RedHat Linux rebuild.
Therefore AlmaLinux can be installed on most relatively-modern bare-metal computers with
x86_64 architecture (Intel, AMD) like laptops, desktops or servers that support at least
the x86_64v3 microarchitecture (indicatively >= year 2010). Alternatively AlmaLinux can
also be installed on virtual machines (VM) under Intel-based hypervisors like commercial
VMware or public ones like VirtualBox.
The installation of DevEnv is based on Ansible, an open-source configuration
management tool. The RPM elt-devenv-ansible contains the Ansible playbooks and scripts to
complete and verify the DevEnv installation, consisting of:
Installation of supporting RPMs
Configuration of services
Creation of user accounts for software development
The current release of the ELT Linux DevEnv is based on the original AlmaLinux image with a
minimal installation of software packages or RPMs (RPM Package Manager).
The real DevEnv installation consists in the download and installation of software packages
relevant to the development of the ELT project. Most of these packages (RPMs) were
originally retrieved from public AlmaLinux and EPEL (Extra Packages for Enterprise Linux)
repositories. In addition to these RPMs, the DevEnv also installs other public-domain tools
and ESO packages not available at public repositories. The process should guarantee the
same result in DevEnv installations done at ESO or by external contractors.
Traceability: For testing and support purposes it is necessary to provide a mechanism that
can retrieve and install any of the previous releases of the DevEnv. In reality it means to
have access to all RPMs referred by previous installations of the DevEnv. For this reason,
the DevEnv cannot rely on public repositories like AlmaLinux and EPEL; they do not support
traceability as old RPMs might be removed with new ones.
The DevEnv installation process has to rely on it:
At our ESO/ELT repositories we combine the packages downloaded from AlmaLinux release
and updates, and with those packages developed at ESO. With new releases of
the DevEnv new RPMs are accumulated to our repository; old RPMs are never removed.
This repository is also the official channel to provide minor and patch releases to the DevEnv
(A major release, e.g. a new OS, will require a new repository).
The minimum requirements for the installation of the ELT Linux DevEnv are:
4x CPUs x86_64 (Intel or AMD)
8GB RAM
40 GB disk
1x NIC
HW compatible with AlmaLinux
Depending on your own requirements, e.g. disk-space, number of users, heavy usage of
GUI components etc. or in your current HW configuration these requirements should be
exceeded.
Configuring BIOS for low latency environments (RT)
If you plan to use the host for real-time applications (RT) you may need to set your BIOS
options for low latency. Please notice that factory BIOS defaults are optimized to provide a
good balance between performance and power efficiency for general-purpose
environments. However there are environments where you many need to optimize your
hardware for maximum throughput or lowest latency to provide optimal responsiveness
where real-time responses are needed.
The available BIOS options may vary, depending upon server model, processor/memory
architecture, and BIOS revision. You have to consult your Hardware Owner’s Manual for
more details.
For Dell PowerEdge 12th Generation Severs please follow recommendations for low latency
as indicated in Dell document:
AlmaLinux installation documents. There are many web pages that describe the
server minimal AlmaLinux installation step by step, snapshots included. Here just a
few of them:
OS installation details are not part of this document and some screenshot may refer to
previous AlmaLinux base versions. Please use any of the many documents
already available in the web (see any of the list in the OS documentation section above).
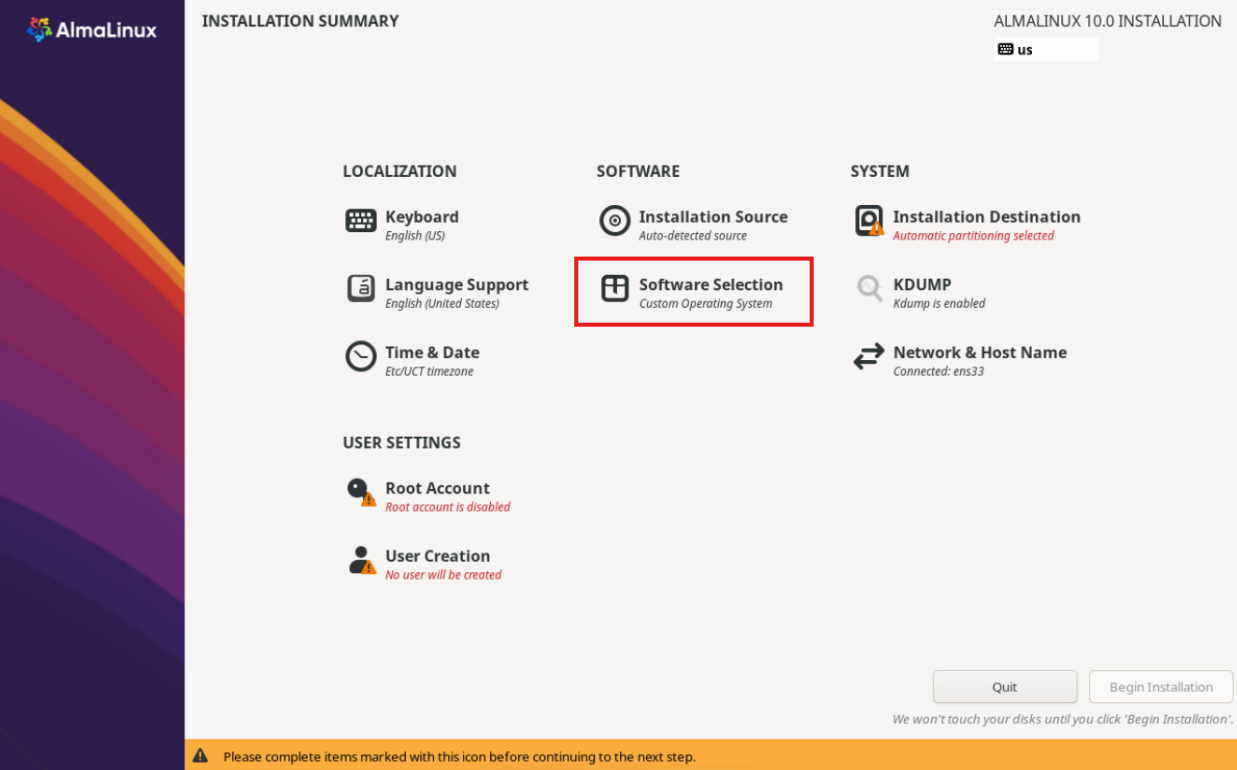
The ELT DevEnv requires the following setting (in bold text where input is required):
LOCALIZATION
DATE & TIME: Etc/UTC
KEYBOARD: English (US)
LANGUAGE SUPPORT: English (United States)
SECURITY
SECURITY POLICY: No profile selected
SOFTWARE
INSTALLATION SOURCE: Local media
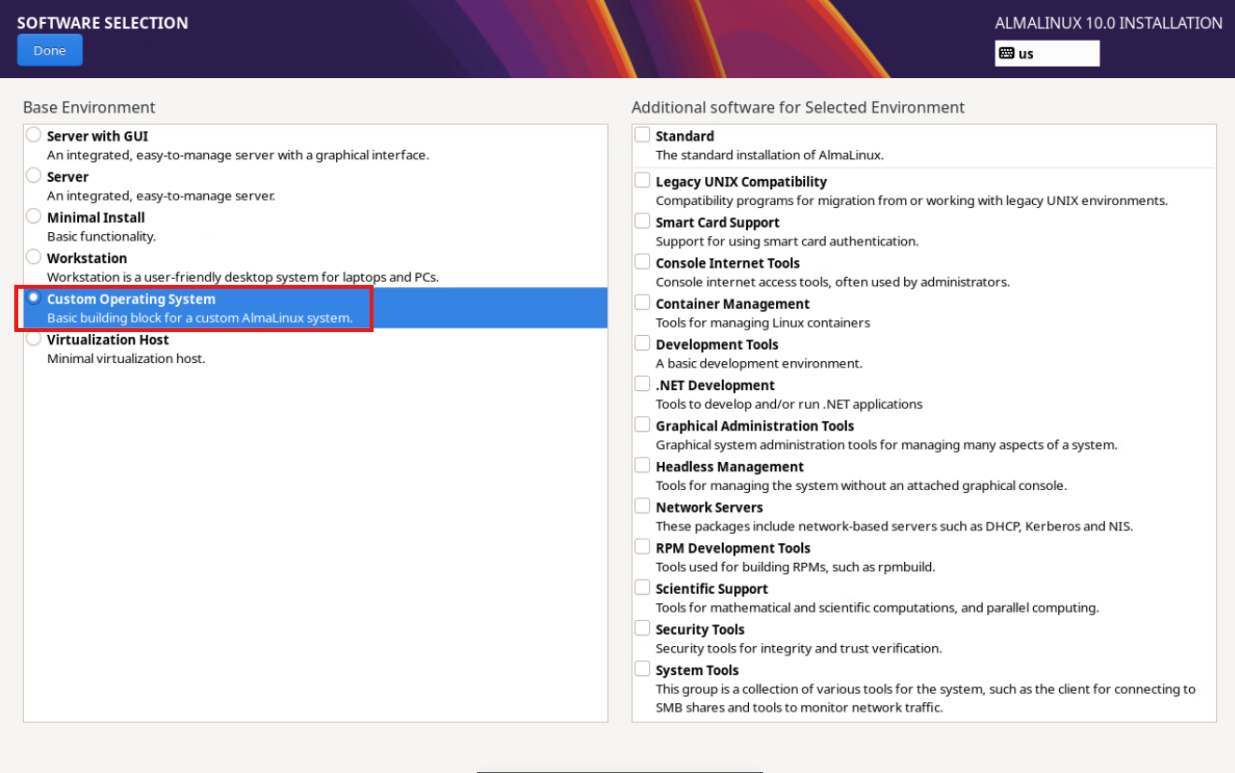
SOFTWARE SELECTION: Custom Operating System
SYSTEM
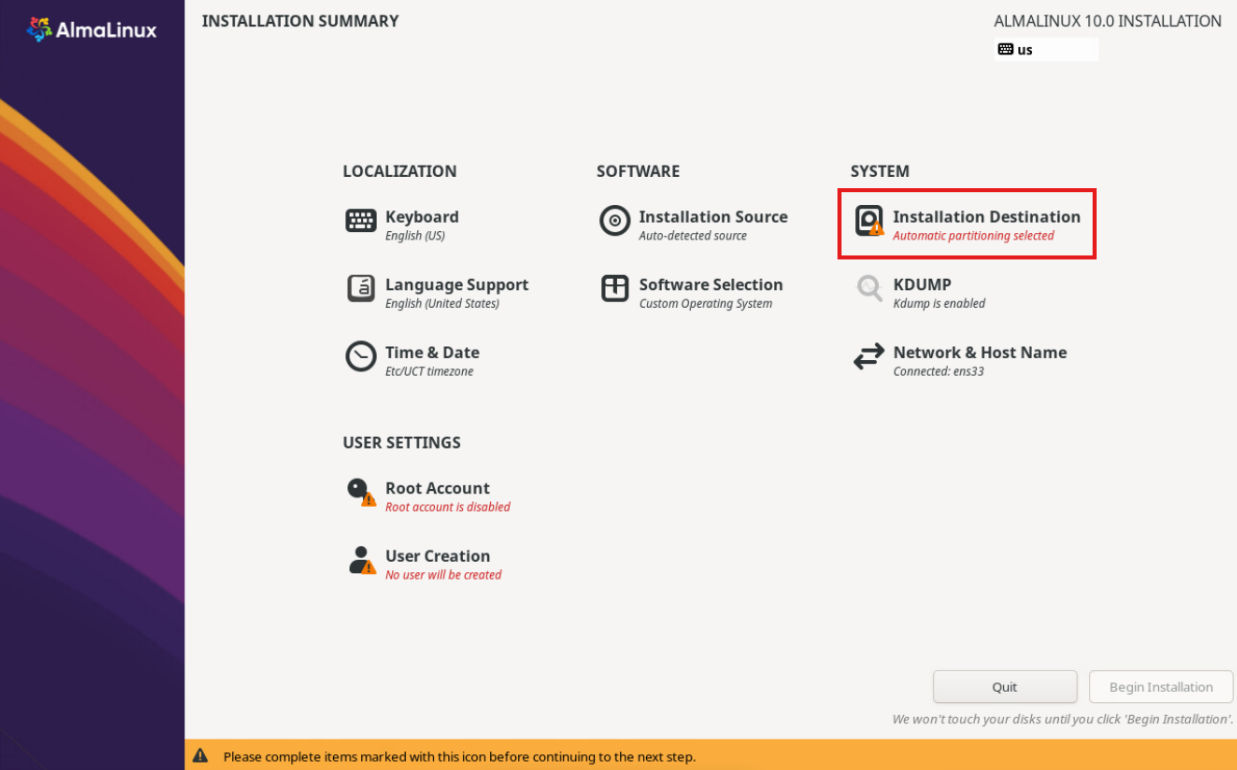
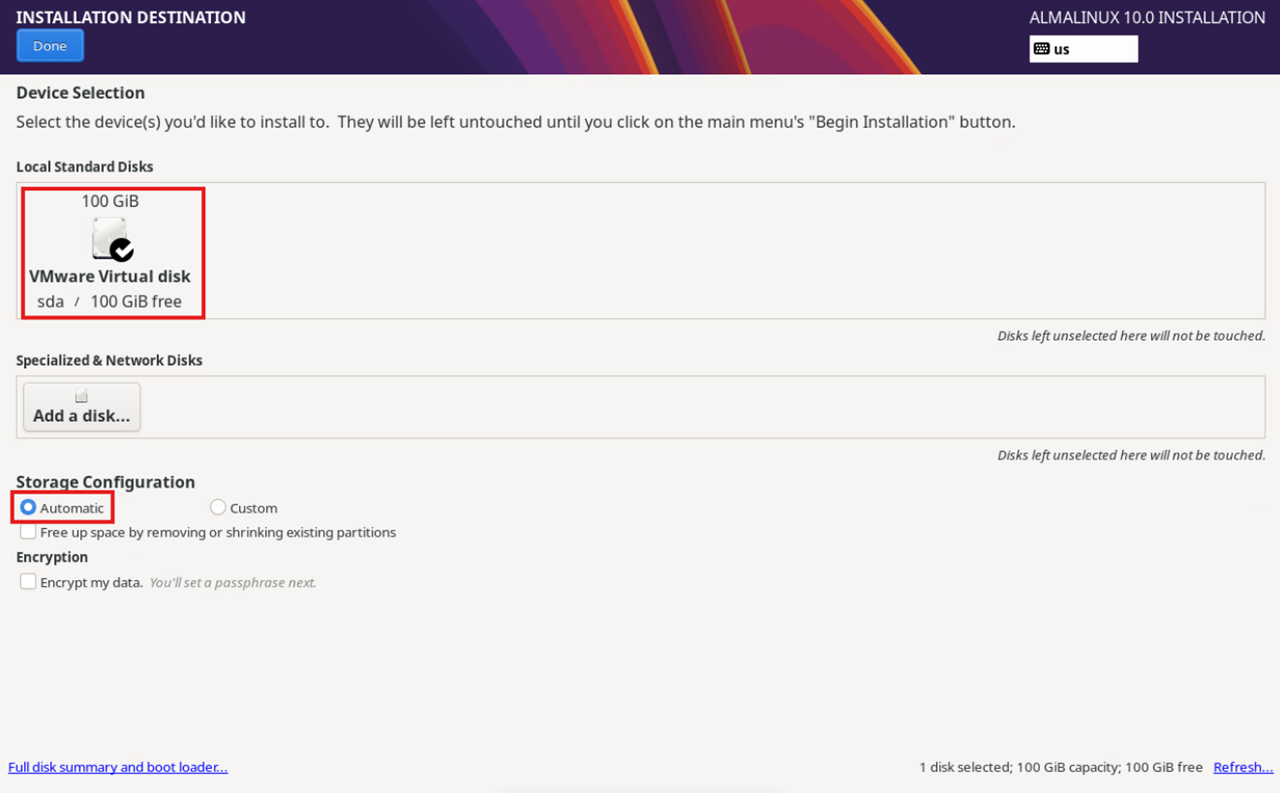
INSTALLATION DESTINATION: Select the disk for the OS installation. Choose also the storage configuration Automatic as described below (Custom variant is described after this section):
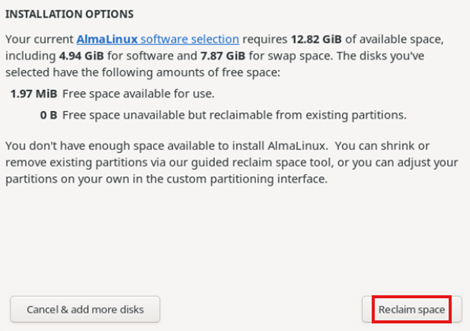
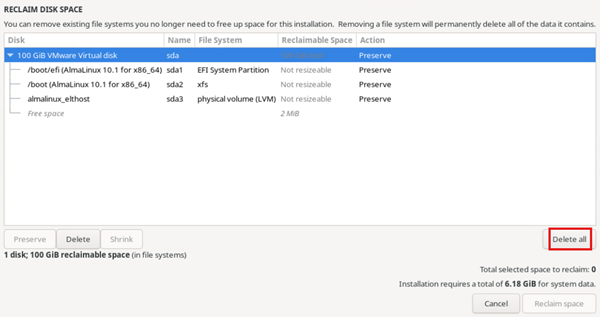
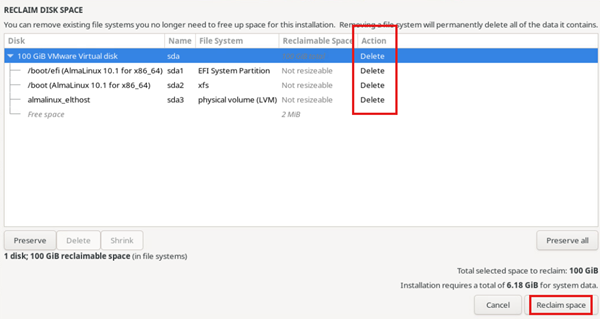
If your selected disk for the OS is already partitioned (e.g. from a previous
OS installation) you might need to delete the existing partition table and
reclaim the disk space for the new OS. Just follow this sequence:
For disk exceeding 200GiB, Custom Storage Configuration is preferable. Suggested partition and logical volume sizes:
This configuration allows for expansion of specific logical volumes in case needed, see Increase Filesystem.
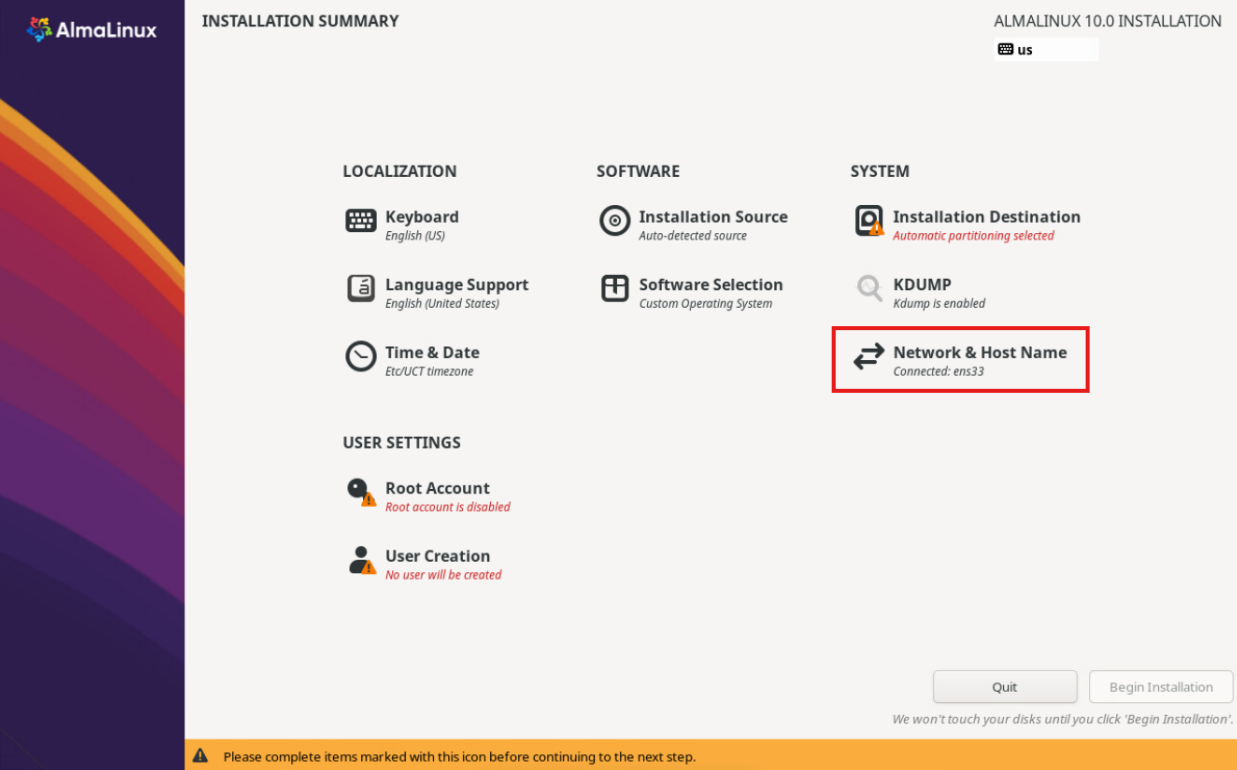
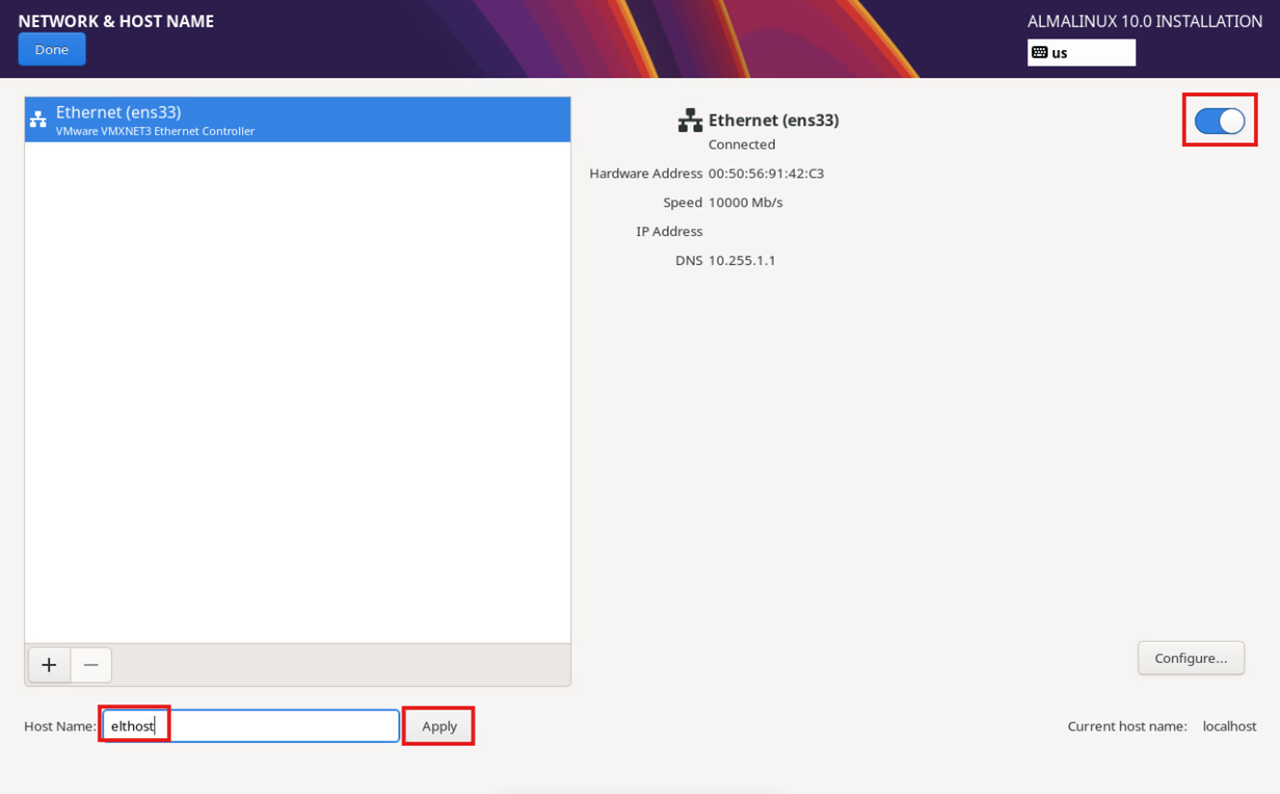
NETWORK & HOSTNAME: Select your NIC, activate it, and select a hostname (e.g. elthost):
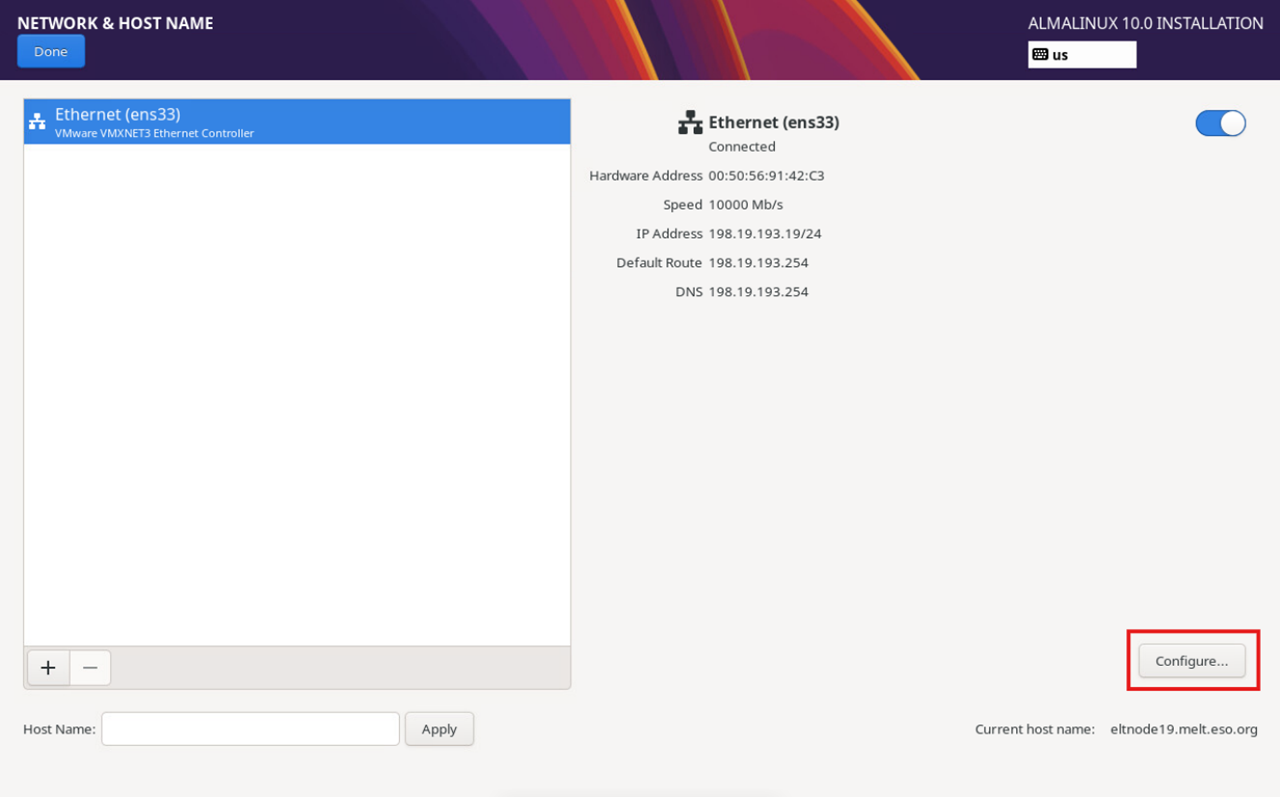
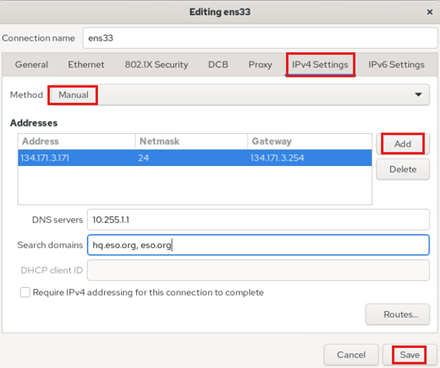
By default, the NIC is configured with DHCP. If DHCP is what you need
(e.g. your elthost is a VM on your Desktop/Laptop) then you are done. If
you need to give the VM a static IP address you can go in the configuration
window:
USER SETTINGS
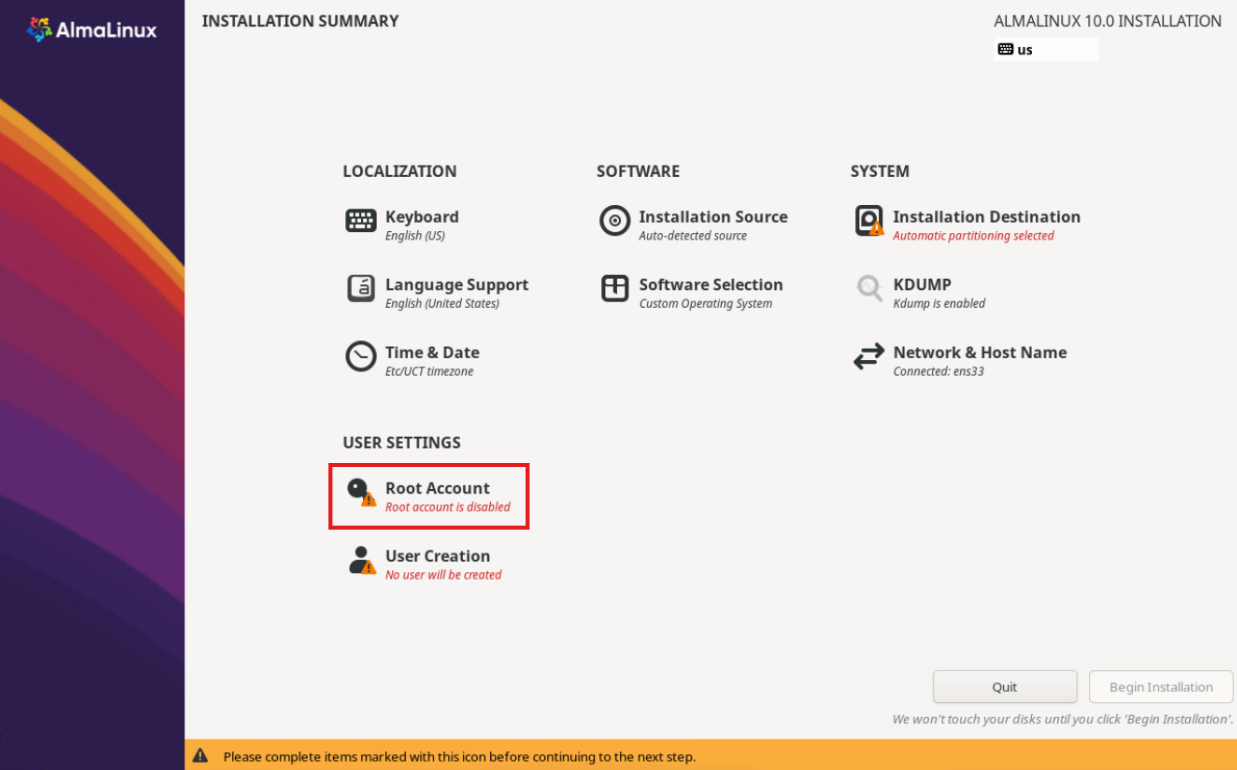
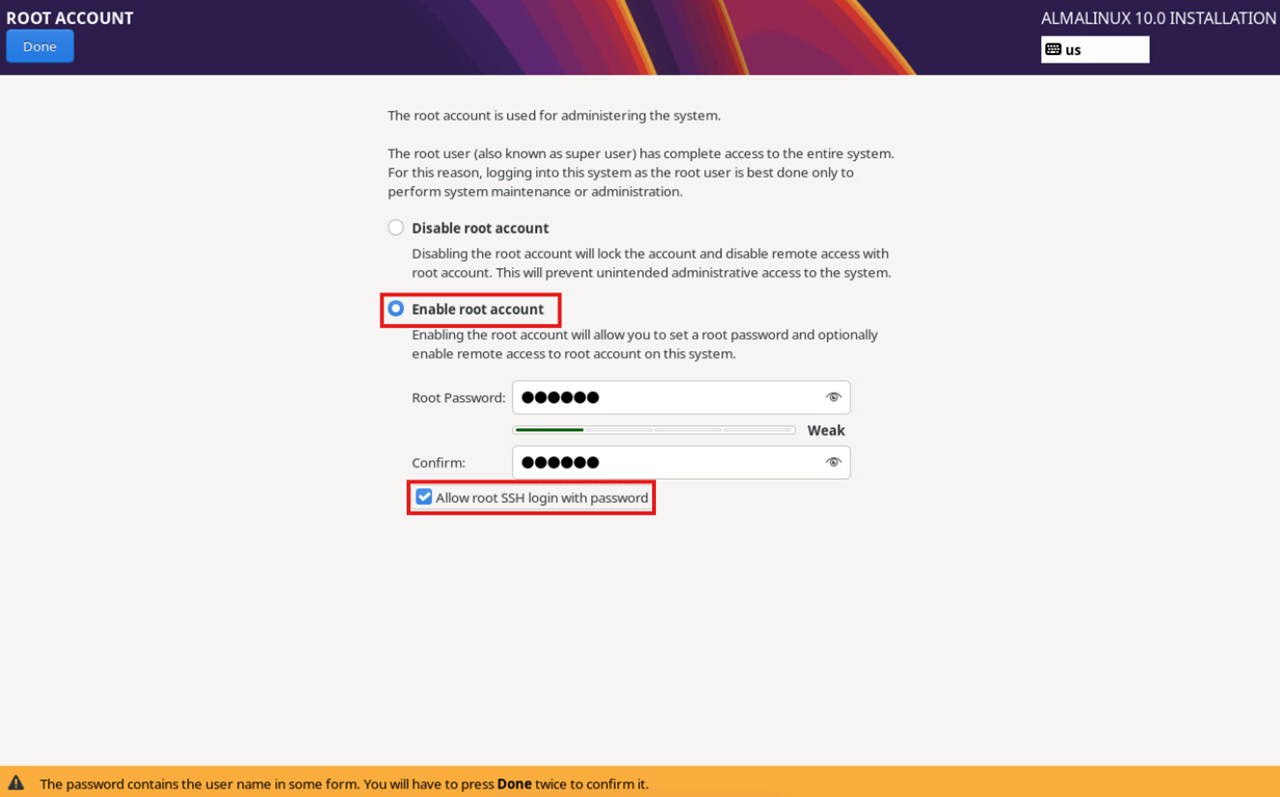
ROOT ACCOUNT: Enable root account, set root password and Allow root SSH login with password.
Do not create any other user account at this time.The ELT DevEnv installation will create later accounts eltdev and eltmgr automatically.
2. Commence Installation
When above selections are completed
3. Finish Installation and Reboot
Note: You might need to stop the system and dismount the DVD before rebooting. In same cases, the DVD remains mounted and
next reboot will bring you back to the AlmaLinux installation.
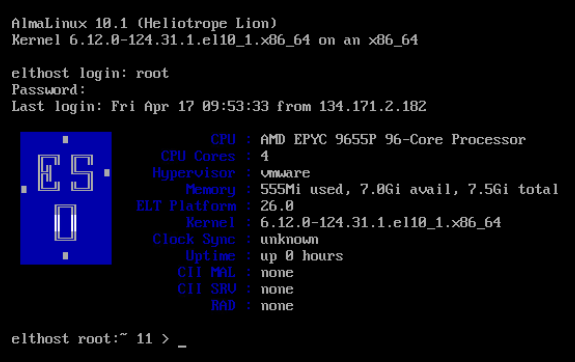
After rebooting the system will presents the following text prompt:
AlmaLinux 10.2 (Lavender Lion)
Kernel 6.12.0-211.7.3.el10_2.x86_64 on an x86_64
elthost login:
Login as root with the password selected during the OS installation:
elthost login: root
Password: <your_password>
Last login: <date & time> on tty1
IMPORTANT: DO NOT execute any “dnf update” in this Minimal Server Installation as you
might get newer RPMs than those required in our DevEnv distribution.The installation of
DevEnv is unable to downgrade them. If this happens you have two alternatives: remove
the newer RPMs by hand (it is risky and not always possible), or start the installation from
the beginning.
4. Increase Filesystem
The default partition table only allocates 15GB for the “/” partition, leaving the
rest of the disk free. You can increase the “/” partition to the full disk size with the following
sequence:
In similar way other partitions previously created can be resized if there is available space in the logical
volume by pointing to the correct volume. Below example shows how to check available volume group size,
logical volumes current sizing and how to extend “/home” volume by 25GiB with filesystem resize:
[root@elthost ~]# vgs
VG #PV #LV #SN Attr VSize VFree os 1 4 0 wz--n- <930.01g 730.10g[root@elthost ~]# lvs
LV VG Attr LSize Pool Origin Data% Meta% Move Log Cpy%Sync Convert home os -wi-ao---- 64.00g root os -wi-ao---- 64.00g swap os -wi-ao---- <7.91g var os -wi-ao---- 64.00g[root@elthost ~]# lvextend/dev/mapper/os-home-r-L+25G
5. Access the internet
To complete the ELT Linux installation is necessary for the machine to have access to
internet. If the network configuration during the OS installation was skipped or incomplete
you can still configure hostname and IP address with commands:
[root@elthost ~]# hostnamectlset-hostname<hostname>
[root@elthost ~]# nmclidevice# to see available NICs[root@elthost ~]# nmcliconnectionmodify<device>ipv4.addresses<IP>/<mask>
[root@elthost ~]# nmcliconnectionmodify<device>ipv4.gateway<IP>
[root@elthost ~]# nmcliconnectionmodify<device>ipv4.dns<IP>
[root@elthost ~]# nmcliconnectionmodify<device>ipv4.dns-search"<comma-separtated list of qualified names>"[root@elthost ~]# nmcliconnectionmodify<device>ipv4.methodmanual
[root@elthost ~]# nmclidevicereapply<device>
Example of the configuration of host eltint63 at ESO:
If you are installing the ELT DevEnv as a VM on a local hypervisor as VirtualBox or VMware
Worsktation, please notice that the network card of your VM can be created basically with
two options:
NAT: The guest VM shares the IP of the host. With the internet access of the host but the guest is isolated from the world. The guest is typically configured with DHCP. This is the default.
Bridged: The guest VM has direct access to the network card of the host. With your own internet access and the guest can be accessed from the world. You can chose DHCP or a static IP.
With the minimal installation of AlmaLinux completed and with the system connected to the internet
it is now possible to install ELTDevEnv and execute installation scripts corresponding to the latest release.
To install ELTDevEnv execute the following:
The script may takes 40 minutes or more to complete; it depends largely on the internet
speed and the connection to the ESO/ELT repository.
The procedure will always generate a log-file that can be used in case of problems. The
log-file contains detailed information about each step performed and is located in the /tmp
directory. The log-file is named elt-ansible-YYYYMMDD.log where YYYYMMDD is the
string describing the year, month and day of execution.
Reboot the system after a successful DevEnv installaltion
Very likely, DevEnv installation will install a new kernel that will only becomes active at
the next reboot of the system. So to complete the installation, please always reboot the
machine:
If you need a particular variant of ELT DevEnv there is an environment variable
defining it. The name of the variant has to be exported before proceeding with the
effective installation. If nothing is indicated, the Ansible installation assumes these
default is:
ELT_ROLE=ELTDEV
The values of ELT development variables is saved by the installation script in the shell
profile configuration file: /etc/profile.d/eltdev.sh. It will be loaded in the environment
with the next login in the system as a reminder of the current installation. You can still
change the configuration, with certain limitations, by re-exporting a new value and re-
executing the script /root/elt/ansible-force-align. See the different options below.
It defines the scope of the installation. The currently known variants for the ELT_ROLE in
the DevEnv are:
ELTDEV: Software development workstation. Includes tools and packages necessary for a standard developer. This is the default choice if nothing is indicated.
MINIMAL: A minimal installation, for use in specific hosts (e.g. Jenkins or in operations). It is subset of ELTDEV.
The ELT Linux DevEnv is defined by the environment variable $ELT_RELEASE. It follows
standard numeration major.minor.patch-iteration, where an increase in:
The major number indicates a considerable change largely affecting the complete DevEnv, e.g. with a new OS. (2: CentOS-7, 3: CentOS-8, 4: Fedora-34, 5: Fedora-38, 6: Fedora-40, 7: AlmaLinux-10).
The minor number indicates a change affecting important components of the DevEnv, like toolkits or their releases.
The patch number will be used to fix a severe bug of a minor release.
To know which release of the DevEnv is installed on any system execute:
[root@elthost ~]# echo$ELT_RELEASE
The release is also indicated in the login welcome message at /etc/motd.
The first command is needed to dowload the latest metadata from repositories. The option
–showduplicates will list all available releases in the repository; and in green font the
current release. You can install an upgrade to any newer release by explicitely indicating
that release:
With updates you might get new kernels, therefore it is always recommended to reboot the host after
the upgrade. At least, users of the system will have to logout/login to reload the new enviroment.