 Photographing spectra
  Photographing spectra
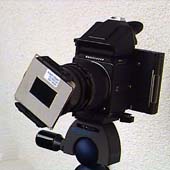
 A transmission grating mounted in the filter adapter of a camera.
![]()
An ordinary camera equipped with a transmission diffraction grating or a prism can be used to photograph a wide range of spectra. In the absence of a slit and a collimator - the other components of a proper spectrograph - a little ingenuity has to be used to arrange the source of light to be dispersed but it is possible to get quite respectable spectra, even of quite faint objects.
I have three gratings bought many years ago as student equipment from "Brunnings" in London. They were made by Adam Hilger and have rulings of 2,000; 8,000 & 15,000 lines per inch. The advantage of these over the cheap transmission grating film available these days is that they are very efficiently blazed in the first order and so are good for looking at faint light sources. I have encased them in stiff card to fit a standard "Cokin P" filter mount. This allows them to be easily rotated with respect to the camera lens. With an aperture of 43 x 28 mm (area = 12 cm^2), they vignette the full aperture (f/4) of the 180mm Sonnar lens in the photograph above - but this has little effect on spectra in the centre of the field. With three gratings and different lens focal lengths, there is great flexibility in the dispersion of the spectra obtainable.
I have also mounted an objective prism in a similar manner to fit into a filter mount. This consists of two 60° prisms, of flint and crown glass, cemented to form a trapezium which is mounted into a short brass tube. This gives a deviation of about 14° and a dispersion of about 2° over the optical spectrum. Since the prisms are only 25mm on a side, the effective aperture of this is only about 4 cm^2 but it is excellent for photographing the spectra of star fields. In mounting this tube, I had to reinforce the card mount with some thin metal cut from a box of polaroid film.
There is plenty of room for experiment here and I cannot claim to have tried more than a few types. Since my interest in photographing spectra was stimulated by the appearance of Comet Hale-Bopp in March 1997, I needed a very fast film. 3000ASA (B&W, type 667) Polaroid film works very well - although the spatial resolution is not very high. It is fast enough to enable spectra of the brightest stars and planets to be obtained at f/4 in less than a minute. Colour film is not worth the effort since the dominant spectral features in the image are due to the colour filters within the film: you don't get a smooth gradation in colour! Even with B&W film, you have to be careful with the rather rapid changes of sensitivity with wavelength which show up as broad bands in the spectrum. This can be confusing for some sources and it is best to have a spectrum of a standard source, eg, a quartz-iodine lamp, for calibration.
For the astronomical spectra, the exposure is limited by the night sky brightness. Using the 3000 ASA film at f/4, I find that 70-90 sec is about the limit although in darker skies it may be possible to expose for longer. For other spectra it difficult to give a general rule. Try using an exposure meter on something which appears to be of similar brightness.
The easiest way to set things up and get some experience with positioning the spectra in the field and getting the right exposure is to start with distant street lamps. Most (but not all!) street lamps are emission line sources and very pretty to look at with a spectroscope. Mercury (Hg) vapour and sodium (Na) are the most common and they appear green-blue-white and yellow or pink-yellow respectively. They both come in high and low pressure varieties which have remarkably different spectra. In particular, high pressure Na has a beautiful spectrum which is dominated by the famous D-lines broadened by pressure to cover the entire optical spectrum.
If there is more than one light source in the field of the camera, the grating can be rotated to avoid overlapping the spectra. When using a grating, it is a good idea to include the zero order image in the field as well as the first order - this will usually be the case anyway unless the grating has a very high dispersion. The zero order can be used as a fiducial for lining up different spectra on a common wavelength scale.
For astronomical sources, it is best to make use of the Earth's rotation to trail the stars perpendicular to the dispersion direction to make a virtual 'slit'. This means aligning the grating rulings perpendicular to the great circle connecting the field of the camera with the pole - got it?
For brighter sources, a handy trick is to use a highly reflective cylinder (eg, a chromium-plated rod) to reflect the light. This produces a line-source which, when seen against a dark background, makes a very effective 'slit'. When the camera lens is focussed below infinity, the lens equation must be used to scale the spectra to a common wavelength scale.
![]()
![]()
Go to table of contents