[ ALMA ] ALMA Common Software Documentation

User Guide - Acs Command Center


Described Versions: Acs 8.1 and later 
Latest Update: 2009-12-21 M.Schilling 

Content

  1. Overview
    1. Launching Command Center
    2. Starting Acs
    3. Running Clients
    4. Stopping Acs

  2. Running Acs
    1. Deployment Scenario A: Using Localhost mode
    2. Deployment Scenario B: Using Remote mode

  3. Managing Projects

  4. Tools

  5. Glossary
    1. Progress Panel
    2. Deployment Info View
    3. Log Area
    4. Acs Instance
    5. Cdb, Cdb- Root

  6. Other resources
    1. What's New?


1. Overview


This section describes how to launch Acs Command Center and why you would want to launch it.

Launching Command Center


Acs Command Center is a tool to start up, manage, and shut down Acs sessions. It can be launched in two ways:

   a) via the command "acscommandcenter" in your (Linux) shell

        Command line options:
        Commandline arguments:


   b) via the Acs Java Web Start [www.eso.org/projects/alma/AcsWebStart] page. For this, your browser needs to have a Java Web Start plugin (the integrated help viewer of Acs Command Center does not have one, in that case please copy the given URL to your full-featured web browser).


To make clear what Acs Command Center can do for you (and what it can't do), we first look at the general work-flow of an Acs session. If you have worked with Acs on the command line before, you will find these steps familiar.

Generally, a session with Acs consists of four tasks. We will give an overview here, and discuss them in more detail in the following sections.

Starting Acs


    1) Start the Services and the Manager
    2) Start one or more Containers

The single workers (worker = Service, Manager, or Container)  can be run on one single host (see figure A) or on several hosts (see figure B). Acs Command Center only supports scenarios where Services and Manager run on the same host.

Deployment Scenario A
Deployment Scenario B
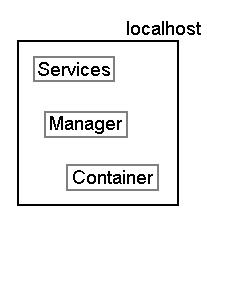
Figure A: Simple Deployment Scenario A
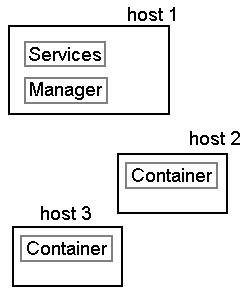
Figure B: Complex Deployment Scenario B


Running Clients


After Acs has been started, you will want to run clients against it. Such a client can either be something provided by you, or be a preinstalled client (Acs comes with various popular and useful clients). These preinstalled clients can directly be started from within Acs Command Center through the Tools Menu.

    3) Run one or more clients


Stopping Acs

After your work is done, you should shut down all workers in reverse order.

    4) Stop the Container(s), the Manager, and the Services


2. Running Acs


Acs Command Center allows for different deployment scenarios, from simple ones like A to complex ones like B. In this section, you will learn how both scenarios A and B can be put into practice following step-by-step instructions.


Deployment Scenario A: Using Localhost mode

In our first deployment scenario (recall figure A), all workers run on localhost.


Figure C - Main Window
Figure C - There and back again... in 7 steps

Preparation

To run Acs locally on your machine,you need a native Acs installation on your machine: Acs Command Center will use shell and python scripts to run your Acs installation.

Make sure "Localhost" is selected in the Common Settings (1).

Specify the Acs Instance to use (2, see Acs Instance in the glossary).

You need to specify a directory where an Acs configuration database is located (see also Cdb in the glossary). Since you have a native Acs installation, Acs Command Center will attempt to figure out which Cdb to use by looking at the environment variables $ACS_CDB and $ACSDATA. If these variables aren't set (for instance because you are running on Windows), you can manually enter the desired Cdb into the "Cdb Root Dir" field in the Common Settings section.

Start

Press the Acs Suite's play button (3), which will start the Services and the Manager. A progress panel will come up (see Progress Panel in the glossary for more information). Note that while the progress panel is up, some controls in the user interface are locked. When all steps have been completed successfully, it will close automatically.

The output of any Acs-related action you trigger can be viewed in its own tab in the log area (L, see Log Area in the glossary for more information). If all goes well, there's no need to pay much attention to these logs.

The freshly started Manager now appears in the deployment info view (D, see Deployment Info View in the glossary for more information).

Ensure you have at least one Container visible on screen (their amount can be adjusted using the plus and minus buttons on the bottom, C). Specify a name and a type (4) for the Container, e.g., "frodoContainer" of type java, then press play to start the Container (5).

Note: The Container name you specify here is used by the Manager to associate components with the Container. It must therefore be the same as the name specified in the Cdb for the component(s) you're interested in working with. For C++, this traditionally is bilboContainer, for Java frodoContainer, and for Python aragornContainer.


Acs is now up and running, and clients can be run against it.
To run one or more of the predefined clients, use the Tools menu (see Tools Menu below). For some of the tools, you may be asked to provide additional information.

Stop

Press the Containers' stop button (6) and then the Acs Suite's stop button (7). This will stop the Container(s), the Manager, and the Services. Once the Acs Suite has been stopped, the Manager will be automatically removed from the Deployment Info View.

Note: There's an asymmetry in the behavior of starting the Acs Suite and stopping the Acs Suite: The first starts the Services and the Manager, the latter stops the Services, the Manager plus the Containers on your local host.


Again, all output will go to the log area (L). In case of problems you should check there.


Troubleshooting

If you encounter problems, e.g., the progress panel presents an error message, and find the Acs session in an inoperable state,  you can attempt to terminate it with the kill button (X). Note, however, that this is, as the name implies, a brute shutdown that may kill the Acs Command Center as well.


Deployment Scenario B: Using Remote mode


In our second scenario (recall figure B), the workers run distributed on several separate hosts. To allow for such scenarios, Acs Command Center offers the Remote mode.

Preparation

Acs Command Center can access other hosts over the network and run Acs on these hosts. This is similar to Localhost mode above in that Acs Command Center will use the same collection of scripts to run Acs on the remote hosts. This implies that a native Acs installation must be present on these hosts.

For accessing the remote hosts, Acs Command Center supports different variants:

a)
Platform-independent ssh is self-contained within Acs Command Center, and you get it "for free" without the need to configure anything. However, it only supports user/password authentication. This means, when you want to start/stop Acs on a remote host, you have to provide a valid accountname and a password for the remote host. The platform-independent variant is the default. Also, please note the following:

b)
Native ssh, on the other hand, makes use of an ssh program already installed on your local system. Thus, it can allow for all features of your native ssh: for instance, and foremost, the public-key authentication. That means, if your native ssh is configured properly, you wont' be required to provide a password for the remote host you want to start/stop Acs on.
The ssh program is available for virtually all platforms (see http://openssh.org/), and many systems already have it installed.
Beware: If you use the native variant but you did not configure ssh for public-key authentication, it will prompt for your password - and that prompt will be on the terminal (xterm, dos box) from which you started Acs Command Center. This behavior is part of the security concept of ssh.

c) Acs Daemons are processes running on a remote host, typically started at boot-time but they can as well be started manually. Acs Command Center can talk to a daemon through the Corba protocol (thus avoiding ssh) and request it, for example, to start a container. To use this variant successfully, there must be a daemon running on each remote host you want to use.


To choose your remote variant, select "Remote" in the Common Settings (1), then select the corresponding entry underneath.


To continue in Remote mode, make sure "Remote" is selected in the Common Settings (1). As for the local variant, you should specify an Acs Instance (2).

Start

Specify a remote host (e.g., "host1") and user credentials for that host in the Common Settings. Start the Services and the Manager as described before by pressing the Acs Suite's play button (3).

Use the plus button (C) to ensure you have at least two Containers available on screen.

Give the first Container a name, and choose its type (4). Then press the first Container's configure button (the one labeled with three dots) and specify a host (e.g., "host2") and appropriate user credentials.

Do the same for the second Container.

Finally, press play (5) to start all Containers in the order you entered them into the list. To move a Container up or down within the list, select it by clicking into its name field (4) and press the arrow buttons (C).

Stop

Stop the containers by pressing the stop button (6). Then, shut down the Acs Suite through its stop button (7). Please refer to Localhost mode above if unsure.

Troubleshooting

As for the local variants, you can terminate Acs mercilessly through the kill button (X) if it appears to hang and alike. Again, note that this will also kill the Acs Command Center if it is running on the same host.


3. Managing Projects


All settings you entered (in the Common Settings section, in the Containers section, etc.) can be stored as a Project. Projects are a neat thing that can save you a lot of typing. Their usage should be self-explanatory, simply use the Project menu to create, store, and load projects.

Note: Any passwords you enter as part of user credentials will not be saved when you store a project. You will have to reenter them the next time you use the project.


4. Tools


Tools Menu

The Tools menu provides access to several useful tools dealing with Acs and Corba. They are invoked as separate local processes, in other words, they must exist as executables on your host.

The necessary configuration required by the tools is automatically derived from your Common Settings without further interaction required (still some tools might ask for additional configuration when you launch them). If you are not satisfied with the default settings, a custom configuration for the tools can be defined in the Configure Tools... dialog.

Tool Definitions

The tools in the Tools menu are defined in an xml file AcsCommandCenterTools.xml that AcsCommandCenter reads in on startup. These definitions can be re-read at run-time. This is done through Expert -> Tools Menu -> Replace... which brings up a file-search dialog to point to a new definition file. The default definition file contains quite exhaustive documentation in case you'd like to copy and accommodate it.


5. Glossary


Progress Panel


    The Progress Panel  shows the single steps necessary to accomplish a task, and how far Acs Command Center has succeeded so far in performing your request. When an error occurs, it is also shown in the Progress Panel. Thus, it will (hopefully) support you in tracking down failures.

figure E - Progress Panel
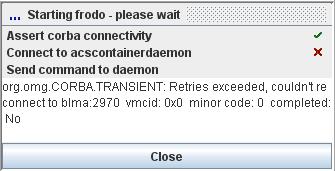
Figure E - Progress Panel indicating that a daemon is not running


Deployment Info View


    The Deployment Info View shows information about an Acs Manager and its related workers. When you start a Manager via the Acs Command Center, the Manager is automatically added to the Deployment Info View.

Still, you can add any Manager manually, provided you know which host and Acs Instance it runs on. Press "Add..." to bring up a dialog that lets you enter the network address of an existing Acs Manager. Network addresses are understood in a couple of formats: the easiest being the short notation "host:instance" (e.g. alma:0 for Acs Instance 0 on host alma), or alternatively a corbaloc (e.g. corbaloc::alma:3900/Manager for Acs Instance 9 on host alma), or a full Corba IOR (like IOR:<really long hex number>).

The shown information will be refreshed automatically. Be aware that this automatism cannot detect all changes on the server-side instantaneously, in some situations there may be delays of about 10 seconds or more. To refresh the display manually, press the "Refresh" button. If, opposed to that, you're overwhelmed with data you can pause automatic refresh through "Freeze".

Figure F - Deployment
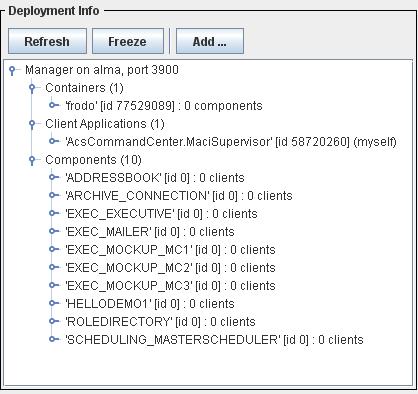
Figure F - Deployment Info View with a manually added Manager


Most elements of the Deployment Info View offer context menus. They allow to refresh the displayed information, activate a component, shut down a container, etc.


Log Area

    The Log Area shows the logs (i.e. the console output) of started processes. It allows to view, copy, and save these logs.

To prevent the Java Virtual Machine from running out of memory, the Log Area allows to restrict the buffer size for each log. It is recommended to make use of this feature -- note however that the Scroll Lock for a log only works properly if its buffer size is "unlimited".  The foregoing said, you should only activate the Scroll Lock, resp. disable the buffer size limit, in special cases but not in the general case.

figure G - Progress Panel
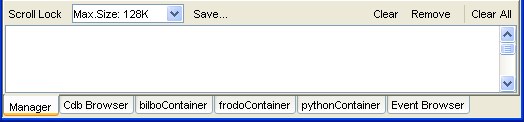
Figure G - Log Area showing the console output of started processes


Acs Instance

    Acs allows for more than one session to be run on the same machine at the same time; we speak of multiple Acs instances (currently up to ten). One may think of a collection of slots on a host, with each one being capable of holding one Acs instance. If you have special preference on which slot to occupy  (e.g., because you made an agreement with your team members to avoid clashes), specify its number explicitly. Otherwise simply try with the default number 0 (zero). If the requested slot is already occupied, you will receive an according message. You should then try a different number.


Cdb, Cdb-Root

    The Cdb (Configuration Database) contains information about schemas, Managers, and components. The Cdb's content is read and published by a server process (Cdb-Dal). In order to be readable by the server process, the Cdb needs to reside in a filesystem directory. This directory is called Cdb-Root.


6. Other Resources


What's new?

The change log for the different versions is on the What's New? page