Getting Started
This section will guide the ICS software developer in creating a working project using a provided coockiecutter template. For getting the template from GitLab, go to the ESO Gitlab site and download the tar file of the template: Template release
The user will be able to start the software components with the specific configuration prepared as a showcase for instrument developers. More details for each of the components will be given in the respective user manuals.
Updating an existing Project Configuration
If a version of your instrument project already exists, it is recommended to start from scratch following the instructions below and update your specific configuration in the new template afterwords. This approach might be better because of the possible changes in the template configuration and in the IFW components. If you have problems doing this, please contact ESO to get help doing this migration. Find here some guidelines to do the porting from previous version: Software Porting Guidelines.
Creating a Project Configuration
The IFW includes a project template that can be used to generate the initial package of an instrument. The generated project can be considered as a mini template instrument that could be used as starting point for the development of the control software. It is still basic but the idea is to develop it further in future versions according to the progress of the framework components.
The generated directory contains a fully working waf project with the instrument directory structure, some configuration files and some custom subsystem samples, e.g. an FCS including a special device. In this example we will use “micado” as an example instrument. After executing the cookiecutter command with the provided template, the system will request the user input to enter the information for the generation of the configuration and customized code. This template also generates the code for a special FCF device that in this case we will name as “mirror”. The ‘component_name’ is referring to an instance of FCS.
> cookiecutter ifw-template/project
[1/9] project_name (myproject): micado
[2/9] project_description (my project description): MICADO project
[3/9] project_prefix (xxx): mic
[4/9] nomad_user (eltdev):
[5/9] component_name (mycomponent): fcs
[6/9] device_name (mydevice): mirror
[7/9] olas_directory (): <path to OLAS directory>
[8/9] hlcc_available (Yes):
[9/9] ngc2o_available (No): No
Note
The OLAS directory is where the FITS files will be stored after they are completed to be sent to the archive system.
Note
You can skip the usage of HLCC by setting the hlcc_available to No.
The generated directory structure including the first two levels is shown below. In this case, the directory mic-ics is a waf project that can be built. The resource directory is meant for storing the instrument resources like configuration files.
micado                  # Instrument repository
├── mic-ics             # Valid waf project
│   ├── build
│   ├── fcs             # Custom FCF instance
│   ├── micstoo         # Startup/Shutdown sequencer scripts
│   ├── seq             # Sample template implementation.
│   └── wscript
└── mic-resource        # Instrument resource directory
    ├── config          # Configuration files
    ├── nomad           # Nomad job files
    └── seq             # Sample OB
After the new directory is created, one could build and install the generated software.
cd micado/mic-ics
waf configure
waf build install
Update CFGPATH environment variable
If not already done, the CFGPATH environment variable shall be updated in the LMOD configuration to include
the template resource directory.
Add the following line to the modulefiles/private.lua file.
prepend_path("CFGPATH","<path_to_template>/micado/mic-resource")
Note
The above setting is needed for the proper functioning of tge IFW components. Make sure the setting is correct before starting nomad.
Starting/Stopping the ICS Software
The IFW uses Nomad (see here) to manage the life cycle of the ICS SW components following the recommendation from the ELT Control project. We are also using Consul, a complementary package providing service discovery that allow us to use names instead of using hostname/IPs and port numbers.
The project template includes the Nomad job configuration to start-up/shutdown the ICS components that are generated by the coockiecutter template. We are also proving a Startup/Shutdown Sequencer script that uses the Nomad jobs to start/stop the complete ICS SW resembling the osfStartup tool in the VLT.
Startup/Shutdown Contents
The project template comes with a predefined startup/shutdown script to start/stop a representative sample of ICS software processes. The list of processes is here:
DDT broker
CCF instance with Simulator and DDT publisher
FCF Simulators (shutter, lamp and motor)
Subsystem Simulators (subsim1, subsim2 and subsim3)
Custom FCF server instance with custom device (mirror).
Custom FCF simulator (mirror)
HLCC processes (optional)
NGCII Optical (optional)
OCM instance
DPM instance
System Supervisor
These components are obviously using simulators and not real hardware. The script shall be executed by the Sequencer.
The script contains three main parts:
Stop all processes
Start all processes
Move all processes to Operational state.
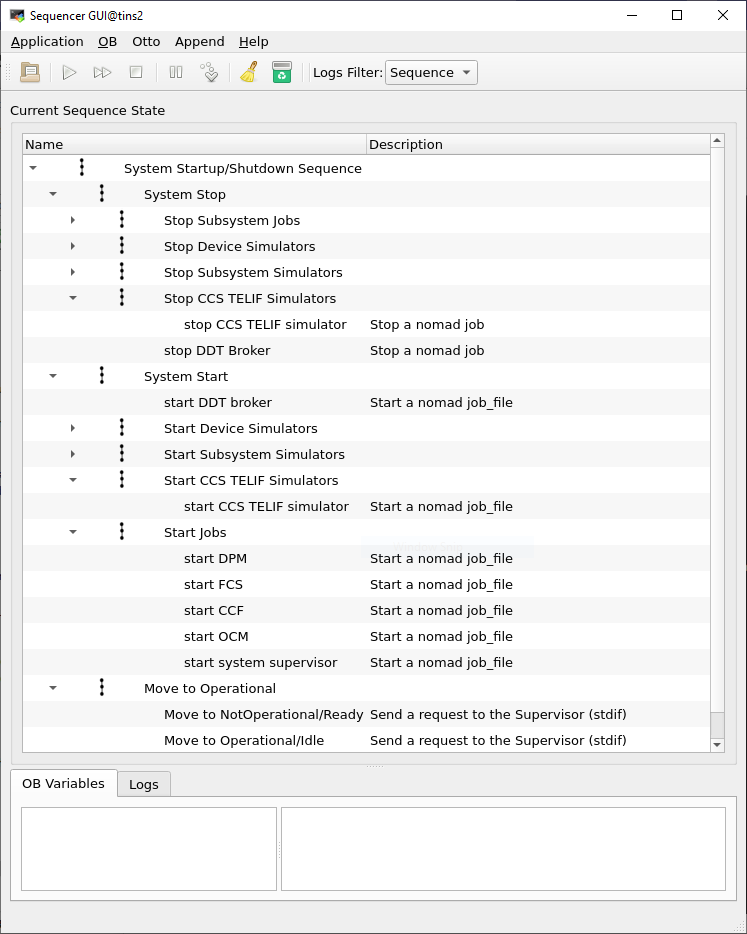
Startup/Shutdown script in the Sequencer.
Executing Startup/Shutdown Script
Starting Sequencer GUI
In a terminal, type the following command to start the sequencer GUI.
> seqtool gui --config config/seqgui_config.yaml
Note
Since IFW version 2024, you need to specify the GUI configuration to enable the support of Instrument Package (IP).
Running the Startup Script
Once the Sequencer GUI is running. Load the startup script (micado/mic-ics/micstoo/src/micstoo/startup.py) by selecting the Load Script option as shown in the following figure. It is assumed that the software has been already built and installed.

Load script option from Sequencer File menu.
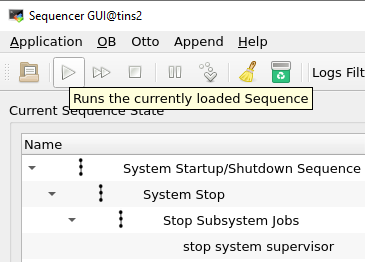
To execute the script, just press the play icon at the top of the Sequencer GUI as it is shown in the next figure. At the end of the execution, all instrument jobs shall be running and the system should be in Operational state.
Load script option from Sequencer File menu.
A quick way to verify is to check the status of the Supervisor.
> supClient `geturi syssup-req` GetStatus
Operational;Idle
After a successful execution of the startup script, the nomad web UI can be used to verify the status the nomad jobs. A total of 15 jobs shall be running.
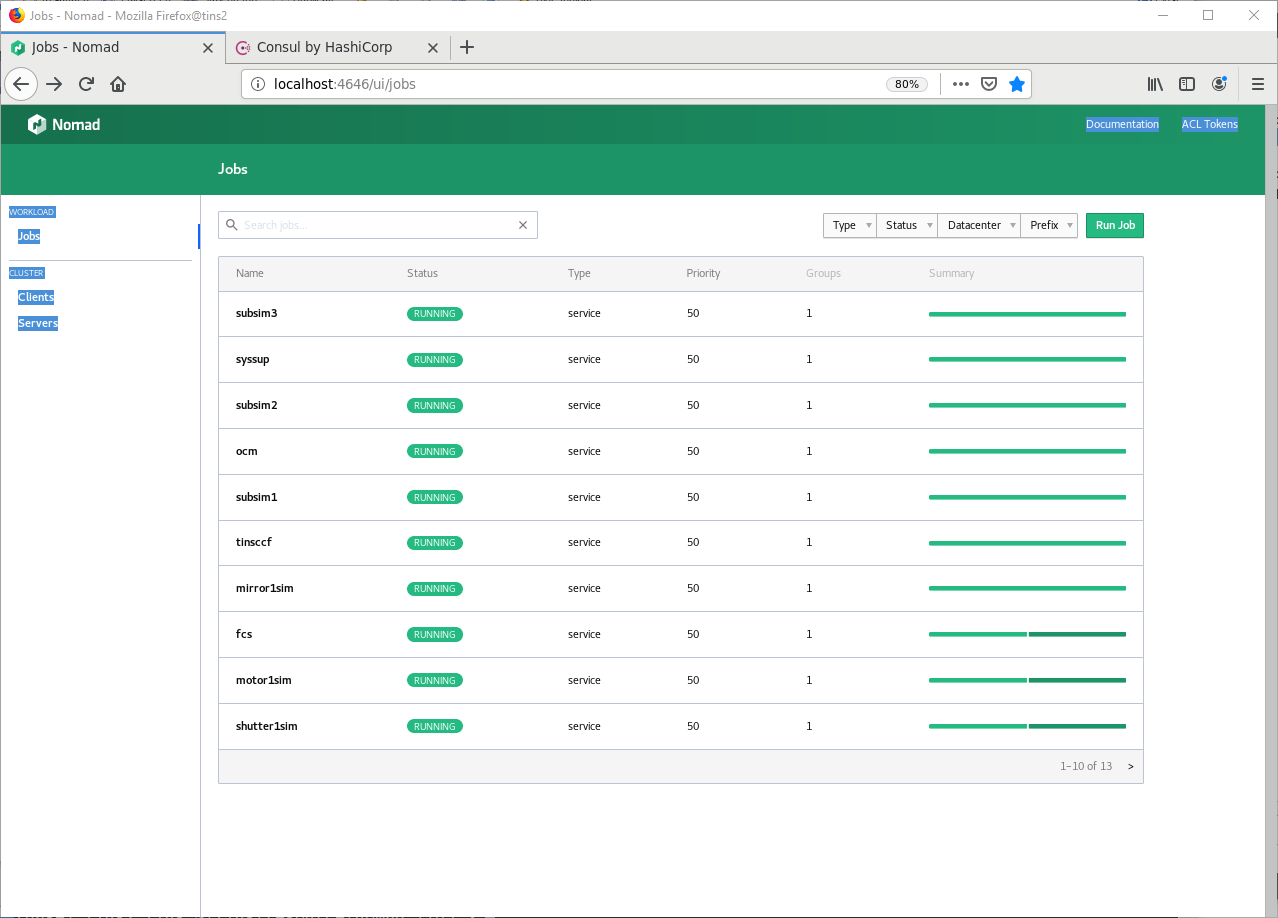
List of TINS Nomad Jobs.
The Consul UI can be used to verify the services registered. In this case the number of services is greater because in some cases there are two services defined per each Job.
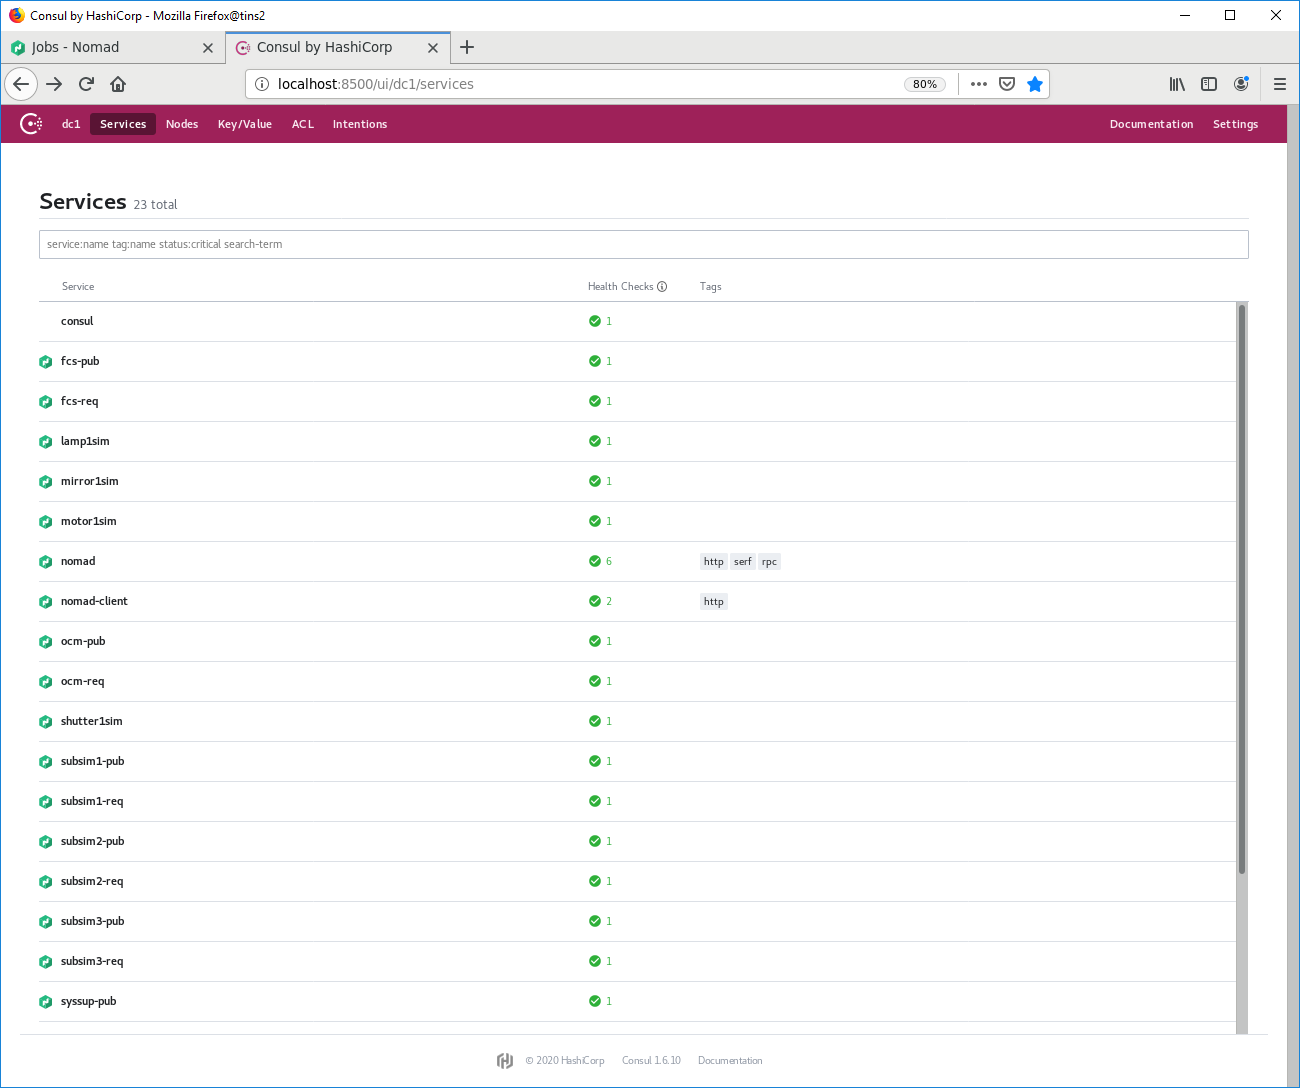
List of TINS Consul Services.
Note
As convention, we use <service>-req as the registered name in consul for the service request/reply port, e.g. fcs-req
As convention, we use <service>-pub as the registered name in consul for the service publish/subscribe port, e.g. fcs-pub
Troubleshooting
If all or some processes do not start, make sure of the following:
1. Check that Nomad/Consul have been started and are running correctly. Try using the Systemd commands to get status of the service, see below.
> systemctl status nomad
* nomad.service - Nomad
Loaded: loaded (/usr/lib/systemd/system/nomad.service; disabled; vendor preset: disabled)
Active: active (running) since Tue 2021-04-20 07:14:11 UTC; 3 weeks 0 days ago
 Docs: https://nomadproject.io/docs/
Main PID: 413992 (nomad)
    Tasks: 541
Memory: 969.4M
CGroup: /system.slice/nomad.service
       ├─ 413992 /opt/nomad/bin/nomad agent -config /opt/nomad/etc/nomad.d
       ├─2864103 /opt/nomad/bin/nomad logmon
       ...
2. Make sure eltdev user has properly defined its environment. All environment variables shall be defined under eltdev since it is at the end the user that runs the processes through Nomad.
Check the status information of Nomad/Consul services with journalctl.
> journalctl -u nomad
4. Stop Nomad and Consul and run them manually outside the Systemd to get all logs and see the possible cause of the issues.
Validating the Software with a sample OB
We have prepared a very basic OB with an acquisition and observation template. The acquisition template prepares FCS, the camera system and the telescope simulator for the upcoming observation template that takes an image with the camera control system.
Note
The interaction between the Sequencer and the components is through the python client libraries provided by each component.
Before to start, the current script loaded in the Sequencer GUI must be cleared by pressing the reset button (trash icon).

Clear the current script and reset the server.
Then, the OB shall be loaded by pressing the open button as shown in the next figure. The path of the sample OB is: micado/mic-resource/seq/tec/MICADO_OB_sample.json.
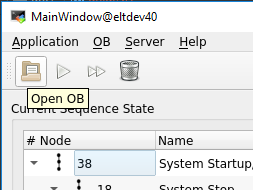
Load an OB.
To run the template, just press the play icon at the top of the Sequencer GUI.
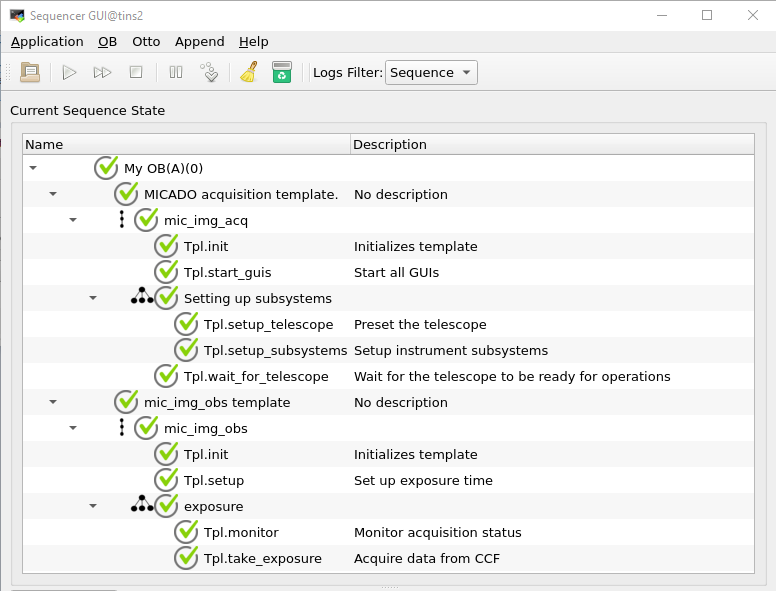
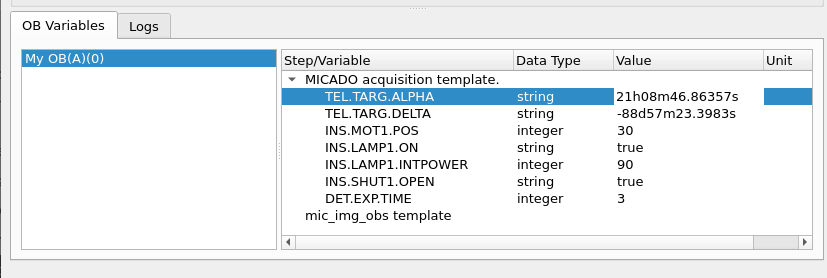
Sample OB.
At the end of the execution, the image acquired by CCF shall be displayed in the DDT Viewer that it started by the template.
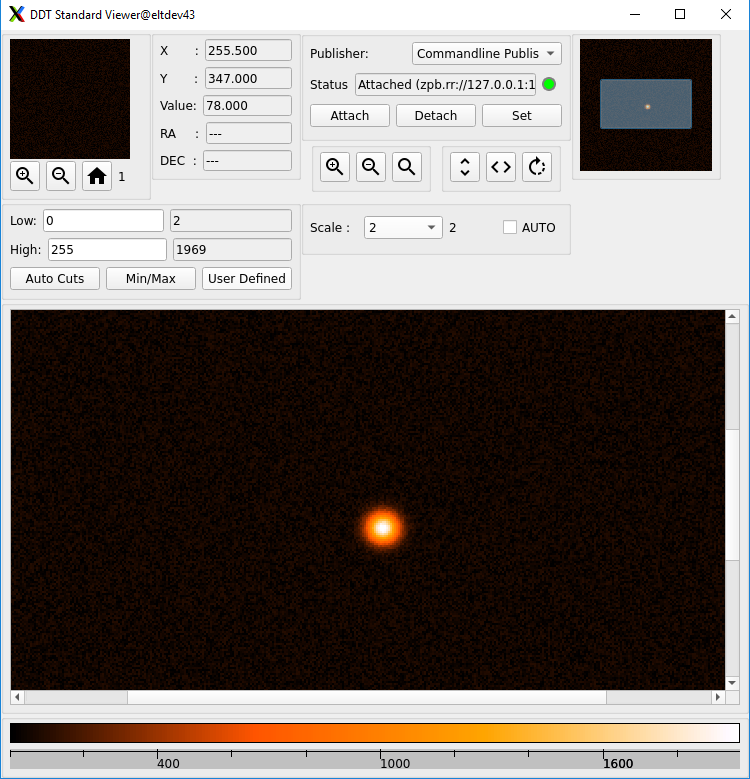
DDT Viewer with image received from CCF.
THe OB also launches the CCS telescope simulator GUI.
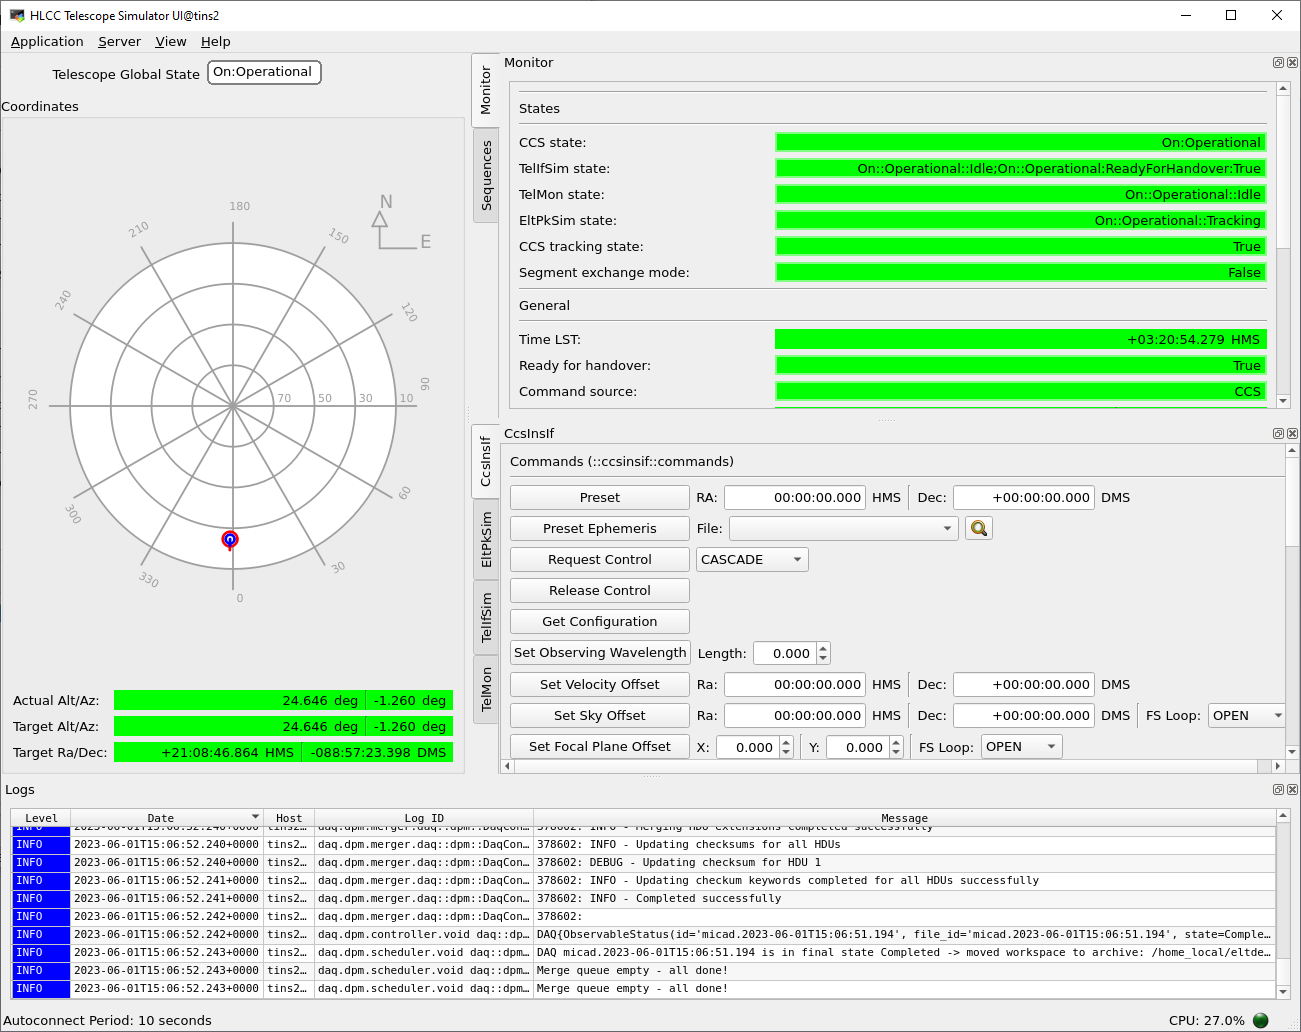
You can verify in this GUI that the telescope simulator is pointing to the right coordinates. You could change the OB parameters from the sequencer GUI and execute the OB again validating the new values are correctly received by the telescope simulator.
Note
For simplicity, we are currently only sending alpha and delta parameters.
The resulting FITS file generated by DPM is located under $DATAROOT/dpm/result.
Congratulations that you reached the end of the general Getting Started section. Further instructions you may find in the specific documentation of the components.
Updating Sample Configuration
To update the default configuration of the template, developers can modify the configuration files that are located under the resource directory, e.g. under resource/nomad.