11. Creating a Custom Widget
This chapter walks through the creation of a custom widget for the IFW
Widget Library from scratch. We will build a fictitious MyStateWidget
that displays a state value via a Taurus label and allows sending a
command through a facade. By the end of this chapter you will have a
complete, minimal widget following the library conventions.
11.1. Prerequisites
Before creating a custom widget, make sure you are familiar with the concepts covered in the following chapters:
Communication facades – how to obtain facades from
ConnectionManagerCCF widgets – the widget construction pattern and OLDB paths dataclasses
OLDB query functions – how OLDB paths are structured
11.2. Step 1: Create the Widget UI
You have two options for creating the UI of your widget. Both are used throughout the library. The main walkthrough in this chapter uses the Taurus Designer approach (Option A), as it is more common in the codebase.
11.2.1. Option A: Taurus Designer
Use taurus designer instead of the plain designer tool. Taurus
Designer adds Taurus widgets like TaurusLabel and TaurusLed to
the widget palette, making them drag-and-drop usable.
Open the file with taurus designer:
taurus designer
Select Widget in the templates/forms, and then click the Create button.
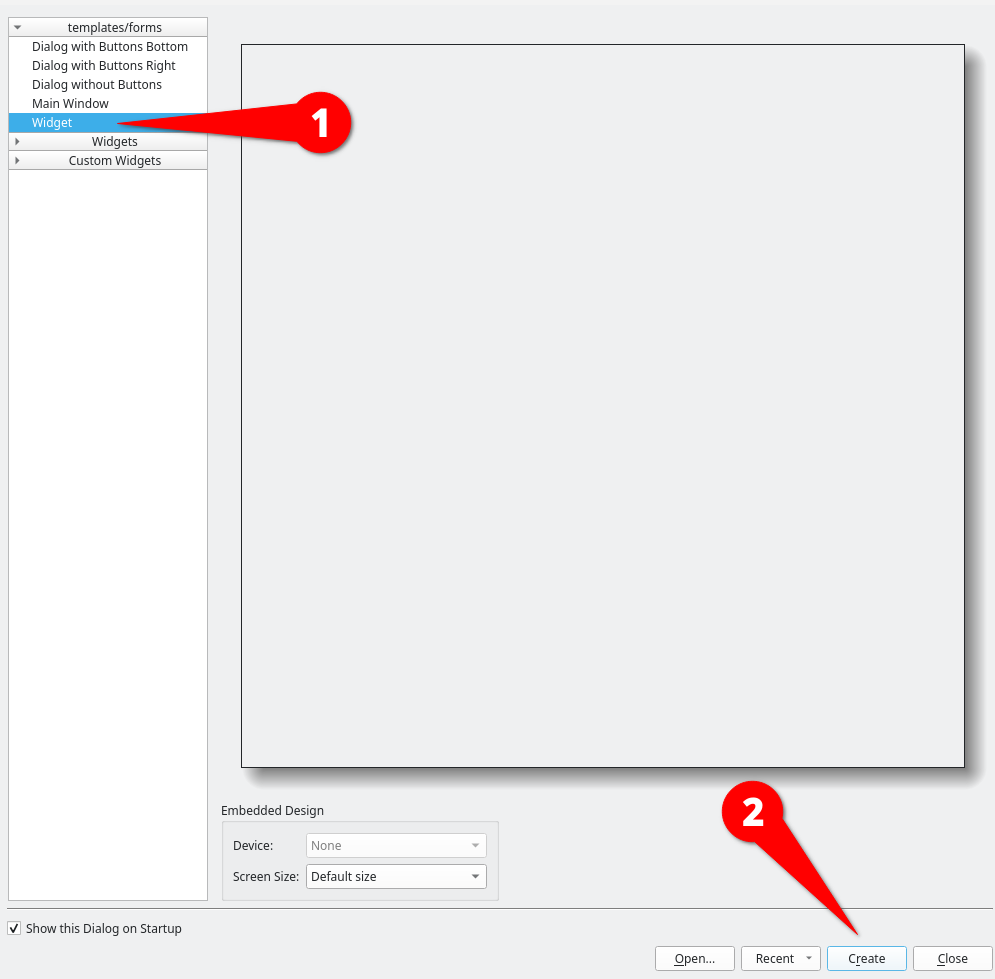
Creation of a new Widget
For our example, create an horizontal layout containing:
A
TaurusLabelnamedstateLabelto display a state valueA
QComboBoxnamedstateComboBoxto trigger state commands (leave it empty for now, items will be added in code)
Make sure to change the name of the Form in the Object Inspector to MyStateWidget
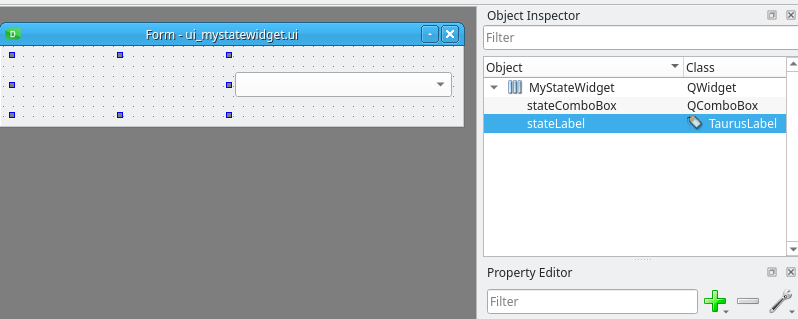
Creation of a new Widget
We use the convention ui_<widgetname>.ui for the filename. Save the .ui
file as ui_mystatewidget.ui alongside the other widget source files in your
feature’s package directory.
When the widget package is built with declare_pyqtpackage in the
wscript, pyuic6 automatically generates a Python module
ui_mystatewidget.py containing the Ui_MyStateWidget class.
The build system handles this step; you do not need to run pyuic6
manually.
11.2.2. Option B: Pure Code Layout
Alternatively, you can build the entire UI in code without a .ui
file. This approach is used by widgets like DiskFreeWidget in
the library. It has no dependency on pyuic6 and is easier to
version control, though it is more verbose than the visual designer.
When using this approach, the widget creates its own layout and widgets
in __init__ instead of calling ui.setupUi(self). For our
example, the UI construction code would look like this:
from taurus.external.qt.QtWidgets import (
    QWidget, QHBoxLayout, QLabel, QComboBox,
)
from taurus.qt.qtgui.display import TaurusLabel
from ifw.wdglib.widgets.common import BaseMalWidget
from ifw.wdglib.comm import StdCmdsFacade


class MyStateWidget(BaseMalWidget):
    def __init__(
        self,
        parent: QWidget,
        base_uri: str,
        dcs_db_prefix: str,
    ) -> None:
        super().__init__(parent, base_uri)
        self._dcs_db_prefix = dcs_db_prefix
        self._setup_facades()

        layout = QHBoxLayout(self)

        self._state_label = TaurusLabel()
        layout.addWidget(self._state_label)

        self._state_combo = QComboBox()
        layout.addWidget(self._state_combo)

        self.remove_bgrole()
        self._update_db_models()
        self._init_gui()

    def _setup_facades(self):
        self._stdcmds = self._conn_mgr.get_stdcmds(
            f"{self._base_uri}/StdCmds"
        )
        self.register_facade(self._stdcmds)
Note that with this approach the Taurus label and combobox are stored as
instance attributes (self._state_label, self._state_combo) rather
than accessed via self.ui. All subsequent steps (binding, signals)
work the same way; only the reference path changes from
self.ui.stateLabel to self._state_label and from
self.ui.stateComboBox to self._state_combo.
11.3. Step 2: Define the OLDB Paths Dataclass
Create a new file mystatewidget.py alongside your .ui file. In it,
define a frozen dataclass that constructs OLDB paths from the
dcs_db_prefix. Use @property accessors to return the full paths
as strings. For our example:
from dataclasses import dataclass

@dataclass(frozen=True)
class MyStateOldbPaths:
    dcs_db_prefix: str

    @property
    def state_path(self) -> str:
        return f"{self.dcs_db_prefix}/sm/state"
If your widget needs identifiers (e.g., a camera or pipeline name), add
them as additional dataclass fields. This pattern is the same as
CcfAcquisitionOldbPaths which takes both dcs_db_prefix and
camera_name.
Note
In ifw-wdglib, the dataclass is defined in the same file as the widget
class, appearing before the widget class. The __init__.py then
imports both from that single module.
Note
The myapp package name used throughout this chapter is a placeholder.
Your widget can live in any Python package – it does not need to be
inside ifw-wdglib. The only requirement is that ifw-wdglib is a
dependency so you can import BaseMalWidget and the communication
facades.
11.4. Step 3: Scaffold the Widget Class
In the same file created in Step 2, create the widget class inheriting from
BaseMalWidget. The
__init__ method follows a fixed pattern:
Call
super().__init__(parent, base_uri)Store constructor parameters (
dcs_db_prefix, etc.)Call
self._setup_facades()to register facadesInstantiate the OLDB paths dataclass
Set up the UI from the generated
ui_moduleCall
self.remove_bgrole()Call
_update_db_models()to bind Taurus labelsCall
_init_gui()to wire up signals
The _setup_facades() method registers the facades your widget needs:
Obtain each facade from
self._conn_mgrusing the appropriate factoryCall
self.register_facade()to wire itsconnectionChangedsignal
Here is the scaffold:
from dataclasses import dataclass

from taurus.external.qt.QtGui import QWidget
from taurus.external.qt.QtCore import Slot

from ifw.wdglib.comm import StdCmdsFacade
from ifw.wdglib.widgets.common import BaseMalWidget
from myapp.ui_mystatewidget import Ui_MyStateWidget


# MyStateOldbPaths dataclass from Step 2 goes here
@dataclass(frozen=True)
class MyStateOldbPaths:
    dcs_db_prefix: str
    # ... (properties from Step 2)


class MyStateWidget(BaseMalWidget):
    def __init__(
        self,
        parent: QWidget,
        base_uri: str,
        dcs_db_prefix: str,
    ) -> None:
        super().__init__(parent, base_uri)

        self._dcs_db_prefix = dcs_db_prefix
        self._setup_facades()

        self.oldb_paths = MyStateOldbPaths(dcs_db_prefix)

        self.ui = Ui_MyStateWidget()
        self.ui.setupUi(self)
        self.remove_bgrole()

        self._update_db_models()
        self._init_gui()

    def _setup_facades(self):
        self._stdcmds = self._conn_mgr.get_stdcmds(
            f"{self._base_uri}/StdCmds"
        )
        self.register_facade(self._stdcmds)
11.5. Step 4: Bind Taurus Labels
Implement _update_db_models() to connect each Taurus label to its
corresponding OLDB path.
For our example:
def _update_db_models(self) -> None:
    self.ui.stateLabel.setModel(self.oldb_paths.state_path)
Each setModel call binds a Taurus label to read the value from its
OLDB path automatically.
11.6. Step 5: Handle Commands and Signals
Implement _init_gui() to wire up Qt signals for your UI elements.
Connection state is handled automatically by
BaseMalWidget – you
only need to call self._update_connection() at the end of
_init_gui() to perform the initial enable/disable check.
For our example:
def _init_gui(self) -> None:
    self.ui.stateComboBox.addItems(["Init", "Enable", "Disable", "Reset"])
    self.ui.stateComboBox.currentIndexChanged.connect(
        self._on_stateComboBox_currentIndexChanged
    )
    self._update_connection()

@Slot(str)
def _on_stateComboBox_currentIndexChanged(self, new_state) -> None:
    selection = self.ui.stateComboBox.currentText()

    if selection == "Init":
        self._stdcmds.init()
    elif selection == "Enable":
        self._stdcmds.enable()
    elif selection == "Disable":
        self._stdcmds.disable()
    elif selection == "Reset":
        self._stdcmds.reset()
The _on_<objectName>_<signal> naming convention makes it clear which
UI element and signal a slot handles. Connection state is handled
automatically by the base class – registered facades are monitored and
the widget visually grays out when disconnected.
11.7. Step 6: Register in __init__.py
Export the widget and its OLDB paths dataclass from the package’s
__init__.py so that they are importable via the public API:
from myapp.mystatewidget import MyStateWidget, MyStateOldbPaths

__all__ = [
    "MyStateWidget",
    "MyStateOldbPaths",
]
11.8. Complete Example
Here is the assembled MyStateWidget as a single listing. Both the dataclass
and the widget class are in the same file, following the convention used
throughout ifw-wdglib:
from dataclasses import dataclass

from taurus.external.qt.QtGui import QWidget
from taurus.external.qt.QtCore import Slot

from ifw.wdglib.comm import StdCmdsFacade
from ifw.wdglib.widgets.common import BaseMalWidget
from myapp.ui_mystatewidget import Ui_MyStateWidget


@dataclass(frozen=True)
class MyStateOldbPaths:
    dcs_db_prefix: str

    @property
    def state_path(self) -> str:
        return f"{self.dcs_db_prefix}/sm/state"


class MyStateWidget(BaseMalWidget):
    """Widget displaying a subsystem state value with state commands."""

    def __init__(
        self,
        parent: QWidget,
        base_uri: str,
        dcs_db_prefix: str,
    ) -> None:
        super().__init__(parent, base_uri)

        self._dcs_db_prefix = dcs_db_prefix
        self._setup_facades()

        self.oldb_paths = MyStateOldbPaths(dcs_db_prefix)

        self.ui = Ui_MyStateWidget()
        self.ui.setupUi(self)
        self.remove_bgrole()

        self._update_db_models()
        self._init_gui()

    def _setup_facades(self):
        self._stdcmds = self._conn_mgr.get_stdcmds(
            f"{self._base_uri}/StdCmds"
        )
        self.register_facade(self._stdcmds)

    def _update_db_models(self) -> None:
        self.ui.stateLabel.setModel(self.oldb_paths.state_path)

    def _init_gui(self) -> None:
        self.ui.stateComboBox.addItems(["Init", "Enable", "Disable", "Reset"])
        self.ui.stateComboBox.currentIndexChanged.connect(
            self._on_stateComboBox_currentIndexChanged
        )
        self._update_connection()

    @Slot(str)
    def _on_stateComboBox_currentIndexChanged(self, new_state) -> None:
        selection = self.ui.stateComboBox.currentText()

        if selection == "Init":
            self._stdcmds.init()
        elif selection == "Enable":
            self._stdcmds.enable()
        elif selection == "Disable":
            self._stdcmds.disable()
        elif selection == "Reset":
            self._stdcmds.reset()
11.9. Using the Widget in a Panel
Once the widget is registered, it can be instantiated in a panel the same way as any other library widget:
from myapp import MyStateWidget

base_uri = "zpb.rr://127.0.0.1:12091"
dcs_db_prefix = "cii.oldb:///ccftest/testdcs"

state_wdg = MyStateWidget(self, base_uri, dcs_db_prefix)
layout.addWidget(state_wdg)
This follows the same pattern used throughout the library and in ccfGui.
11.10. Testing with a Minimal Main Window
To quickly verify that your widget works, you can create a standalone
test script with a minimal QMainWindow. Save the following as
test_mystatewidget.py at the project root:
#!/usr/bin/env python3
import sys

from taurus.external.qt.QtWidgets import (
    QApplication, QMainWindow, QWidget, QVBoxLayout,
)

from ifw.wdglib.comm import ConnectionManager
from myapp import MyStateWidget


def main():
    app = QApplication(sys.argv)

    conn_mgr = ConnectionManager()
    conn_mgr.auto_connect = False

    window = QMainWindow()
    window.setWindowTitle("MyStateWidget Test")
    window.resize(400, 200)

    central = QWidget()
    window.setCentralWidget(central)

    layout = QVBoxLayout(central)

    state_wdg = MyStateWidget(
        central,
        "zpb.rr://127.0.0.1:12091",
        "cii.oldb:///ccftest/testdcs",
    )
    layout.addWidget(state_wdg)

    conn_mgr.connect_all()
    window.show()
    sys.exit(app.exec_())


if __name__ == "__main__":
    main()
To test with a live CCF application in simulation, start the DDT broker:
ddtBroker --uri zpb.rr://*:12011/broker &> /dev/null &
And then start the CCF simulator with the example configuration:
ccfCtrlSim --config config/ifw/ccf/control/example.cfg.yaml
Run the test application with:
python test_mystatewidget.py

MyStateWidget running in the minimal test main window, grayed out without a running MAL endpoint
Without a running MAL endpoint the widget will appear grayed out (for example by changing “zpb.rr://127.0.0.1:12091” to an unused port number), which indicates that the connection state handling is working correctly. When a real endpoint is available, the widgets activate and display live data.
This is a quick smoke test, not a production panel. For a full application, follow the pattern documented in the ccfGui Design Decisions chapter.