Python Application Example Tutorial
1. Conventions
Note
Please notice that this document refers to module and packages. We create distintion by indicating each time, which kind it belongs to:
Python module: a python file, may contain several classes, functions and scripts.
Python package: a directory, and a __init__.py file. This packages contains all other python modules in inside of the directory.
WAF module: a directory with a wscript, that is not a top-level project script.
WAF project: the first wscript of a project. It also must document the external dependencies of the project.
Note
Through this document, the author will refer to widgets by name using the following notation:
TextOnTheWidget kindOfWidget
For example:
Accept button or Open File dialog
2. Download, Compilation, and Running
This document guides the user on the creation of a new Python GUI Application, using Python, WAF modules and basic Taurus and Qt functionality. As this is a programming tutorial, we use continously the files in https://gitlab.eso.org/ahoffsta/cut/-/tree/master/examples/, so our first step will be to download it.
git clone https://gitlab.eso.org/ecs/cut
mv cut/examples/python_application ./
rm -rf cut
The directory we will be using for this tutorial is the python_application, and it contains the code for a simple Python applicaiton. This is a waf project on its own, so it can be build in an independent manner from the rest of Control UI Toolkit. In order to do so, the reader must execute:
cd python_application
waf configure install
And to execute the application:
paegui
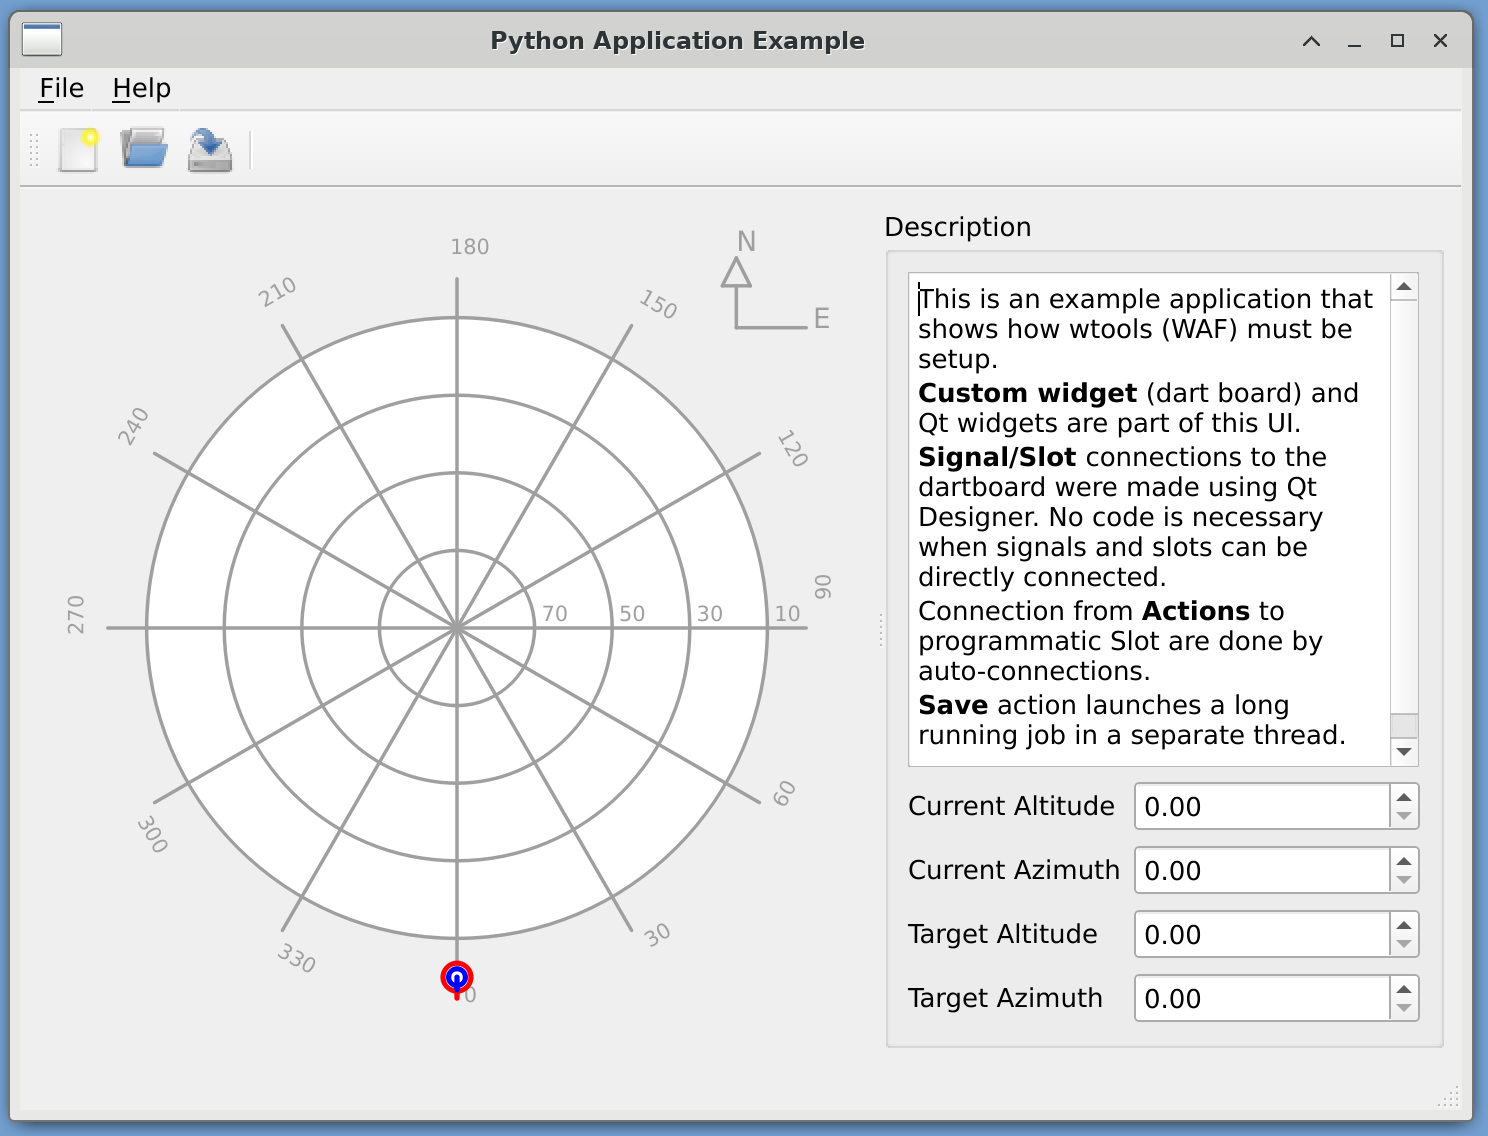
Python Application Example: We will create an application like this
3. Project Structure
This is the structure of the WAF project:
python_application/
├── PythonApplication
│   ├── src
│   │   ├── paegui
│   │   │   ├── applicationwindow.py
│   │   │   ├── __init__.py
│   │   │   └── mainwindow.ui
│   │   └── paegui.py
│   └── wscript
└── wscript
The first file we should take a look is python_application/wscript:
1 2 3 4 5 6 7 8 9 | from wtools.project import declare_project
def configure(cnf):
pass
declare_project('PythonApplicationExample', '0.0.1-dev',
requires='cxx python pyqt5',
recurse='PythonApplication',
cxx_std='c++17')
|
The project is named PythonApplicationExample, and this file is in charge of setting up dependencies. Since under Python dependencies are resolved in runtime, the configure() method is empty. The declare_project() method includes under the require keyword the python and pyqt5 strings, which indicates that the included modules could be python programs.
Then, the recurse list indicates which directory will be considered as module for this project. This WAF project has only 1 WAF module: PythonApplication.
The PythonApplication WAF module is the most important one. To create a basic UI application, we need:
One python package:
The directory called
PythonApplication/src/paeguiandIts
__init__.pyfile)
At least one UI file
mainwindow.ui,The implementation of said UI file
applicationwindow.pyAn entry point script
paegui.py
Warning
WAF imposes two important restrictions:
Each WAF module (for example
PythonApplication) can only produce only artifact. In this case it will be an application calledpaegui, that has only one python package.When creating python applications, the name of the target in the
wscriptfile; the entry point python filename inPythonApplication/src; and the python package directory namePythonApplication/src/paegui, must all be the same.
The restrictions mentioned above indicate why adding a bash script must have its own WAF module: Only one artifact per WAF module can be produced. On the other hand, the WAF wscript are very simple.
4. Entry Point Python Script
The entry point python script paegui.py is the one that creates a Qt GUI Application.
13 14 15 16 17 | import sys
from taurus.core.util import argparse
from taurus.core.util import Logger
from taurus.qt.qtgui.application import TaurusApplication
from paegui import ApplicationWindow
|
TaurusApplication inherits from QApplication, and it is in charge of application initialization, configuration of default values, logging, etc.
In this example, two Taurus utilities are used:
Logger provides several logging utilities using logging.
taurus.core.util.argparse provides common argument parsing to both the application and Taurus internal options. It is based in optparse, which will eventually be replace by argparse.
19 20 21 22 23 24 25 26 27 28 29 30 | if __name__ == '__main__':
description = 'PythonApplicationExample GUI (or paegui), is part of a tutorial \n' + \
'intended to introduce how to developed a simple GUI application \n' + \
'for the E-ELT software '
parser = argparse.get_taurus_parser()
parser.set_description(description)
parser.add_option("-V", '--verbose',dest="verbose", action="store_true", default=False,
help='Outputs more information of the instructions executed by the program')
parser, options, args = argparse.init_taurus_args(parser=parser)
|
The code above is the beginning of the main python method, which is the first one invoked after the script global section has been processed.
This section here deals with argument parsing. In line 25 it gets a parser from the Taurus argparse library. In line 26, it sets a description for the application. Between lines 27 and 28, a new option is given to the parser, the -V or --verbose option. These follow the signature for optparse.
32 33 34 35 36 37 38 39 40 41 42 43 | app = TaurusApplication(
app_name = 'Python Application Example GUI',
app_version = '0.0.1',
org_name = 'ESO',
org_domain = 'eso.org',
cmd_line_parser=parser
)
window = ApplicationWindow()
window.show()
sys.exit(app.exec_())
|
The last section of the main method is listed above. The most important part are the declaration of app, as a TaurusApplication in line 32. This will create a context where Qt and Taurus object can exists.
In line 40 the user interface is created by the creation of an instance of the ApplicationWindow class, which is then assigned to the window object. The ApplicationWindow is part of our python package, and contains the implementation of the UI.
At this point, the application is ready to start, and to do so, we order it to show something in the screen. In this case, the GUI we have just loaded, using the show() method.
But control is still under the script’s flow, and we most surrender control of the program, to Qt’s event pump. A program or a python script is a sequential flow of instructions. There can be decision points where the program flow to one section of the code to another, but in general terms, is a linear flow.
When we surrender control of the program to Qt event pump, Qt will constantly look in the system for inputs like keystrokes and mouse movements and click, and execute the appropriate methods. We have in fact changed from a sequential program, to an event-based one. Events are the deciding factor of the programs next instruction set.
To pass the control to the event pump, we invoke app.exec_() method. This will leave the application in an endless loop governed by events.
5. Design of the Graphical User Interface
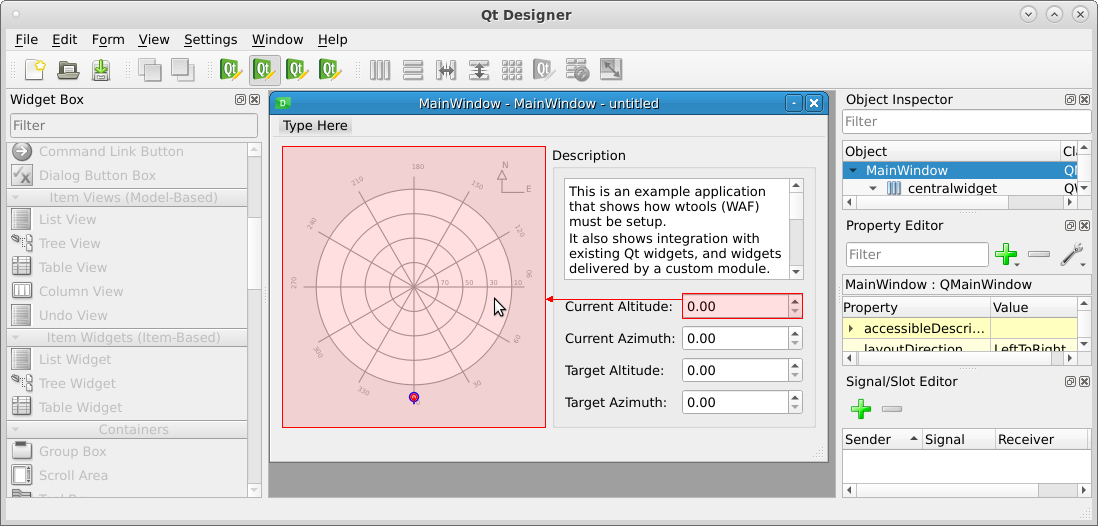
The GUI for this example is a simple one. We will create four QDoubleSpinBox, one QTextEdit, one custom QeDartBoard widget, and several QAction.
The QDoubleSpinBox will be used to modify the values of the QeDartBoard. The QTextEdit will present an explanation on the UI. QAction is used to abstract the UI and the implementation from tasks.
Python Application Example - GUI design to achieve in this example.
We will start the designer, by executing this command in a terminal:
designer
The Qt designer will start, and automatically, will ask us what kind of UI this new file will be. The default selection is Main Window. Please click on the Create button in the lower right corner of this window: this will close this selection dialog.
The designer will then create an empty UI, that inherits from the QMainWindow class, and we will have to the whole designer set of tools.
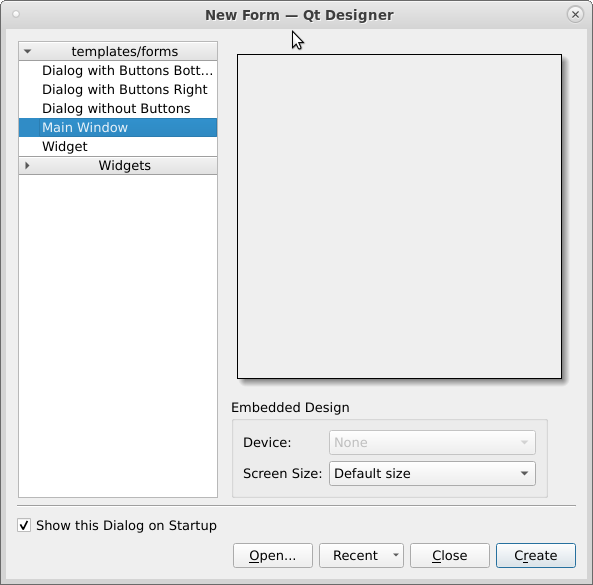
Qt Designer - Selection of new Graphical User Interface template.
The most common GUI used for the presentation of an application is the QMainWindow. This one has a Menubar on top, a Toolbar, a central widget, and a StatusBar. Most desktop applications follow this setup. This application also uses the same setup.
On the left side of the Designer window, is the Widget Box Docking Window. We begin by dragging a QeDartBoard from the he Widget Box Docking Window, to the MainWindow in the center of the Designer.
A new QeDartBoard Widget will appear. We can drag its corners to make it bigger. Make it a little bit bigger so we can see its features, but don’t go overboard, left some space free for the other widgets.
Drag a Form Layout from the Widget Box Docking Window to the MainWindow in the center of the Designer.
Drag a Label Widget from the Widget Box Docking Window, and drop it on top of the Form Layout. Notice that the Form Layout can contain other widgets, and the target’s background for the new widget changes color when dragging.
Drag a DoubleSpixBox Widget from the Widget Box Docking Window, and drop it right of the Label Widget, inside of the Form Layout. Notice that the empty space on the right of the Label Widget is highlighted in red.
Repeat steps 4 and 5 three more times.
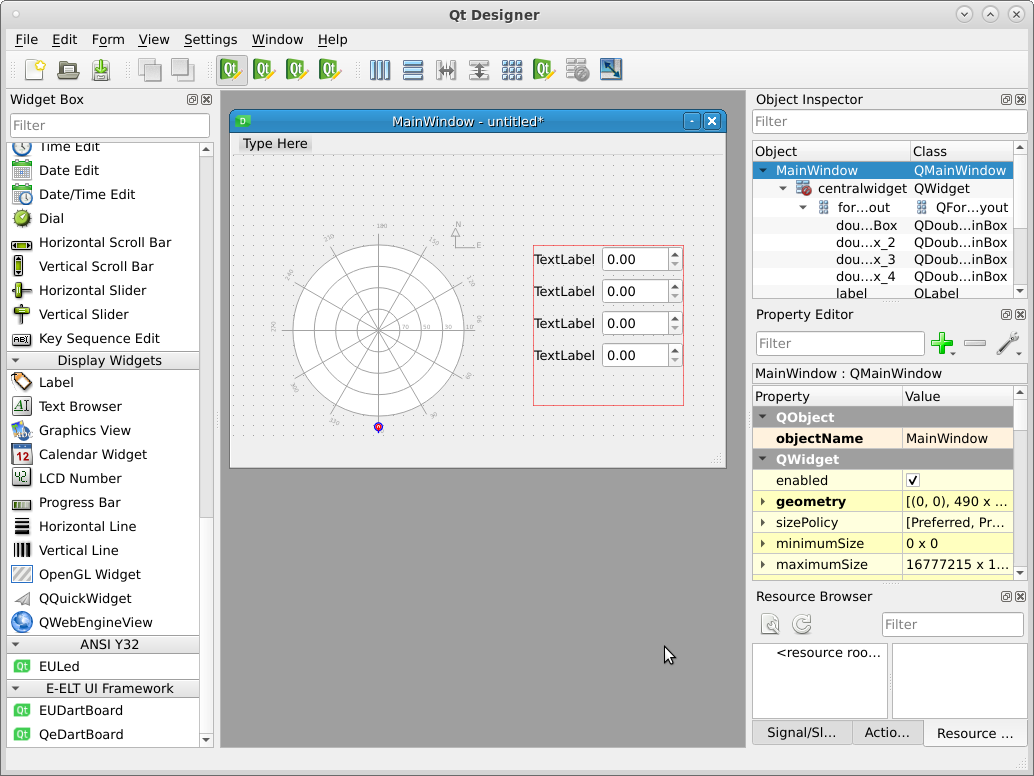
Qt Designer - Progress so far.
We have now static widgets, and a layout. We will stop at this point to explain some characteristics of positioning and size:
You can resize the MainWindow. This will in fact change the default starting size of the application when its opened.
If you resize the MainWindow, you will notice that the widgets do not move. If you make the MainWindow too small, some widgets will disappear until to resize it to a proper geometry.
Resize the Form Layout. You will see that the widget it contains are properly redimensioned.
It is required by the E-ELT Control GUI Guidelines, that User Interface scale and redimension themselves when resized. This is a basic feature of a well programmed GUI. Layout allows developers to achieve this.
Let’s continue with the GUI.
From the Widget Box Docking Window, drag a Vertical Layout to the MainWindow. Resize it so it is bigger than the Form Layout.
From the Widget Box Docking Window, drag a Text Edit widget to the MainWindow, and drop it inside the Vertical Layout.
Drag the Form Layout, and place it inside the Vertical Layout.
Widget that can contain other widgets, have the Layout context menu. Right click on an empty space of the MainWindow, and a context menu will appear. Select the Lay ou Entry. Select Horizontal Layout Entry.
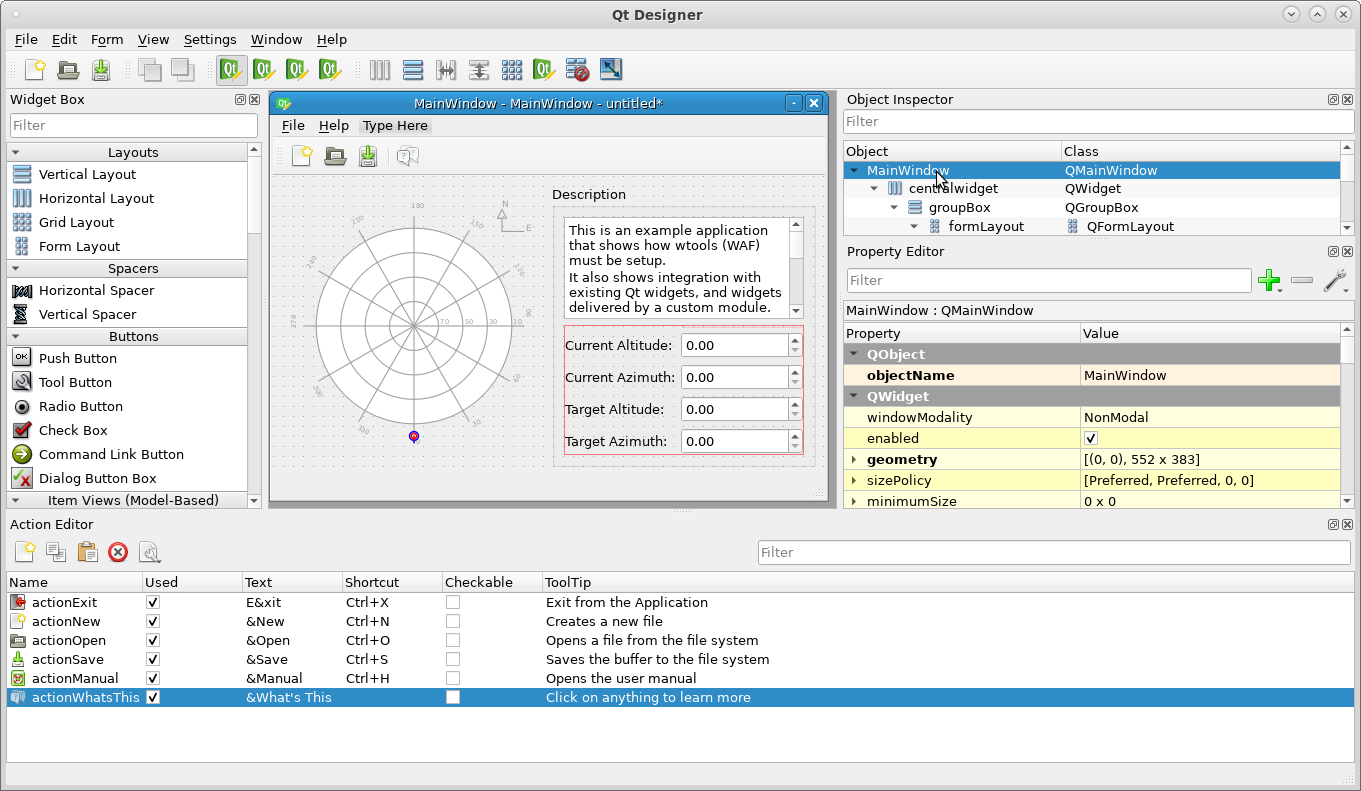
On the Right hand side of the Designer, is the Object inspector Docking Window. This is a tree representation of the GUI. Select the MainWindow Entry.
Now, on the Right hand side of the Designer, under the Property Editor Docking Window, scroll down, until you see Layout. In there is the property Layout Stretch. Set it to “1,1”.
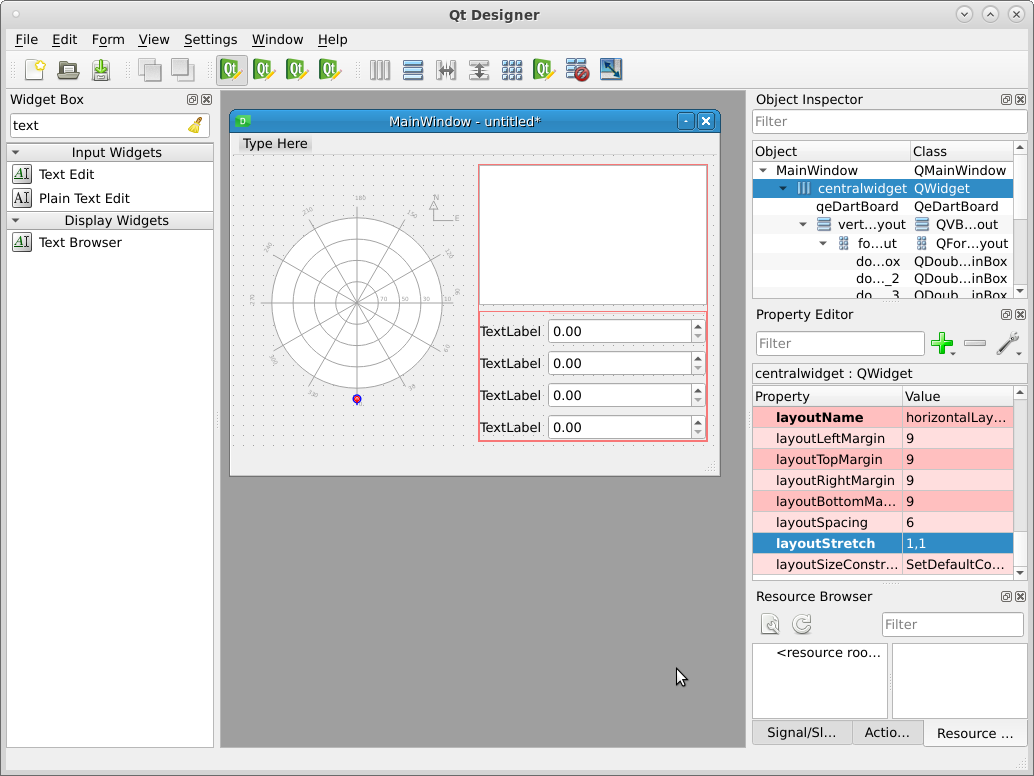
Qt Designer - Progress so far.
We have now a completely elastic GUI. Go ahead and resize the MainWindow, and you will see that every component in it resizes nicely.
The layoutStrecht property indicates in what proportion each component of the HorizontalLayout will stretch. In this case, there are two first order child (though the Vertical Layout has many children) on the MainWindow, which are the QeDartBoard and the Vertical Layout, and each will get 50% of the available space.
Tip
Elastic UI are achieved by use of Layouts. Do not fix the size of a widget. Instead use Layout and stretch factor to set the appropiate sizes.
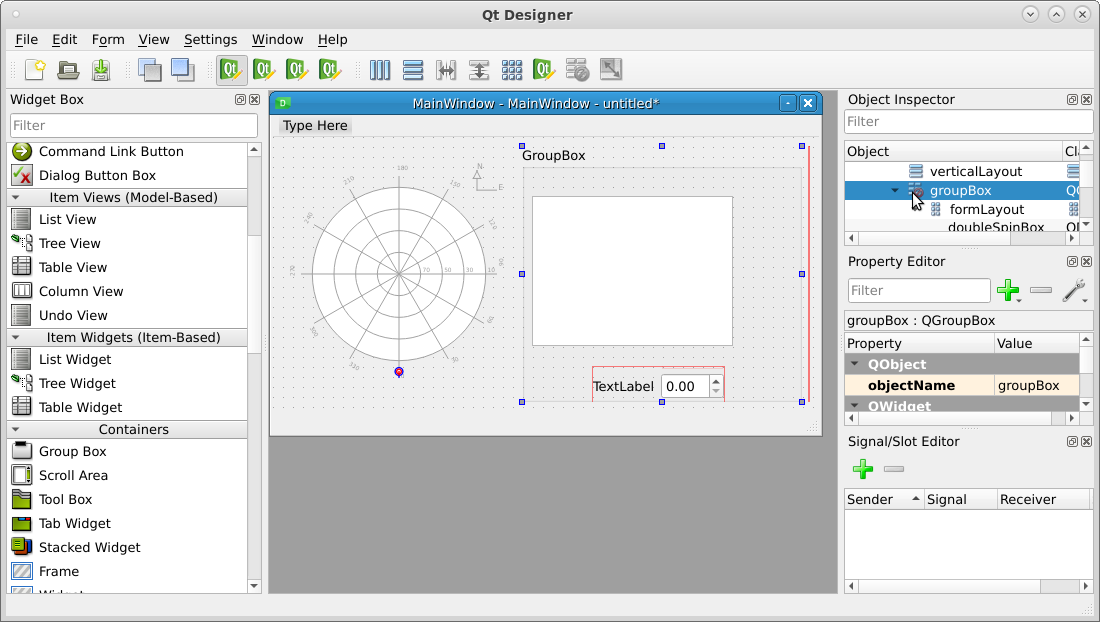
At this point, only one thing is missing from the original image. Surrounding the whole Vertical Layout, there is a Groupbox with the Description title. From the Widget Box Docking Window in the left hand side of the Designer, drag a Group Box. Drop it in between the QeDartBoard and the Vertical Layout.
The Group Box will appear. Now we drag the Text Edit into the Group Box, and the Form Layout into the Group Box. An empty Vertical Layout will be left with no elements, and looking like red vertical line.
Qt Designer - Progress so far.
Finally, use the Object Inspector Docking Window on the right hand side of the Designer. Select the groupBox, right click on it, select Lay out Entry, and select Vertical Layout Entry. Since the Group Box is also a container, it can use layouts.
The UI is nearly finished. Update the Labels by double clicking on them, or changing its text properties.
5.1. Widgets Connections
But one thing is missing: connections: Qt UI files are capable of expressing in the UI files connection between elements of the UI. We will create four of them:
In the Designers Toolbar, click on “Edit Signal/Slot” button, or press
F4. You will no longer be capable of adding widgets, but you can drag one widget, and drop onto another, to form a connection.Drag from the first Double Spin Box, and drop on top of the QeDartBoard.
Qt Designer - Drag and Drop operation using Edit Signal/Slot Designer functionality.
When you drop, a new dialog called Configure Connection will open. It will automatically read from the source widget its signals, and from the destination widget its slots. Now the developer must select matching signatures. Please selected in the left side valueChanged(double), and on the right side setCurrentAlt(double). Press the OK button.
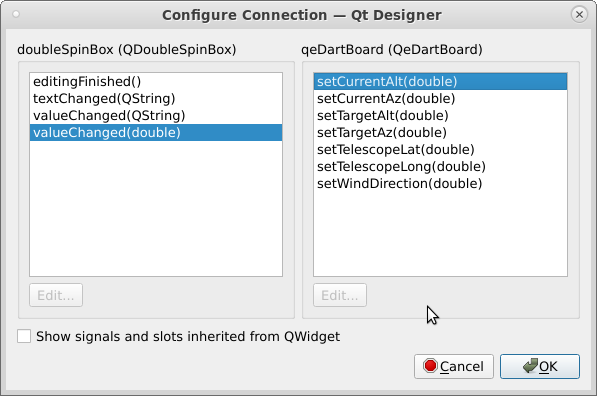
Qt Designer - Configure Connection dialog window
Repeat the same procedure for the remaining three Double Spin Boxes, but using as slot: setCurrentAz(double), then setTargetAlt(double) and for the fourth Double Spin Box, setTargetAz(double).
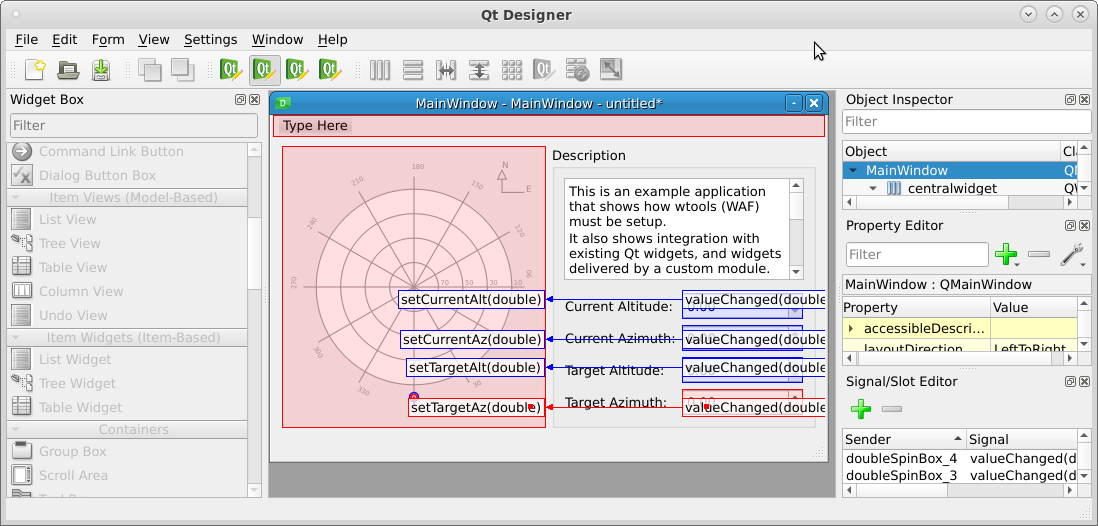
Qt Designer - All four connections are made.
The developer may test this right away inside the Designer. The Designer plugin we develop in the widget_example_, and any Qt Plugin that is rendered in the Designer is a fully capable one.
In the Designer Toolbar press the Edit Widgets button, or press F3. Now change the values in the Double Spin Boxes, and play with the values in the Double Spin Boxes and see how the target (blue) and current (red) indicators in the Dart Board move.
5.2. Actions
For this the developer needs to use the Action Editor Tab. We recommend to drag this from its current position below the Property Editor Tab, and move it below the MainWindow Form. This will give us extra space. If the Action Editor Tab is not visible, you can make it visible using the Designer Main Menu, then View Menu, and click on the Action Editor entry.

Qt Designer - Action Editor placed below the Main Window Form will give the developer extra space.
Now the developer may proceed to create actions:
On the toolbar included in the Action Editor Tab, press the New button. A New Action dialog will pop up. Enter the following information exactly as in the entries below (the
&character included):
Text: E&xit
Object Name: actionExit
ToolTip: Exit form the application
Icon Theme: application-exit
Leave Checkable and Icon with its default values.
Shortcut: Click on it, and press
Controlandx.
Click on the OK button.
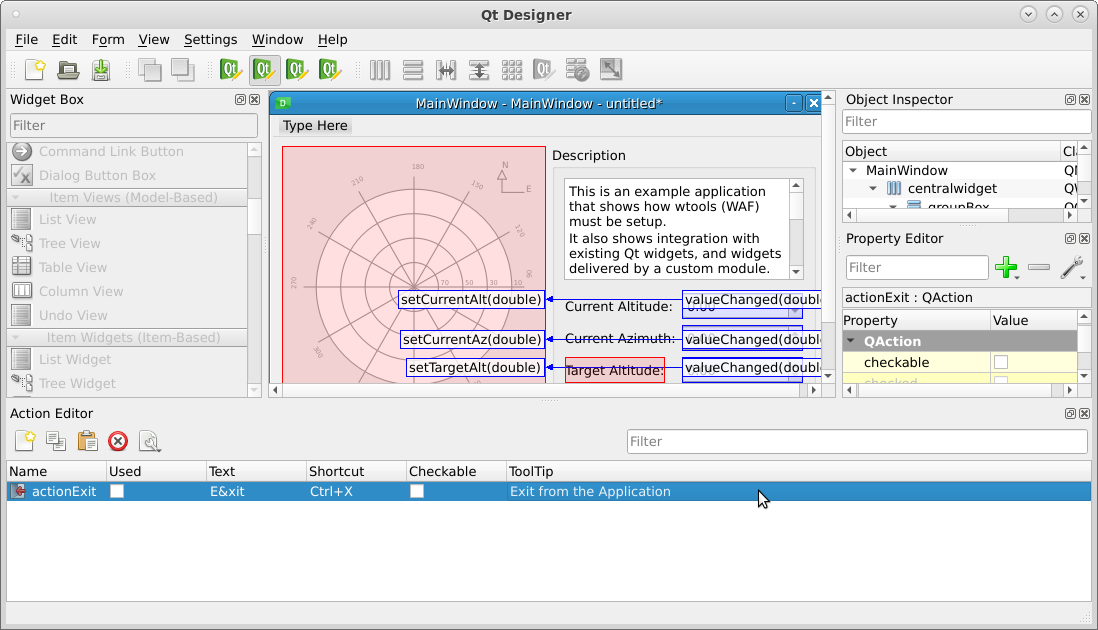
Qt Designer - A new Action has been created: actionExit
In these Action, we configure the presentation and how the user access them. Its implementation is still left for the developer, as we will see in the next section, but presentation and access, is determined in the UI file, using the Designer.
Please create five more actions:
Text |
Object Name |
Tooltip |
Icon Theme |
Shortcut |
|---|---|---|---|---|
&New |
actionNew |
Creates a new file |
document-new |
Control + N |
&Open |
actionOpen |
Opens a file from the file system |
document-open |
Control + O |
&Save |
actionSave |
Saves the buffer to the file system |
document-open |
Control + S |
&Manual |
actionManual |
Opens the user manual |
system-help |
Control + H |
&What’s This? |
actionWhatsThis |
Click on anything to learn more |
help |
At this moment we are ready to create the Main Menu: On the Main Window Form, where the Menu should be, there is a text that reads Type Here. Please click on it, type &File and press Enter. A Menu will appear, and the Type Here text will move right. Please click on the Type Here text again, type &Help, and press Enter.
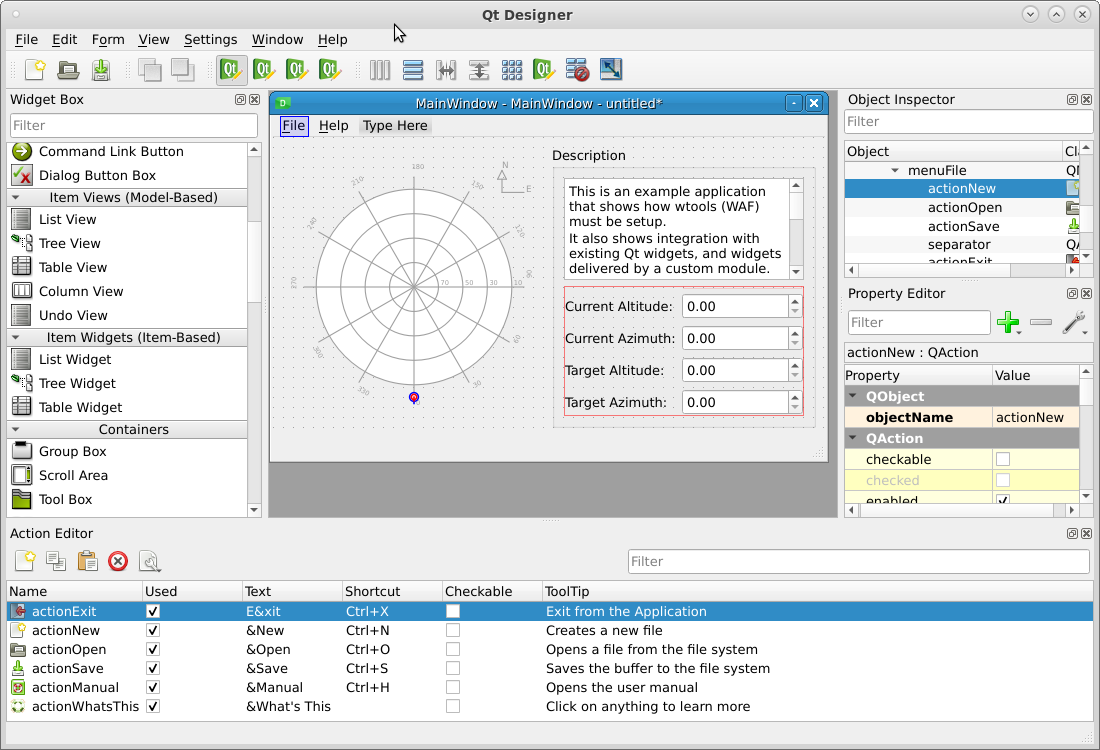
Qt Designer - All six actions and two menus have been created.
Now the developer may populate the menus:
From the Action Editor Tab drag the actionNew Action to the File Menu. An empty File Menu will pop up. Drop the actionNew in this empty menu.
Repeat for actionOpen and actionSave.
At this point click on the File menu, and double click on the Add Separator entry.
Now drag the actionExit action to the File menu, but be sure to drop it after the separator.
Repeat the drag and drop operation for the actionManual and actionWhatsThis, but drop them instead into the Help Menu.
Warning
The developer must learn the difference between accelerators and shortcuts.
Shortcuts are keyboard combinations, usually involving two keystrokes, one of them a modifier key (Control or Shift), and are accessible from anywhere in the application while it has focus.
Accelerators are only valid while the user navigates a menu, for example the File menu. In the text of the File menu, the original entry was &File, which means that Alt + F will open that menu. Then instead of clicking the New entry (which original text is &New), the user can press in the keyboard the letter n.
Action can be placed in the Menu, or in the Toolbar.
On the Object Inspector Tab, go to the Main Window QMainWindow entry, right click on it, and select Add Toolbar entry. This will create a new toolbar for the UI.
From the Action Editor Tab, drag the New, Open and Save Actions.
On the new Toolbar, right click and select the Add Separator entry.
Now, from the Action Editor Tab, drag the What’s This Action.
This reuses the definitions from the Menu, and makes them accesible from the toolbar. Actions are highly reusable, and can also be triggered, enabled and disabled by code. Disabling an Action will make them unavailable both in the menu, and the toolbar.
Qt Designer - New toolbar and buttons in place.
Note
Every piece of the UI we have defined, can be also defined through code. We strongly recommend to use UI files instead of code. UIs defined through code are hard to maintain and easily grow into thousands line file.
Note
All elements used in the designer, end up in an XML formatted file, the UI file. This file will be used by the pyside2-uic –Qt UI Compiler–, which will be automatically invoked by WAF, and generated the Python version of the same UI file.
Widgets, layout, properties, actions and connections, all are saved into XML, and then when WAF is executed, a python version of it is automatically generated. This is intentionally invisible to the developer as in no case, the developer should use this file directly.
6. Implementation of the User Interface
In this section, the developer will use the UI designed in the previous section, and implement basic functionality for them. Every function needed will be implemented in the PythonApplication/src/paegui/applicationwindow.py file.
All the entry points for missing functionality are already defined through the Actions in the UI file, we just need to connect the missing pieces. We will begin explaining the imports.
10 11 12 13 14 15 16 17 18 19 20 21 | import time
from PySide2.QtCore import QObject
from PySide2.QtCore import Slot
from PySide2.QtCore import Signal
from PySide2.QtCore import QMetaObject
from PySide2.QtWidgets import QMainWindow
from taurus.core.util import Logger
from elt.cut.task import WorkerIO
from paegui.mainwindow import Ui_MainWindow # WAF will automatically generated this
|
Most classes in the Qt library inherit from QObject. This is true also for widgets. QObject is the base class that provides Signal/Slot connection capabilities to the Qt Toolkit. We will use them plenty through the design and implementation of GUIs. If you are not familiar with them, we suggest you to read:
The QMainWindow import is present, as this class is the implementation of a QMainWindow. At the beginning of the design section, a Main Window was selected. Therefore, the implementation class must match the top level UI element.
The Logger import is from taurus, and it allows to enhance a class with logging capabilities.
Finally, the Ui_MainWindow import is the python code generated by the pyside2-uic compiler. The compiler is automatically invoked by WAF, so no extra instructions are to be given. It is important that the UI file is inside of the Python Package name paegui, as from this directory is where WAF will look for any UI file, and automatically compile them.
Important
To determine both the name of the Python Module and the Class Name, the name of the first element of the UI file is used:
The Python module name will be lowercased name of the top level element of the UI file (in our case mainwindow.py).
The resulting Class Name will be Ui_<name of top level element>, in this case Ui_MainWindow.
You can see the first element name in the the Designer; Object Inspector Tab; the first element. You can also change it in the same place.
The resulting import show how the Python Module and the Class Name are used:
from paegui.mainwindow import Ui_MainWindow
We will now proceed to examine the Class definition:
19 20 21 22 23 24 25 26 27 28 29 30 31 32 33 34 35 36 37 | class ApplicationWindow(QMainWindow, Logger):
'''
Implementation of the mainwindow.ui file.
Since the UI file indicates that its root is a QMainWindow, then
this class should also inherit from it.
We should also call explicitly its parent constructors.
The implementation for this class also includes slots for
actions, and management of the closeEvent.
'''
def __init__(self):
QMainWindow.__init__(self)
Logger.__init__(self,name=qApp.applicationName())
# Construction of UI
self.ui = Ui_MainWindow()
self.ui.setupUi(self)
self._init_gui()
|
Line 19 declares a new class called ApplicationWindow, which inherits from QMainWindow. QMainWindow already inherits from QObject, so we can use signal and slots from this class definition.
The __init__() manually calls both its parent classes __init__() method. This is very important, as Python does not make implicit calls to these.
In line 33, the Logger parent class is initialized, but we use as name keyworded argument, qApp.applicationName(). qApp is a global reference to the QApplication or TaurusApplication of this process. Qt forbids running two or more QApplications in the same process, and in Python, they offer a quick manner to obtain a reference to the QApplication object. Developers may use the qApp global object.
In line 35 is where we create an instance of the UI definition we have in the mainwindow.ui file. It is assigned to self.ui. Then, in the next line, we invoke its setupUi() method, passing as argument the self reference to the QMainWindow object being initialized. The setupUi() method in the Ui_MainWindow() class will create every element as defined in the Designer for us. It is actually Python code that was translated from the XML. When the method finishes, every widget, action and layout will be available for the developer at self.ui.
Important
self.ui is very important for UI development using Qt. We suggest the reader to familiarize themselves with this manner of accessing the UI declared in the UI file. Developers should never copy and archive to repositories the result of pyside2-uic compiler. Instead, they should archive the UI file, and WAF automatically will produce an updated version of the UI.
We also encourage to use an editor capable of Python introspection/code completion. This will make the navigation of self.ui much more easier.
The next section of the code has many entries like this one:
66 67 68 69 70 71 72 73 | @Slot()
def on_actionNew_triggered(self):
'''
Slot that auto-connects to the actionNew.
actionNew is not declared in the code, but in the mainwindow.ui.
See: https://doc.qt.io/qt-5/designer-using-a-ui-file.html#widgets-and-dialogs-with-auto-connect
'''
self.info('actionNew triggered')
|
Each of these method defined the implementation of an action. The developer may notice a pattern in the name of the method: It is a composite of an existing Action name, and a signal it has. Qt will automatically recognize this pattern, and connect that object’s signal, to this slot.
The only entry that is different is the closeEvent() method.
168 169 170 171 172 173 174 175 176 177 178 179 180 181 182 183 | def closeEvent(self, event):
'''
Not to be confused with actionExit, this method is special. Instead
of using signals to know when an application is closed, we can
override the closeEvent method from the QApplication class, and
determine here what will happen when the window is closed.
In this case, we are just forwarding the event to its parent class.
This is useful when disconnection from server or prevention of
current work needs to be implemented.
:param event: Event received from Qt event pump
:type event: QtCore.QEvent
'''
self.info('Application shutting down...')
QMainWindow.closeEvent(self, event)
|
Let’s remember that Qt is an event based library. It detect and translate many input performed by the user and internal system outcomes into Events. Example of these are mouse movement, click, keystrokes, closing minimizing, maximizing the application, among many more. When a user click on the close button of an application, this is translated into an event.
Each UI element in Qt has one main handleEvent() method, and many specialized Event methods: , like closeEvent():
handleEvent() is the main entry point for any event. The QApplication.handleEvent() method will process this event, clasify it accordingly, and then call a specialized method.
closeEvent() is the specialized method when a window or dialog is requested to close. In the case of our particular implementation, closing the application main window should exit the program. Qt does this by default, so we just call parent implementation using QMainWindow.closeEvent().
At this moment, we will not concern ourselves with other kinds of methods.
At this point, the implementation is ready, and will log every action that is triggered.
6.1. Long Running Jobs
Qt runs in one thread. The main thread of the process is used by the event pump to detect and conduct the necessary operations, and drawing the GUI. For example, resizing the application will create many resizeEvent, which will request redrawing the UI to the appropriate dimensions.
But for this to happen, the main thread needs to be free. The developer may implement short and quick methods, and connect them using signal/slot mechanism. Qt will insert in between signal/slot execution many of its own events, keeping the UI smooth. But long running jobs should not be conducted in the main thread.
For sake of simplicity, a long running job can be emulated with a time.sleep() call. An example is given below. This will cause the GUI to freeze for 5 seconds, as no other event gets executed in between, including input detection, and GUI drawing instructions.
@Slot()
def on_actionSave_triggered(self):
    '''
    Slot that auto-connects to the actionSave.
    actionSave is not declared in the code, but in the mainwindow.ui.
    See: https://doc.qt.io/qt-5/designer-using-a-ui-file.html#widgets-and-dialogs-with-auto-connect
    '''
    self.info('actionSave triggered')
    self.info('actionSave launching new Job')
    time.sleep(5)
In this example application, we include a solution for this. In line 90, the actionSave() slot is queuing a long running job into the Taurus Manager. The Manager() from taurus package will return us a reference to the Taurus Manager object. This object provide a ThreadPool based job queuing solution. To use it, we gave as argument two methods: one for the actual method that is to be executed in a separate thread, and one for a callback, that is executed when the method finishes.
90 91 92 93 94 95 96 97 98 99 | @Slot()
def on_actionSave_triggered(self):
'''
Slot that auto-connects to the actionSave.
actionSave is not declared in the code, but in the mainwindow.ui.
See: https://doc.qt.io/qt-5/designer-using-a-ui-file.html#widgets-and-dialogs-with-auto-connect
'''
task = WorkerIO(self.save_job)
task.signals.result.connect(self.save_job_cb)
task.start()
|
Both methods save_job() and save_job_cb() are defined in the code shown below. save_job() is a method, and it is doing the long running job (in this case, sleeping for 5 seconds). When finished, the Taurus Manager will automatically invoke the callback save_job_cb(), passing as argument the return value of the save_job() method.
159 160 161 162 163 164 165 | def save_job(self):
self.info('save_job sleeping for 5')
time.sleep(5)
return 'Slept for 5 seconds'
def save_job_cb(self, arg):
self.info('sleepCB reporting %s' % (arg, ) )
|
Though it take more coding line, this simple solution keep the GUI running smoothly.
Now the reader may run the PaeGui using this command:
paegui
Logs from Taurus will appear in the console and the application will start. Please exercise the different Double Spin Boxes, and see how connections works with the Dart Boart. Also, if you press several times the save button (or its menu entry), you will see how each job request will get executed in its own separate thread:
(base) [eltdev@cut python_application]$ paegui
MainThread     WARNING  2021-06-17 17:21:27,065 TaurusRootLogger: <frozen importlib._bootstrap>:219: DeprecationWarning: taurus.core.util.argparse is deprecated since 4.5.4. Use argparse or (better) click instead

MainThread     INFO     2021-06-17 17:21:27,108 TaurusRootLogger: Using PySide2 (v5.14.1 with Qt 5.14.0 and Python 3.7.6)
MainThread     INFO     2021-06-17 17:21:27,184 taurus.qt.qtgui.icon.icon: Setting Tango icon theme (from /opt/anaconda38/lib/python3.7/site-packages/taurus/qt/qtgui/icon/)
MainThread     INFO     2021-06-17 17:21:27,480 TaurusRootLogger: Plugin "taurus_pyqtgraph" loaded as "taurus.qt.qtgui.tpg"
MainThread     INFO     2021-06-17 17:21:29,058 Python Application Example GUI: actionSave triggered
MainThread     INFO     2021-06-17 17:21:29,058 Python Application Example GUI: actionSave launching new Job
MainThread     INFO     2021-06-17 17:21:29,059 WorkerIO: Created QThreadPool with 8 threads
Dummy-1        INFO     2021-06-17 17:21:29,059 Python Application Example GUI: save_job sleeping for 5
Dummy-1        INFO     2021-06-17 17:21:34,064 WorkerIO: RTN: Slept for 5 seconds
Dummy-1        INFO     2021-06-17 17:21:34,064 WorkerIO: Is a common reply
MainThread     INFO     2021-06-17 17:21:34,066 Python Application Example GUI: sleepCB reporting Slept for 5 seconds
MainThread     INFO     2021-06-17 17:21:36,384 Python Application Example GUI: Application shutting down...
Taurus logs have the following syntaxt: Thread, Level, Timestamp, Logger Name, message.
If you need lower level logs, please start the application with the following command:
paegui --taurus-log-level Debug
Help is always present when using the TaurusApplication class:
paegui --help
If the parser was configured as in the start of the application, the taurus default options and the application options will all be handled by the same parser.
7. Frequently Asked Question
7.1. I have connected a signal and slot, but nothing is happening. What is missing?
Make sure you are using the @Slot() decorator for the Slot.
The Object where the Slot is located must inherit from QObject. Make sure that at some point in the inheritance tree this happens. You can add it to the particular class definition, but please make sure first any of its ancestors do not have them.
7.2. What causes the GUI to freeze?
A slot, or method in your GUI is using too much time in the main thread. You should keep to a minimum the ammount of time slots and main thread methods can use.
Qt runs all input detection and rendering instructions in the main thread. This is shared with the signal/slot mechanism. If you have a task that takes too much time to complete, you should move it to a separate thread. This tutorial includes an example how to do this.