2 USER'S GUIDE
This part of the document provides a description of the way how a CCD stand-alone system must be operated. Operations are performed through GUI panels; no programming is involved nor required. On the other hand, the DCS part of the CCD software, described in [14], does not include any GUI panel and can be commanded, also from a remote station, through messages sent by higher level applications belonging to instrumentation software or telescope control software.
2.1 Overview
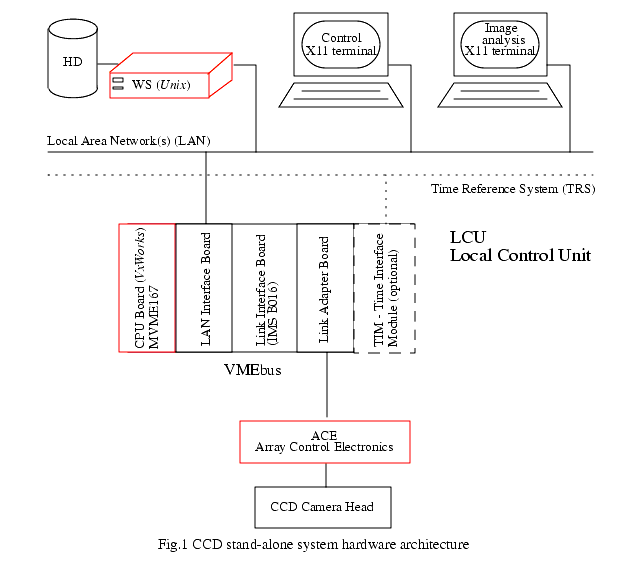
The CCD control software is distributed over three hardware platforms: WS, LCU and ACE transputer network (see Fig.1).
2.1.1 User Station
· one X11 terminal, used to define configuration and setup parameters, control exposures and display the status of the system. It is equipped with mouse and keyboard.
· one X11 terminal (for performance reasons would be preferable the Workstation console) used to analyse the images stored on disk by the CCD software with the real-time display (see [17]) or any other image analysis sw package, such as ESO-MIDAS. It is equipped with mouse and keyboard.
In a simplified version, currently used, the functionality of both terminals is put into one.
2.1.2 Workstation
See [14].
2.1.3 LCU
See [14]
2.1.4 ACE
See [18]
2.2 Control panel
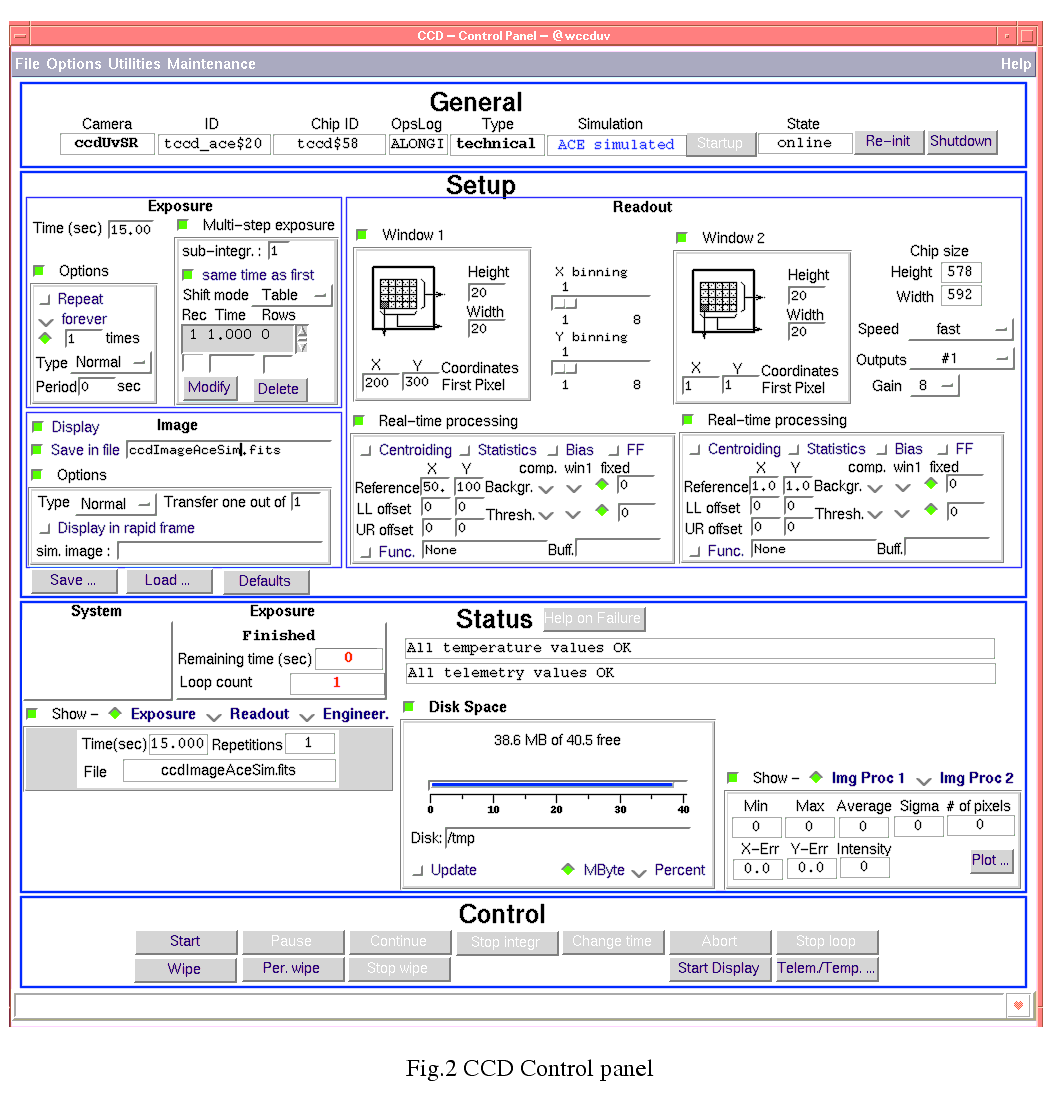
One single panel, shown in Fig.2, provides all functionality needed to startup/shutdown the CCD software, define an exposure setup, start and control an exposure, display an image as result of an exposure.
The same panel is used, independently if and which parts of the CCD system used are simulated.
Detailed information about meaning and scope of each widget in the panel can be found in the manual page of ccdCtrl, section 3.1
Note: the panel is rather big and contains quite some information. Depending on the load of the Workstation CPU it can take a few seconds before being displayed. Please, wait and don't panic!
2.3 Getting started
In order to be able to operate the CCD software, the installation procedure, as described in [14], section Installation Guide must have been completed successfully.
As already mentioned in section 2.1, the CCD software runs on three platforms. In order to help beginners in the learning phase and to localize better possible cause of failure, it is suggested to get into the system gradually, executing in sequence:
Note: In the following, the usage of the mouse is limited to the left button, e.g. to push buttons and select entry fields in panels.
2.3.1 Simple Demo session
Type from the Workstation shell prompt:
The control panel (Fig.2) is displayed.
Execute in sequence the following operations:
c. Push OK. The file selection box disappears and the entries in the Setup area are updated according to the contents of the setup file.
a. Push the button Start.This will animate the area Status, simulating the execution of the exposure.
b. Push the button Pause. The status of the running exposure goes to paused and the remaining time remains fixed
c. Push the button Continue. The status of the running exposure goes to integrating and the remaining time decreases again.
d. Push the button Stop integr. The remaining time goes to 0 and the exposure status changes to Read&Transfer. After a while it changes to Finished.
c. Push the Stop loop button. The current exposure is terminated regularly and then no further exposure is started.
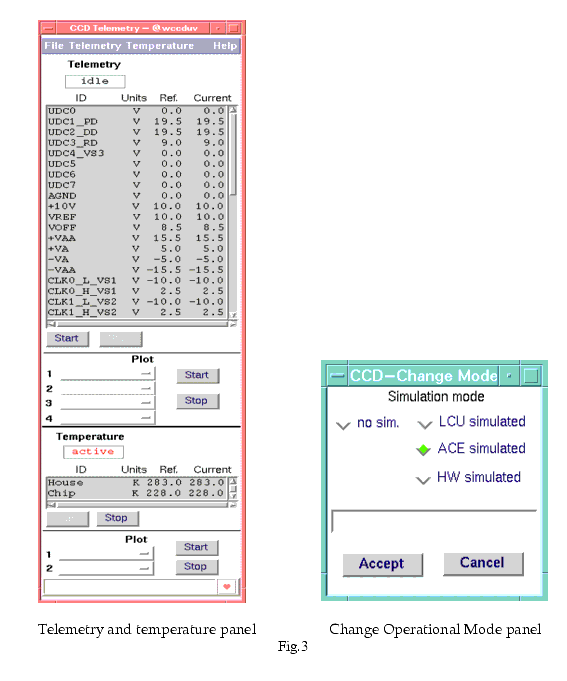
a. Push the button Telem/Temp... (area Control). The panel dedicated to telemetry and temperature monitoring is displayed (see Fig.3).
b. Push the button Start in the Telemetry area. The telemetry status will turn to Active and the values displayed are updated periodically.
d. Push the button Start in the Telemetry Plot area. A new window pops-up, showing the plotting of the selected parameter.
g. Push the button Start in the Temperature area. The temperature status will turn to Active and the values displayed are updated periodically.
2.3.2 LCU simulated session
Type from the Workstation shell prompt:
The control panel (Fig.2) is displayed.
Execute in sequence the following operations:
a. Check the status of the button Shutdwon: if it is disabled, unselect option context sensitive in the menu Options. The button Shutdwon is enabled
a. Select the CCD Engineering Interface option in menu Maintenance. The panel Engineering pops up (see also [15]).
d. Push Accept. The panel disappears and the simulation field in the area General of the main panel turns to LCU simulated
c. Push OK. The file selection box disappears and the entries in the Setup area are updated according to the contents of the setup file.
a. Push the button Start.This will animate the area Status, simulating the execution of the exposure. Please note that only a few fields are updated when LCU is simulated, namely the exposure status and remaining time. As a result of the simulated exposure, an artificial image, consisting of a linear scale (1,2,3....) is saved in the specified file in FITS format and displayed with the Real-Time Image Display utility, the latter only if real-time display has been selected in the setup definition (point 6.b.ii.); to improve the quality of the displayed image press the button Auto Set Cut Levels
2.3.3 ACE simulated session
Type from the Workstation shell prompt:
The control panel (Fig.2) is displayed.
Execute in sequence the following operations:
a. Check the status of the button Shutdwon: if it is disabled, unselect option context sensitive in the menu Options. The button Shutdwon is enabled
a. Select the CCD Engineering Interface option in menu Maintenance. The panel Engineering pops up (see also [15]).
d. Push Accept. The panel disappears and the simulation field in the area General of the main panel turns to ACE simulated
c. Push OK. The file selection box disappears and the entries in the Setup area are updated according to the contents of the setup file.
a. Push the button Start.This will animate the area Status, simulating the execution of the exposure. As a result of the simulated exposure, an artificial image, consisting of a linear scale (1,2,3....) is saved in the specified file in FITS format and displayed on both main and rapid frame of the Real-Time Image Display utility, the latter only if real-time display has been selected in the setup definition; to improve the quality of the displayed image press the button Auto Set Cut Levels.
2.4 Exposure definitions
2.4.1 Exposure types
The CCD stand-alone supports only exposure types as known to CCD DCS (see [14]).
2.5 Operational modes and simulation
The operational modes implemented are:
1. Normal. The CCD software tries to access the related hardware, assuming that the whole software and hardware exist and are properly installed.
a. Workstation software simulated. The whole CCD sw package is simulated in CCS at the level of Message System (see [10]). Useful only to test the command interface between CCD and external software and for demo purposes (see section 2.3.1).
b. LCU software simulated. The whole LCU SW is simulated at WS level. The LCU processes are simulated by means of the simulation option in the CCS Message System (same as at point 2.). This kind of simulation is useful when no LCU is available; the user must be aware that at this level of simulation the behaviour of the CCD camera is rather simplified. In particular, the exposure setup used is hard-coded (single exposure, no binning). Nevertheless the interface towards the external software can be almost completely tested as for Normal mode.
c. ACE software simulated. The LCU software behaves the same as in Normal mode, except at the level of the so called Device Control Libraries (see [16]), i.e. just one level above the device drivers. These libraries simulate driver function calls, assuming that no failure takes place and the most realistic results are returned. This mechanism is implemented in a way that the hardware do not need to exist at all and even the device drivers do not need to be installed.
d. Hardware simulated. The hardware behaviour is simulated within the ACE software with the most realistic response. If chip read-out is simulated, fixed images with the appropriate windows and binning replace real images.
Changing the operational mode is allowed ONLY when the system state is OFF (see 2.6). The wanted operational mode has to be configured in the local database (both in the WS and LCU!!) before start-up (see panel CCD Change Mode Fig.3 and section 2.7.3).
2.6 Operational states
The CCD software can be in one of the following operational states (see [4] for standard states definition).
1. OFF. The CCD software is in OFF state when it is not loaded or some task is not running. No operations are possible in this state.
2. LOADED. The CCD software goes to LOADED state as soon the database is loaded and all processes needed after cold start-up are activated.
3. STAND-BY. Normally all hardware components are powered-off, except those which are needed to preserve the camera from damages, such as the temperature control and the periodical chip wiping.
In detail all actions needed to bring the whole CCD camera to stand-by mode are very dependent on the system hardware architecture and therefore cannot be defined in this document for all cameras. Typically the following actions are implemented:
2.7 Running the system
In order to be able to operate the CCD software, the installation procedure, as described in [14], section "Installation Guide", has to be followed and completed successfully.
2.7.1 Start the control panel
Type from the Workstation shell prompt:
The control panel (Fig.2) is displayed.
2.7.2 Check CCD camera configuration
Before starting to operate the camera it is essential to verify that the configuration parameters stored in the on-line database are properly set.
Push the button "Configuration .." in the area General. The CCD configuration panel, described in [15], pops-up.
In order to verify the correctness of the parameters stored, knowledge of the CCD camera characteristics is needed, and therefore assistance of a specialist, at least for the very first verification is recommended.
2.7.3 Set the operational mode
a. Check the status of the button Shutdwon: if it is disabled, unselect option context sensitive in the menu Options. The button Shutdwon is enabled
a. Select the CCD Engineering Interface option in menu Maintenance. The panel Engineering pops up (see also [15]).
d. Push Accept. The panel disappears and the simulation field in the area General of the main panel turns to no simulation (or the desired simulation mode if this is the case)
b. basic FITS information in the image file and HIERARCH information in a separate ASCII file with extension .det (default, same output produced by the CCD DCS part).
4. Define, through the option archive in the menu Options, if the VLT Archive System has to be informed or not about new files produced by the CCD stand-alone sw. The interface is defined in [6].
2.7.4 Start the control software
Push the button Startup (area General). After a while the CCD state will turn to on-line.
2.7.5 Define exposure setups
The whole Setup area of the control panel is dedicated to this purpose. See section 3.1 for more information about its contents.
Note 1: The current version of the CCD software does not allow to change setup parameters, except exposure time, while an exposure is running. It is therefore recommended to check carefully the setup definition before starting an exposure.
2.7.6 Control exposures
It is done through the buttons in the Control area.
The status of a running exposure is displayed in the Status area.
It is suggested, before starting any exposure, but specially the very first one, to clean the chip from charges possibly accumulated during periods when the camera was not active. To do this, push the button Start wipe. One complete clean-up cycle of the whole chip may take, depending on the chip size, a few seconds; it is recommended to wait about 20 seconds and then push Stop wipe.
To start an exposure, push the button Start. The setup currently displayed will be first passed to the system (for the very first exposure it takes a few seconds longer, since the whole Data Dictionary has to be scanned) and then the exposure is started.This will animate the Status area.
The actions which can be performed while an exposure is running are:
4. Change the integration time of the running exposure. The new value is taken from the Setup area. Button Change time.
5. Abort an exposure. Button Abort. The current version of the CCD software allows to abort an exposure only while it is integrating. It is not possible to interrupt the read-out.
6. Stop a loop of repeated exposures. Button Stop loop. Note that the exposure currently running will be terminated regularly. Therefore, if one is not interested in it either, the Abort button must be pushed additionally.
2.7.7 Failure report
Failures can be divided in the following categories:
1. Synchronous. They occur while executing a command. They are normally reported to the user automatically through a pop-up window.
2. Asynchronous. They occur while some background activity is running. Typical example is a failure during the execution of an exposure. The exposure itself is started through the command START; the execution of the command is completed when the exposure is started; if a failure occurs after the exposure has been started, then there is no automatic mechanism to report to the user why such a failure occurred. Such information can be retrieved by pushing the button Help on Failure in the Status area of the main panel.
2.7.8 Analyse images
The image files produced by the CCD sw stand-alone are in FITS format. They can therefore be analyzed by any image analysis software supporting FITS, e.g. ESO-MIDAS.
Furthermore, for quick-look, one can start the VLT Real-Time Display (Rtd) utility (button Start Display). When the Rtd new panel appears (it takes a few seconds), in order to display the CCD images during acquisition, select the menu entry Real-time, item Attach Camera. Of course, the image display option must have been selected during the setup operations (see section 2.7.5).
2.7.9 Monitor telemetry and temperature values
In order to monitor telemetry and temperature values the following has to be done:
1. Push the button Telem/Temp.. (area Control). The panel dedicated to telemetry and temperature monitoring is displayed (see Fig.3). All values defined in the Configuration panel are monitored
2. The telemetry system can be monitored only if the indicated status is Idle. If it is not Idle, it means that something failed during system initialisation and the connections to the hardware have to be checked.
a. To start monitoring, push the button Start in the Telemetry area. The telemetry status will turn to Active and the values displayed are updated periodically.
b. The trend of up to 4 telemetry parameters can be plotted: select the parameters to be plotted through the associated option buttons and then push the button Start in the Telemetry Plot area. A new window pops-up, showing the plotting of the selected parameters.
d. To stop monitoring, push the button Stop in the Telemetry area. The telemetry status will turn to Idle.
3. The temperature system is normally monitored as soon the system goes to state ONLINE If the temperature status is neither Active nor Idle, it means that something failed during system initialisation and the connections to the hardware have to be checked. Please note that the current ACE system for scientific CCDs does not provide temperature monitoring facilities. From the Temperature area of the panel one can stop (button Stop, status goes to Idle) and restart (button Start, status goes to Active) monitoring. The trend of temperature values can also be plotted (same rules as for the telemetry).
2.7.10 Shut-down the control software
Push the button Shutdwon (area General). The State will turn to OFF.
2.7.11 Shutdown the panels
|
Quadralay Corporation http://www.webworks.com Voice: (512) 719-3399 Fax: (512) 719-3606 sales@webworks.com |