
p1 - Help
Here we provide a detailed description of the p1 User Interface (p1UI), by guiding you through each step required to complete the preparation of an observing proposal.
A few general remarks:
1. All PIs and co-Is must be registered in the User Portal. As of CfP106, they must have updated also their UP profile and ticked the box "I want to submit (an) observing proposal(s) (as PI, dPI or CoI) and/or be considered for selection as a proposal referee."
2. Previous proposals can be cloned via the p1tool interface by selecting the proposal of interest and using the 'Clone' button that appears on the top right of the Summary view of the proposal to be cloned.
3. Any time you type something, a red asterisk will appear at the top of the window that is being edited. This asterisk disappears once the text has been saved in the database.
4. As soon as you create a new proposal, immediately below the Title, there will appear a red box. This is to remind you which sections of the proposal still have to be completed and any associated issues applicable.
5. Once you have added the CoI(s) all the collaborators can edit the proposal simultaneously. You also have the option of nominating one as dPI (see below).
6. The PI can submit, retract and/or delete a proposal. Delegated PIs (dPI) have the same privileges, although the ultimate responsibility for the content of the proposal lies with the PI.
A short presentation (about 4min) is available to guide you through the basic steps of proposal preparation and submission. It has been updated to reflect the changes implemented for P106 Call for Proposals.
For further clarifications, reporting issues and/or overall feedback on the p1 interface, you can contact us via the ESO Operations Helpdesk.
What's new
Since CfP106, minor improvements have been implemented in the p1 User Interface, both for external and ESO-internal usage.
Reminder: point #1 in the list above is very important if you wish to submit proposals - you and all your co-Is must check that under your User Portal profiles the box "I want to submit (an) observing proposal(s) (as PI, dPI or coI) and/or be considered for selection as a proposal referee." is ticked. Cloning an old proposal which lists dPI/coIs who have not updated yet their UP acount affects the display of the cloned proposal.
p1 is implemented using Google’s Angular framework and it should work on any recent browser (Chrome, Firefox, Edge, Safari). The system requirements of p1 are less stringent than basic security requirements. If you suspect that p1 does not run because your browser is too old, you most likely have a dangerously old version. For more details, refer to Angular browser support.
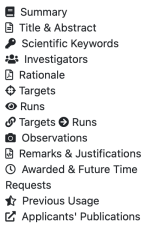
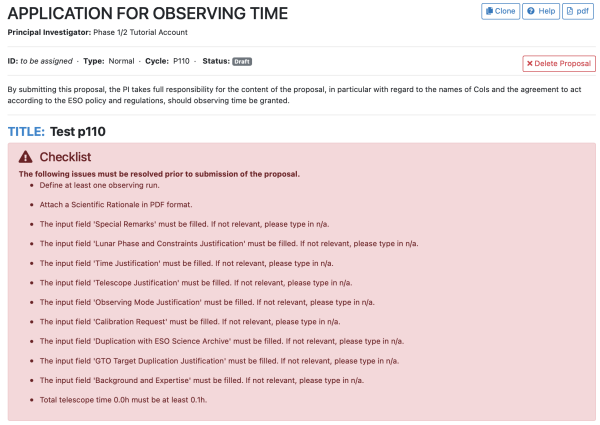
Summary
The Summary provides an overview of all sections of your observing proposal. The individual parts can be accessed through the menu in the left column, or via the buttons in each section.
At the very top of the Summary, some high-level information can be found: Principal Investigator, followed by ProgrammeID (this will be assigned only after you submit the proposal), Programme Type, Cycle, and the current Status of your proposal (Draft, Valid or Submitted, being the most common ones).
At the side, there are a few key buttons:
[Submit/Unsubmit] allows you to submit or unsubmit a proposal, if you wish to update/change something. This action can be performed only by the PI or their delegated PI (dPI). The [Submit] button appears only when the proposal is ready to be submitted, i.e. when the proposal has no more errors to fix. Once submitted, the Status of your proposal will change to Valid (for DDT proposals) or Submitted (for regular proposals calls; it will then turn into Valid after the submission deadline); if unsubmitted, its status will be reverted to Draft. Important: if a proposal is in Draft status it will be ignored, even if already submitted once.
[Delete] allows you to delete entirely your proposal. Important: there is no undo for the Delete action - once clicked, the proposal is lost, but this is a 2-step process because a pop-up window will ask you to confirm if you really intend to delete the proposal.
[PDF] allows you to create a pdf printer-friendly version of your proposal.
[Clone] this appears only when you select one of your previous (older) proposals and allows you to clone it for the CfP that is currently open. Any change in the instrument set-ups or other sections of the proposal form between calls for proposals will be highlighted as an error, which needs to be fixed.
Red Box: this highly visible checklist box alerts you about all pending issues that need to be resolved before you can submit your proposal. Since this box appears as soon as you create a new proposal, it will list all issues of a still empty proposal at first, but as you progress with your proposal preparation, the alerts will start to disappear.
Title & Abstract
The Title is the first thing that one usually specifies when creating a New Proposal from the p1 interface. It can be of course revised also later on while working on the proposal.
The Abstract is a free text box where you need to summarise the scientific goals of your proposal.
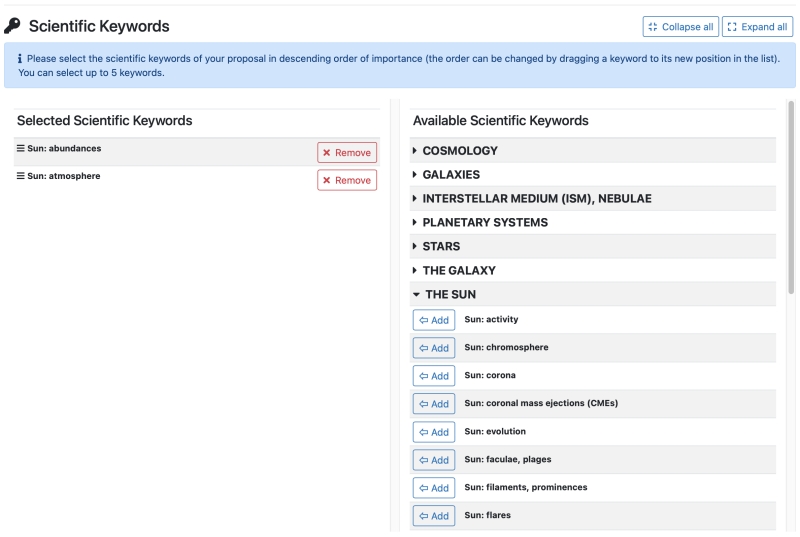
Keywords
As of CfP110, the old scientific sub-categories (belonging to the OPC Science Categories - A, B,C and D) are replaced by a standardised list of scientific keywords, identical to the list available in the ESO User Portal and similar to the keywords used by scientific journals to classify your research manuscripts. Their purpose remains the same as before, i.e. to describe the scientific case of the proposal.
For your convenience, the available keywords are listed in groups. You can select keywords belonging to different groups as you see it fit to best describe the proposed science case. The minimum/maximum number of keywords that you have/can specify depend on the programme type.
The keywords must be selected in descending order of importance, but you can always change their order by dragging a given keyword to your desired position in the final list.
These keywords will be used in the proposal-referee matching process, initially for the Distributed Peer Review and then also for the classical Panel review. It is therefore very important that your User Portal profile is up to date, and your scientific areas are properly defined. This applies to all circumstances, even if you do not plan to serve in an ESO review Panel.
Note: Calibration proposals do not require any scientific keyword. They will automatically be assigned the keyword L0-Calibration.
For P108 DDT users: until the end of Period 108, you will continue to select the one keyword that best describes your proposal, as defined in the OPC Science Categories (A, B,C and D and the sub-categories therein).
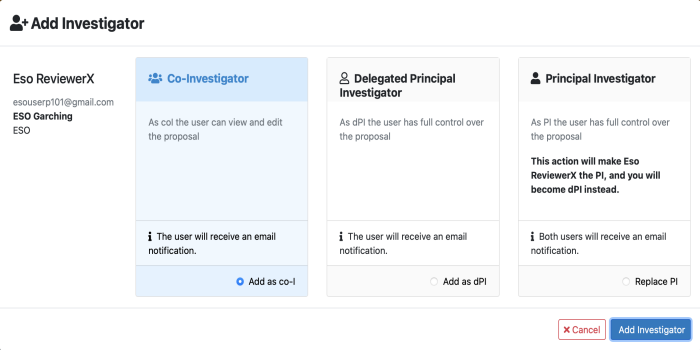
Investigators
Here is where you define your proposal team of investigators. You, as the PI, will already be listed, since you have used your User Portal credentials to login onto the p1 system.
NEW - All investigators (PI, dPI, coIs) must be registered in the ESO User Portal. As of CfP106, all investigators must have also updated their UP profile and ticked the box "I want to submit (an) observing proposal(s) (as PI, dPI or CoI) and/or be considered for selection as a proposal referee."
If some of your collaborators are not registered yet, invite them to do so by visiting the User Portal registration page.
To add collaborators, type their complete email in the search field, and select the person from the box that will appear (because of personal data protection constraints, the system is not meant to support name-based searches).
co-Investigators can delete themselves if they do not wish to be part of a given proposal by clicking the corresponding delete button [x] at the right-end of their name.
Updates to one's UP profile (e.g., affiliation) will be automatically reflected in an already created proposal only upon submission of that proposal. Alternatively, the UP update(s) can be included in any given proposal before its submission if the PI/dPI remove that specific co-I and add them anew to the list of investigators.
Note: with the introduction of Distributed Peer Review, the p1 system now assigns by default the DPR Reviewer role to the proposal PI. You can assign this role to any co-Investigator, by selecting them in the Investigators table (column: DPR Reviewer).
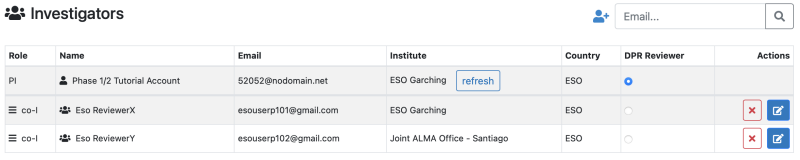
Next, select the role of the collaborator you are adding:
Principal Investigator (PI): full privileges to modify, submit, retract and delete proposals, to get a PDF of the proposal, and to add and remove collaborators, and change their privileges.
Delegated PI (dPI): full PI privileges.
Co-Investigator (coI): privileges to modify the proposal and get a PDF.
The roles can also be modified at a later stage of the proposal preparation.
Beware that, as PI or dPI, you can also strip yourself of the PI/dPI privileges. If you do so, you will not be able to submit/retract the proposal, or change the list of collaborators.
Rationale
Here is where you upload the Scientific Rationale of your observing proposal in PDF format, which you have prepared offline using one of the provided templates:
· Google Doc: Open the file, click File > Make a Copy to edit in your Google Drive.
· Microsoft Word: Normal, Large or Survey (4MOST)
· LaTeX: template file (same for Normal and Large programmes). No sty file needed, template calls the graphicx package to include figures. In case you wish to latex the template file, here are the two associated figures (Fig1.pdf and Fig2.pdf). The original figure(s) must have a bounding box defined; see the documentation of your graphical software, or the documentation of graphicx to position your figure without bounding boxes.
These templates can be edited collaboratively with Google Drive sharing, MS Word 360 and similar sharing mechanisms. LaTeX template can be edited collaboratively on overleaf.com . Please note that the template for 4MOST surveys is available only in Google Doc and Microsoft Word.
If your proposal requests a Visitor Instrument, you will also need to upload a Technical Specification report. For this, you can use one of the following templates:
· Google Doc Tech: Open the file, click File > Make a Copy to edit in your Google Drive.
· Microsoft Word: template TechSpec
· LaTeX: template TechSpec file . No sty file needed.
Page Limits
For Large and GTO-Large proposals, the pdf must be 5 pages or less (up to 3 pages for the scientific rationale; up to 2 pages for figures).
For Survey proposals, the pdf must be 12 pages or less (up to 3 pages for the scientific rationale; up to 2 pages for figures; up to 7 pages for survey metrics).
For Normal and all other types of proposals, as well as for the Technical Specification report, the pdf must be 2 pages or less.
Longer files will be rejected.
Important note - Changes to Section Headings and/or text formatting are forbidden. The format of the templates is not checked. However, proposals with blatantly modified format (smaller font, smaller margins, smaller interline...) will not be considered. It is acceptable to use smaller (but still comfortably readable) fonts for picture captions, references and similar ancillary material.
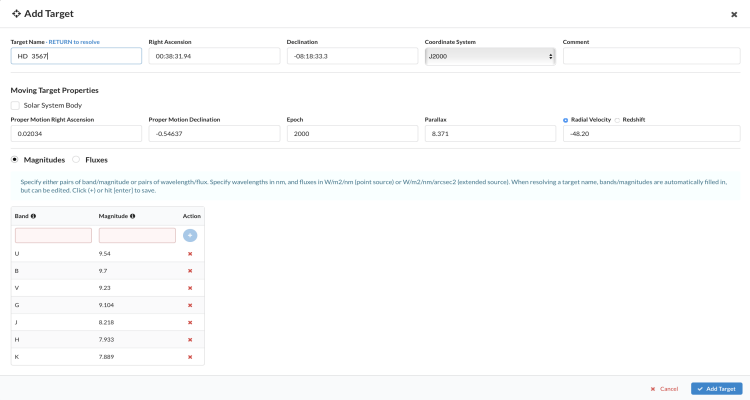
Targets
Here you define the science targets that you wish to observe, any Reference Star (as required by some instruments), and you can add special target notes.
Depending on the size of your targets list and programme type, you have different options. For Normal/GTO/Monitoring/Calibration proposals, you can either take advantage of the [Add Target] or [Import Target List] functionalities. If you are preparing a Large Programme, you have a third option, namely [Add Target List].
Option [Add Target] is recommended for short lists of targets. It opens a window that can retrieve basic details directly from Sesame, after you have specified your object identifier and hit 'Return'. It's always good, though, to double check that the information thus retrieved is correct. Information can be modified (e.g. to fine-tune coordinates) or added. If a target cannot be resolved by Sesame, you can add it by hand - just avoid hitting the 'Return' key after having specified the target identifier.
Important Notes:
Target names can include: any letter (small and/or capital), any number (0-9), spaces (but not in front or at the end of the name), underscore symbol (_), plus and minus signs. Therefore, for, e.g., comets, please leave out the slash or slant symbol (/) and/or parentheses.
For those targets for which magnitude/flux information need to be specified by hand, please click on the 'Add Band' button in order to save your entry. Only then you will be able to click on 'Add Target'.
For moving targets, no automatic data retrieval is possible. If you have only 1 or few such targets, please enter their name/ID without hitting 'Return' and add the details by hand. If you have many targets, then look below for further instructions.
Should you experience issues with the automatic retrieval of target information, please check first if CDS services are down.
Option [Import Targets] is recommended for longer lists of targets. It allows you to upload a list of targets, in CSV format. The minimum set of information that needs to be specified is 'Name, RA, Dec, Mag', but a target table can include the following entries:
Name = object identifier. Each target must have a different identifier. Each identifier must include at least three characters.
RA = Right Ascension, hh:mm:ss.sss
Dec = Declination, +dd:mm:ss.ss
System = Coordinate system: J2000 (for FK5), B1950 (for FK4), ICRS. Other systems are not accepted.
Rv = Radial Velocity, in km/s
Mag = magnitudes. Group them between double quotes: "V=21.2,R=23.1,J=20.9"
Note = comment, free text.
For distant objects:
pmra_arcsec , pmde_arcsec = proper motion in arcsec/year
Epoch used for the proper motions
Plx = paralax, in milli-arcsec
z = redshift
For Solar System Objects:
dra , dde = representative non-sidereal motion, in arcsec/sec
Important note: if your table columns are not labeled, then the system expects to process the complete table with the columns ordered as listed above; if your table has fewer columns or has a different order of the columns, then you need to label each column with its exact content (using the names listed above) so that the system can recognise the content of the table.
Examples of valid CSV files are available: minimalist, complete. Note that properly formatted CSV files are easy to produce with spreadsheets, like MS-Excel or Google-Sheet.
If you have many targets (>50) and if your science case allows it, you can define a smaller number of representative targets, each representing n real targets (e.g., n=10). When defining the individual observations on these representative targets, set the Repeat factor to the same n to account for the total telescope time.
Option [Add Target List] is recommended for very long lists of targets (>100), as it may be the case for some Large Programmes or Survey-type proposals (when offered). It allows you to upload a list, which, differently from the previous option, will remain attached to your proposal as a list file.
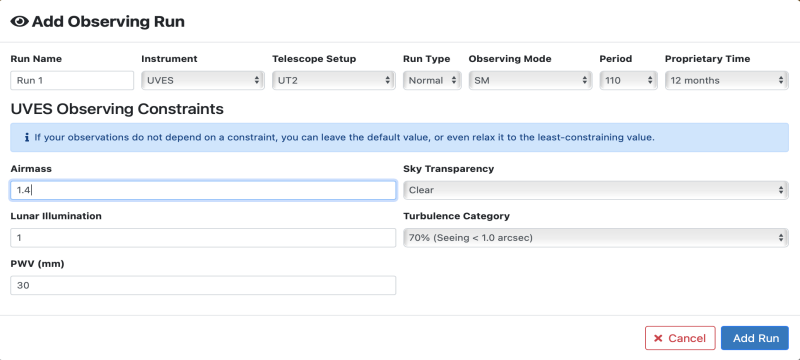
Runs
Here is where you specify the observing runs; one per instrument, run type and observing mode, because a run represents the minimum schedulable entity. For each run, you will also have to specify the atmospheric constraints required by your observations. If your instrument does not depend on some of the available constraints, leave its default value or revise it to the most relaxed value.
A Run defines a series of observations to be performed with one instrument, with a common set of observing constraints (that is, all the observations require conditions that have the same probability of realization). Depending on the instrument there may be additional constraints on what can be mixed and matched in a Run.
How to start:
Create a new Run with [+Add Run]. Assign a name to the Run – you can call them A, B, C... if you want to reproduce the old ESOFORM look, but more informative names can be used. Select the Instrument, Run Type, Observing Mode, Proprietary Period. For some types of programmes, the Period during which the observations are to be extecuted can be chosen (Large, Monitoring programmes). Set the proprietary period to reduce the default or leave the default value. Then specify the observing constraints. A detailed description of observing constraints and conditions can be found here.
Define the type of observations you will need for this Run by adding one or more instrument Set-Up(s) to your Run with [+ Add Observing setup]. Each type of observation is one set-up. There can be more than one for a Run.
Define a Set-Up: the interface will guide you through, by prompting you with a series of pull-down menus. You will start by selecting one generic Mode (which applies to all observations in that set-up, e.g. “FORS Imaging”, or “SPHERE IRDIS Long-slit spectro”, "UVES Slit"), and one or more individual observation(s) - these can be added by clicking on the [+ Add Template] button). Each of these are further defined by selecting those set-up elements that are relevant at Phase1, i.e. for scheduling the observations and for performing the technical feasibility reviews. Users familiar with the ESO p2 system will recognize some of the features.

Duplicate: a Run can be duplicated (by clicking on the small [double-proposal] button at the right-end side of the Run) and then edited. For instance, you may find this feature useful when you need to specify similar observations to be performed under different conditions (e.g., good seeing for faint sources, relaxed seeing for bright sources), or different time constraints. However, beware, it is possible to type incompatible time constraints, thus rendering the run unschedulable.
Time Constraints: Each run can have separate time constraints. These can be specified by clicking on the [clock] button at the right-end side of the Run, following a custom language that is defined here. These time constraints replace and consolidate the series of independent time constraints fields of the old ESOFORM, allowing for both absolute and relative time constraints. The new schema also lets you visualize immediately the time constraints you specify. You can access The specification of time constraints

Targets --> Runs
This is where you associate targets to runs, by selecting the scientific target(s) and the run that should observe it(them). There is no constraint on the number of targets associated to a run (1, 2, .. all), so long as at least one target is associated to each run that you have created.
By performing this association, you create a series of individual Observations: each observing Set-Up of the Run will become an Observation for each Target. For instance, if you associate 5 Targets to a Run with 2 Set-Ups, this creates 10 Observations, 2 for each of the 5 Targets.

If you want to skip a given Observation for a given Target, this can be done by setting its 'Repeat' to 0 (see next section below, i.e. step=Observations). If you want to skip many Observations or many Targets, it is probably more convenient to split the Run.
Note: Reference/Guide stars should NOT be associated to any run, but it is mandatory to add them in step=Targets.
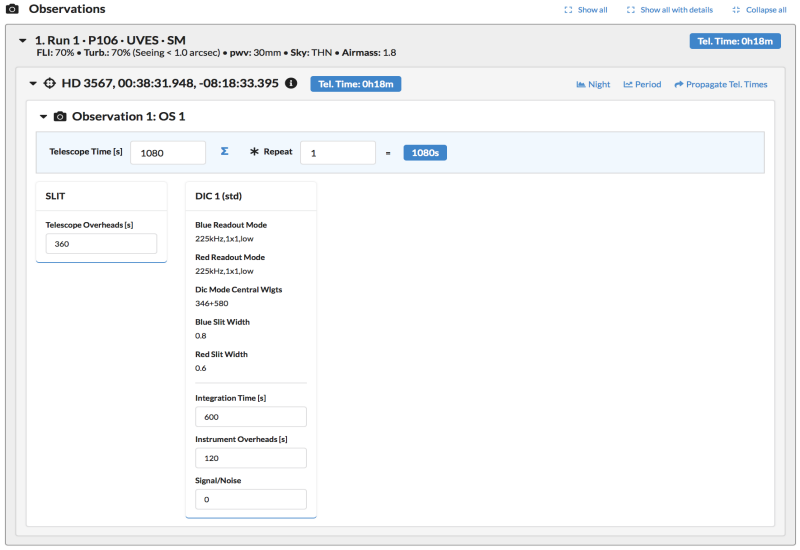
Observations
In this section, you request time for each of the Observations you have defined. In other words, here you specify your exposure times. Within a Run, every Target gets associated to (at least) one Observing Set Up to form an Observation.
Please note that there are 3 levels of telescope times that are reported. From bottom to top, you should first define the total time required to perform a given observation (e.g., at the level of 'Observation 1: OS1'); this amount will then be propagated to the target level, i.e. you will see the total time associated to a given target in case more than one observation has been specified; finally, you will see the total time for the run, including the aforementioned target(s) and observation(s).
For each Observation, you must fill the blue box (which represents the 'Total Time' for that Observation) by specifying the corresponding 'Telescope Time [s]', i.e. Integration Time + all Overheads (telescope and instrument)
o If you need to repeat the observation (either to reach a higher S/N, or e.g. to monitor the object), mark this accordingly in the Repeat box.
o If you wish to skip this observation (i.e., you do not need this Observing Set Up on this Target), set Repeat to 0. Leaving 'Telescope Time[s]=0' is not the same, as a default amount of telescope overheads would still be accounted for (360s).
o If the Telescope Time [s] you have specified is less than 360s, a red box will appear underneath the blue box alerting you that the time specified is too short and does not even cover for the telescope overheads (360s). You will then need to revise the time accordingly or click anywhere in the red box to display the detailed view of your observations (see Optional part below)
All 'Total Time per Observation' (more than one, if more Observations have been defined) are then propagated to compute the Target Tel. Time and the Run Tel. Time.
Overheads: please consult the overheads table for estimating the overheads of your observations or, even better, use the p2demo to derive them accurately.
Optional: For each Observation, you can also fill the details of the individual components of the observation. You access this level of detail by clicking on the [camera] icon left to, e.g., 'Observation 1 - OS1' (cf. next screenshot).
o Telescope Overhead (first box), this is for the preset and acquisition overheads. Please note that the default value of 360s needs to be checked and eventually revised, depending on the instrument you have specified;
o Integration Time, the total integration time for that specific observation (e.g., DITxNDITxNEXP);
o Instrument Overheads, the overheads associated to the specific instrumental setup (e.g., instrument set-up, read-out);
o S/N, the signal-to-noise you expect from this Integration Time.
Although these are optional, we recommend you fill them for at least some representative observations, to illustrate your time request justification and remember to click on the [Sum] button in the blue-box so that all times and overheads are properly computed and propagated.
Use the box "Time Justification" to discuss the details of the time you request (in step=Remarks & Justifications).
Important note for Reference/Guide Stars:
If you have selected an AO or VLTI instrument, you may be required to specify a reference star (tip-tilt star, AO reference star, Coudé guide star, or fringe tracker star) in the [Add Reference target] field. This search-box field allows you to select only stars that you have already added to your Targets section. It does NOT allow you to resolve a target via Sesame.
By typing the initials of any reference target you have specified in step=Targets you will be shown a list of available objects. Furthermore, unlike the scientific targets, objects to be used as reference stars for a given AO/VLTI-instrument run should NOT be associated to that run (in other words, the Targets->Run association is meaningful only for scientific targets).
If a reference star cannot be easily identified at time of proposal submission (e.g., in case of Solar System targets) please do the following:
o In step=Targets, add a Reference Target placeholder (e.g., name = "Appulse Star" or "Callisto" - if one plans to observe Jupiter, with same coordinates as the science target, or 00:00:00).
o Add a note in the Target Notes (e.g., "The appulse reference star will be provided at phase 2" or "The exact coordinates will be specified at phase 2")
o In step=Observations, when asked for the Reference Target, attach/specify the Reference Star "placeholder" to the observation.
Remarks & Justifications
Several text fields are to be filled in this section. Please note that they are almost all mandatory - for those not applicable to your case, please simply add N/A in the text box.
Special Remarks: This is to be used for any special remark you deem useful or necessary to pass on to the OPC.
Lunar Phase and Constraints Justification [mandatory]: Here is where the choice of FLI and atmospheric constraints should be justified. However, remember not to over-constrain your observations.
Time Justification [mandatory]: Here is where the total Telescope Time requested should be detailed and justified.
Telescope Justification [mandatory]: Why ESO? Why the specific telescope/instrument you have chosen?
Observing Mode Justification [mandatory]: Here is where you specify why you chose a given observing mode (SM, VM, dVM) and whether or not you state if the observations could also be carried out with a different observing mode.
Calibration Request: To be used if Special Calibrations, on top of those included in the Standard Calibration Plan of your proposed instrument(s), are needed.
Experience of the Team [only for Large Programmes / GTO LP; mandatory]: This is where you describe, in detail, the expertise of your team with respect to the telescope time request and how the work and data analysis will be distributed and carried out.
Data Product Delivery Plan [only for Large Programmes / GTO LP; mandatory]: This is where the delivery plan of advanced data products via ESO Phase 3 interface should be described.
Duplication with ESO Science Archive [mandatory]: If there are no duplications, please specify N/A.
GTO & Survey Target Duplication Justification [mandatory]: If there are no duplications, please specify N/A. The ists of GTO protected targets lists can be found here (please choose the link for the applicable Period)
Background Experience [mandatory]: background, expertise and roles of the various team members.
Awarded & Future Times
Related to the telescope time application you are preparing, you can specify here what has already been awarded to the same scientific case and what will still be needed in the coming semesters. You start by clicking on the [+] button to add a (new) row, that you then fill in with your details. Your entry is then automatically saved (as soon as the red asterisk disappears).

Previous Usage
This section allows you to specify the previous uses of ESO facilities most relevant to your current telescope time request. You can do so for yourself and your co-Is, by selecting the names of your team members, one at a time.
Note: the list that is automatically retrieved per investigator goes back 5 years and lists only PI programmes of the selected person.
Applicants' Publications
Here is where you can add the publications most relevant to this proposal, published by your proposal team over the past 2 years. We recommend no more than 10 - 20 publications (10 for Normal and up to 20 for Large programmes).
We recommend using the following format:
Author1, A., Author2, B. Author3, C., et al. (year) "Title," Journal, Volume, p.start-p.end - BibCode
or, for instance
Giacconi, R., Gilmozzi, R., Leibundgut, B., et al. (1999) "Science verification of the Unit Telescope 1 of the ESO Very Large Telescope," A&A, 343, L1-L4 - 1999A&A...343L...1G
This format can easily be produced using ADS as follows:
select the paper(s) you wish to report, click [export], select [Custom Format] and enter: %3.3l (%Y) "%T," %q, %V, %pp - %R \n
This will automatically link the reference to the article.
Alternatively, you can also shorten the format to
Author1, A. et al. (year) "Title," Journal, Volume, p.start-p.end - BibCode
which can be easily produced using ADS Custom Format: %3.3i (%Y) "%T," %q, %V, %pp - %R \n
Note: there is a hard limit of 250 characters - you will need to shorten your publication entry as you deem most appropriate should it exceed this limit.