
5
aioxInducer - Driver Test Panel for Analog I/O Devices
5.1 Starting from the Command Line
The simplest way to start the panel is with:
You can specify command line arguments to connect the panel immediately to a particular environment/device. To reduce the size of the panel or eventually to speed up the tool, it is possible to specify the first input signal and the total number of input of signals to be displayed in the panel by giving the corresponding command line parameters (firstInputSignal is 0 by default and nInputSignals is 16 by default). Note that nInputSignals can take the values 4, 8, 12 and 16.
Therefore the complete command line is:
After a few moments the new window appears and the panel is built. The complete start-up may take up to half a minute.
5.2 Panel Overview
The aioxInducer utility provides a visual representation for analog I/O devices in a LCU environment that are controlled by the "aio" driver. The figure below shows the panel that is exposed when the tool is started. It provides you the functionality of the device and the corresponding driver trough graphic representation of analog signals.
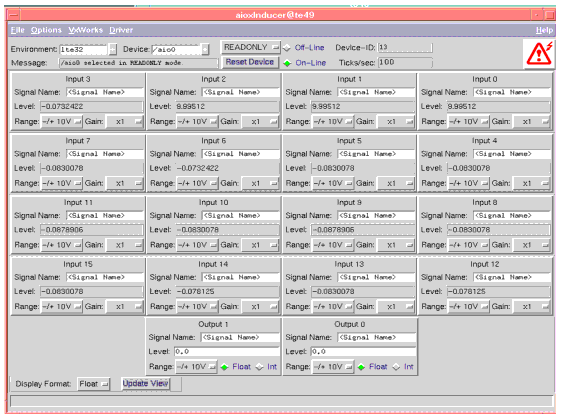
Your actions are immediately forwarded to the connected device, and changes of the device status are immediately displayed on the panel as well.
The panel shows up to four rows of four input signals each and one row with two output signals. For each signal you see its number, name, voltage level and configuration settings. If you point with the mouse over any interface element you will get in the panel's "Short Help Area", a brief description of its purpose. Below the output signals there is a "control area" where you can select the display format of the input values and an "Update View" button, it updates the whole panel contents.5.2.1 Display Formats
You can visualize the input values in four different formats: Float (default), Int, Hex and Bin.The Float format displays the current voltage level read at the output of the A/D converter as a floating point number in the range defined for that signal. The Int format displays the read value in its digital form, as an integer in the range defined by the board (-2048/2047) which is independent of the signals's Range. Hex and Bin formats displays are two bytes Hexadecimal andBinary representations of the Int display.
To set a displayformat select it from the options button labelled "Display Format" in the "control area" located inthe bottom of the panel.
5.3 Single Signals
The figure below shows an Input Signal and an Output Signal. They are very similar, for each one of them you have:
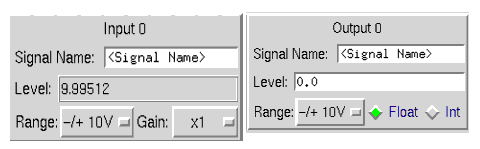 Level For input signals it shows the current voltage read at the output of the A/D converter. For output signals it is an entry field where you can specify a Voltage level to send to the driver.
Range This shows the current voltage range configured for the signal. Note that this is fixed by jumper settings and it is not programmable.
Float, Int (output signals) This buttons select if the value in the output will be sended as a Float value, i.e. in the current voltage range, or the value will be an integer in the fixed range defined by the board (-2048/2047).
5.3.1 Signal Name
You can name the signals in various ways. First, you can simply type the name in the entry field. Second, you get the name from a previously saved panel, and last, you get the name from the LCC configuration for the signal.
5.3.2 Voltage Level
For input signals the current voltage level is displayed and automatically updated when it changes. For output signals you have an entry field which allows you to specify a voltage level to write to the output, it is sended to the device when you press <Retun>.
5.3.3 Signal Configuration
The current input/output voltage range configured is displayed below the voltage level display. Note that the range is fixed on the board by jumper settings and it not programmable. With the buttons you can interactively modify the setting that is used by the driver, but you cannot change the physical range setting used by the board.
The display of the signal configuration is not automatically updated but you can update the whole panel pressing the "Update View" button.
For input signals you also have the current Gain factor, which is - unlike the range configuration - programmable. You can change it using the mouse.
5.4 Load and Save Panel Data
The panel supports to save and re-load its contents into/from a file, as described in section 2.6.1. The following panel-specific values will be saved:
The order of the above keywords in the produced file must not be changed. The format of the file is not compatible with aioxInducer v1.17 or earlier, there is a conversion utility in the test directory of the aiox module that you can use to update your saved panels.
5.5 LCC Signal Support
The panel supports to load the LCC configuration for the device from the LCU, as described in section 2.6.2.
When you select the "Option>Load LCC Config" menu, each signal currently present in the panel it's configured using the data retrieved from LCC, if exists. It includes signal name and signal number. The other parameters like Convertfactor, lowerRange and higherRange are currently ignored. Note that the procedure to get the LCC configuration can take some time. The completion will be indicated by a dialog-box; do not enter new inputs before that time
5.6 Known Problems
Remember that the monitor loop currently in use for this driver look for changes in the voltage level of input signals only, to get a whole and updated view of the state of the device you can press the "Update View" button.
|
Quadralay Corporation http://www.webworks.com Voice: (512) 719-3399 Fax: (512) 719-3606 sales@webworks.com |