2
Common Part of the Driver Test Panels
7 The upper part of all panels is identical. A collective description is given here, rather than repeating it for each device-specific panel.
2.1 Panel Overview
The control elements described in this chapter are the same for all Driver Test Panels, but in the device-specific part they might not all be implemented.
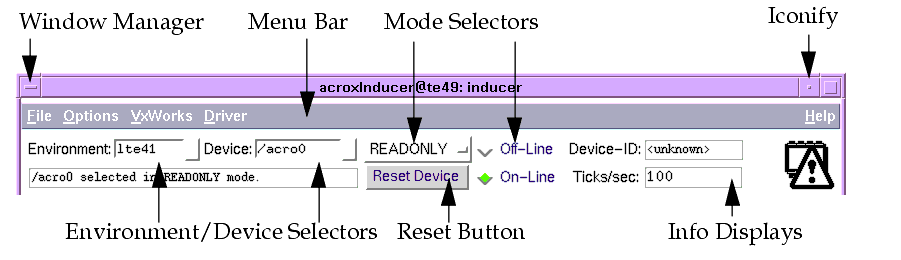
The `Window Manager' button calls a menu with several window manager function, which are different for each manager used. To double-click on this button usually closes the window. The `Iconify' button can be used to minimize the window. The remaining elements are desriced in the following sections.
2.2 Environment and Device Selection
The panel must first be connected to a specific device residing in a LCU environment:
1. Click on the `+' button of the `Environment' selector and choose one entry, or type the environment name into the entry and press Return (completion function with Tab). The environments menu is queried from the configuration database.
2. Click on the `+' button of the `Device' selector and choose one entry, or type the device name into the entry and press Return (completion function with Tab). The devices menu is queried dynamically from the LCU upon environment selection.
After that the device should be connected, unless one of the following errors occurs:
· "Environment is not responding" - verify that the LCU is working properly and that the inducerServer task is running (see section 9.3).
· "Connection to device refused" - either the device is unreachable, or there is a conflict with the open-mode, e.g. another task has already reserved the device. You may try to connect in a less priviledged open mode (see section 2.3).
The special entry `<none>' in the Device's menu disconnects the panel from any device. This should always be done when the panel is not used (to reduce CPU activity and network traffic), and particularly before the LCU with a connected device is rebooted (otherwise the re-connection might cause problems; you can try it although, simply by ignoring the resulting error-boxes).
2.3 Device Open Mode
By default the READONLY open-mode will be selected initially, so that no write accesses to the device can be performed. You may want to select another mode from the option-button right of the Device selector, namely:
· TEST - all operations are allowed, independent of any other opened channels. Only one test channel can be opened at a time.
· EXCLUSIVE - requests exclusive access to the device, so that no other channel in EXCLUSIVE or SHARED mode can be opened.
· SHARED - requests access in shared mode, which is only possible when no exclusive channel is active.
The device is then disconnected and re-opened in the new mode. An error message is displayed if this new mode conflicts with other opened channels to the same device.
2.4 On-Line and Off-Line Mode
The two elements labelled with `On-Line' (green) and `Off-Line' (red) are at the same time indicators for the current connection mode, and buttons you can press to change the mode. They have the following meaning:
· Off-Line - in this mode the panel is not receiving or sending data from/to the device, so that the device is not monitored and user inputs will not be forwarded to the device. However, if a device has been connected before entering this mode, then the channel with the selected open-mode will be kept opened. User inputs made to the panel during Off-Line mode can afterwards be forwarded to the device in one go by pressing the On-Line button.
· On-Line - in this mode the device is continously monitored and user inputs will immediately be forwarded to the device, so that the panel always shows the actual device status. Pressing this button will forward the whole contents of the panel to the device. Note that this operation can take a few seconds.
The On-Line/Off-Buttons - unlike the corresponding indicators - need some device-specific support, therefore it is not in all panels possible to swich between the two modes by pressing the buttons. A dialog-box will appear when the operation is not supported.
2.5 Reset Device Button and Info Displays
The `Reset Device' button performs a software-reset operation for the connected device (provided such an operation is available). You will be asked for confirmation. The operation is not possible in READONLY open-mode.
The `Ticks/sec' output displays the system-clock-rate used on the LCU, when the environment has been selected.
The `Device ID' output displays an inherent device identification when the device has been selected, provided such an information is available.
2.6 Menus
This section describes the menu entries accessible from the panel's menu bar:
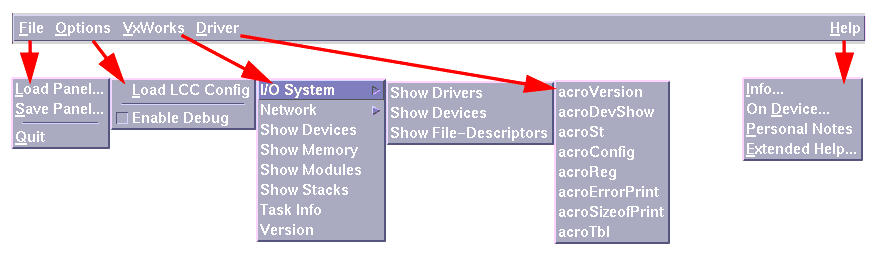
2.6.1 File Menu
This will re-load a previously saved panel data file. The name of the file can be specified with the file selection box. A warning might occur that the file was saved with another version of the tool and might therefore be incompatible. The loading can take a few seconds, during which the panel automatically goes to Off-Line mode.
This saves the current contents of the panel into a user-selectable file. The extension should be ".ipd" (inducer panel data). Before the data is saved, the panel automatically goes to Off-Line mode, to avoid changes during the save procedure. The saving can take a few seconds; upon completion a dialog-box appears.
This exits the panel. If a device is still connected, it will be properly closed before. Double-clicking the the upper left button in the window-frame has the same effect in most window-managers.
2.6.2 Options Menu
Some device types are supported by LCC. In this case the LCC configuration information for the connected device can be queried from the LCU and put into the panel. For example the LCC signal configuration for digital and analog devices can be loaded from the LCU into the panel. Except for the fact that the data comes from the LCU rather than a file, this operation is the same as `Load Panel' described in section 2.6.1.
2.6.3 VxWorks Menu
This menu contains the most frequently used VxWorks commands to get information about the system. When an entry is selected, the corresponding command is executed on the connected LCU environment, and the resulting standard output together with the function's return-value is transferred via the message-system and displayed in a separate pop-up window:
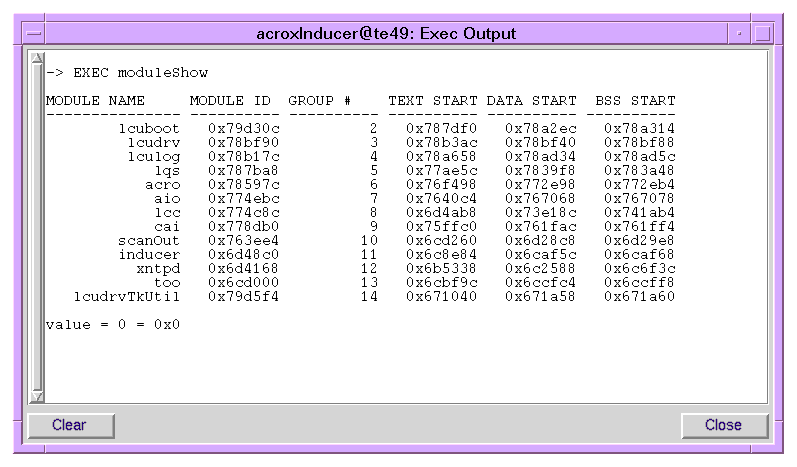
This behaviour is similar to the command input from the VxWorks shell; however, this is not a shell session, hence the shell will not be locked.
The `Clear' button clears the display. The `Close' button exits the window.
2.6.4 Driver Menu
This menu is dynamically assembled when an environment is selected, and contains all the driver tool functions, as they are defined in the driver's header files and described in the respective driver user manual. The principal behaviour is exactly the same as for the VxWorks menu.
Refer to [3] and the description of lcudrvTk to find out more about the necessary format of the driver headers.
2.6.5 Help Menu
The Help menu consists of the following entries:
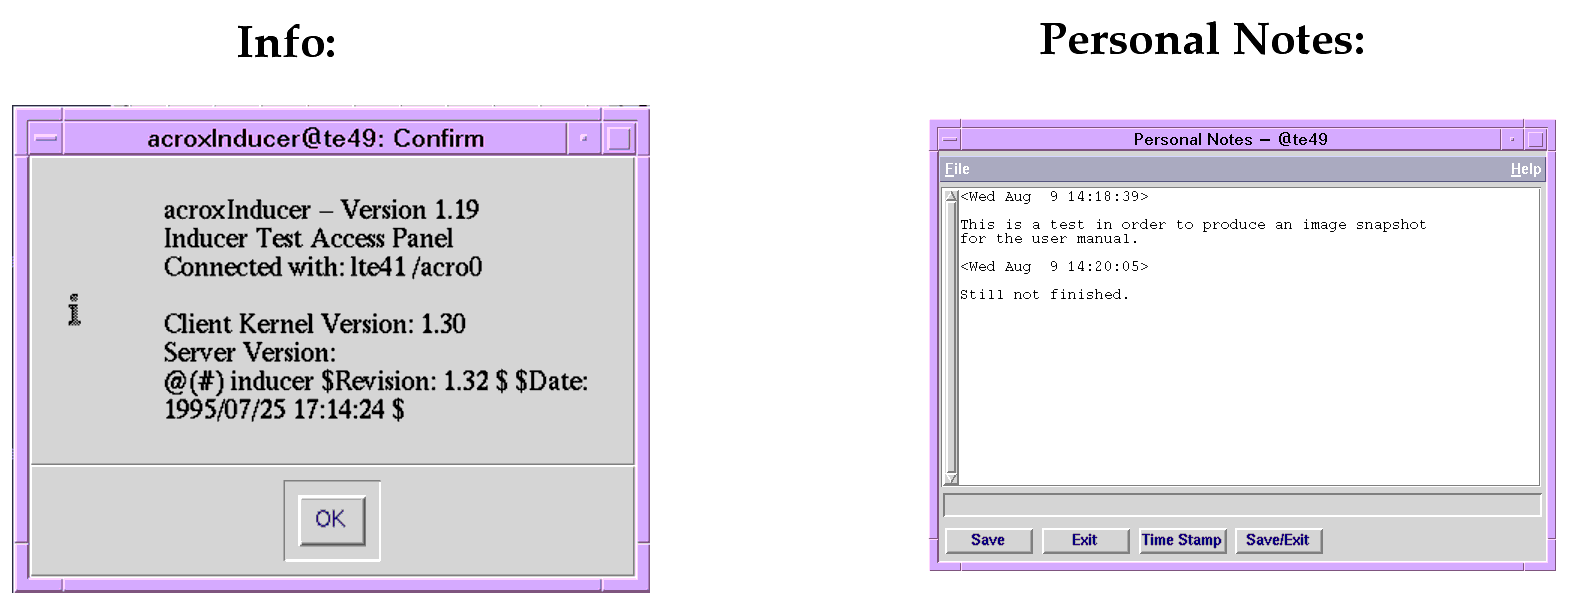
Displays general information about the panel and its status, especially which versions you are working with.
Opens the man-page browser with the device-specific board description. This contains information about mandatory and recommended jumper settings, address selections, and other hardware related things.
Opens a pop-up window where you can enter some notes and save them into a file. The name of the file will be "~/.<name-of-the-tool>.notes" in your home directory, so that there is one personal file per tool.
Opens the man-page browser with the panel-specific description. This serves as on-line help to operate the tool.
Examples of Help pop-up windows:
2.7 Configuration File
At start-up, every panel sources the file named "inducer.config", which usually resides in the directory "$VLTROOT/config/". Host-based configuration is possible in "$VLTDATA/config/".
This file contains configuration options for applications of the Inducer Test Panel Suite. It is intended to pre-define default names and values to be used by the application-programs and to adapt them to any changes in environment-names.
To have a private copy of this file, copy it to either "$INTROOT/config/inducer.config" or "$MODROOT/config/inducer.config". Additionally you can have a copy in your home-directory as "~/.inducer", which will be sourced after "inducer.config", whereby re-definitions are possible.
Look into the comments in the file to find out more about configuration options of the panels.
3 inducerStarter - Starter for device-specific Test Panels
There are two ways to start the device-specific panels, which will be described in the next chapters:
To invoke the starter panel, enter this to the command line:
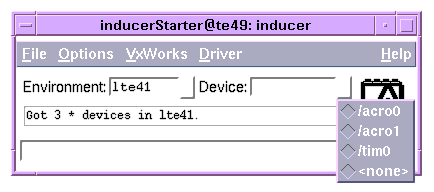
When you select an `Environment', all the devices on that LCU system are queried and put into the `Device' menu.
Then you can select a device from the menu, and the device-specific panel will be started, and immediately connected to the chosen environment and device. An error-box will appear if no panel is available for a selected device.
The VxWorks menu works as described in section 2.6.3, as soon as an environment has been chosen.
Correspondingly, the Driver menu works as described in section 2.6.4. The only difference is that the tools for all devices found in the environment are included, rather than only for one single driver.
|
Quadralay Corporation http://www.webworks.com Voice: (512) 719-3399 Fax: (512) 719-3606 sales@webworks.com |