
TestBench software user's manual
How does it work ?
First of all, have a look to the physical setup :
The software underlying this setup is described here :
The blue names inside the boxes are the servers names to be launched before any access to the hardware.
FIERA in a standalone way can be used, provided that the fcdNoVltSrv server is running.
Prerequisite :
The "fcdrun" account has to be used to control locally the testbench. The {root} dir is /export/home/fcdrun
On the UNIX workstation called odta2 nearby the tes bench, after a reboot, you need to start all hardware devices.
So on, you have to launch the following process:
- The RTAP message manager (command : vvcStartEnv -e $RTAPENV), here, if one echoes $RTAPENV you should get wodta2a.
- Check that the variable CCDNAME is properly defined, echo $CCDNAME , the setenv command could be added into the odta2.cshrc.local file located in the {root}/config/
- The tcp-ip interface manager (command : fcdNoVltSrv). You can find a version here. This one could be found there : {root}/tbenchSoft/fcdnvsrv/bin/fcdNoVltSrv build march 16th, 2000. The purpose of this server is to allow any NON-VLT software client to speak with VLT-SW drivers. This service uses the 2331 port. To enable fcdNoVltSrv to communicate, edit the /etc/services and add in this file : wodt 2331/tcp, put this command between vccMAKE::begin and vccMAKE::end. There is no need to restart anything but fcdNoVltSrv.
No output message is provided, just check afterwards that this process is running with the ps -edf | frep fcdN command. The code source is located here {root}/tbenchSoft/fcdnvsrv/src and can be compiled by using make clean all.
- The Fiera software (command : fcdSlcuCon+STARTUP+ONLINE), this one should be ONLINE, by usual means or user own request. The pulpo server (fcdpserver) is launched automatically by Fiera SW.
- The testbench server (command : fcdtserver). You can find a version here. The code source is located there :{root}/tbenchSoft/tbenchTest/src and the software itself : {root}/tbenchSoft/tbenchTest/bin
Before starting this daemon, the following devices must be on : GPIB to SCSI box, the two monochromators MS257, the ke486 ammeter, the MM4000 motion controller optionnaly. If one of the device fails, press enter to proceed the rest of the initialization.
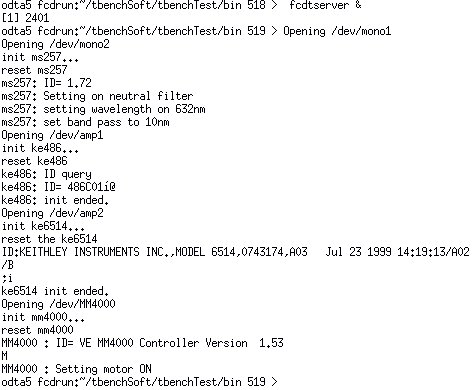
This is a typical output provided by the daemon startup :
Opening /dev/mono1
Opening /dev/mono2
init ms257...
reset ms257
ms257: ID= 1.72
ms257: Setting on neutral filter
ms257: setting wavelength on 632nm
ms257: set band pass to 10nm
Opening /dev/amp1 init ke486...
reset ke486
ke486: ID query
ke486: ID= 486C01î
ke486: init ended.
Opening /dev/MM4000
init mm4000...
reset mm4000
mm4000 init error -> GPIB error: write error mm4000 (ibwrt function)
The last sentence has been raised because the MM4000 was switched off, just press enter to carry out the rest of the initialization.
Then press enter after the last line is displayed :
MM4000 : Setting motor ON then press <Enter>
Just check afterwards that this process is running with the ps -edf | frep fcdt command.
- A FTP server running (port 21) at the workstation's side, so that PRiSM will be able to pick up images FITS files from the /DETDATA directory.
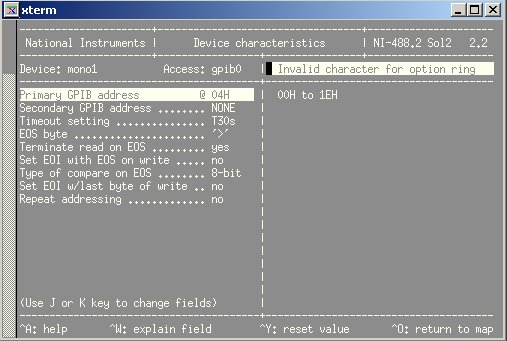
How to setup the GPIB :
On August 2001, a new GPIB PCI board was installed on the new SPARC. To setup GPIB device, the following software should be used : ibconf
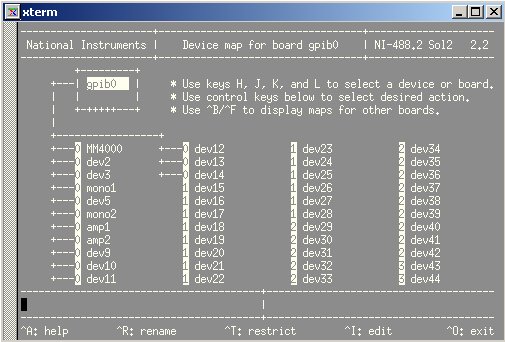
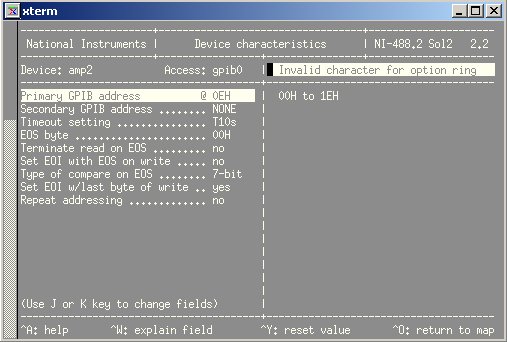
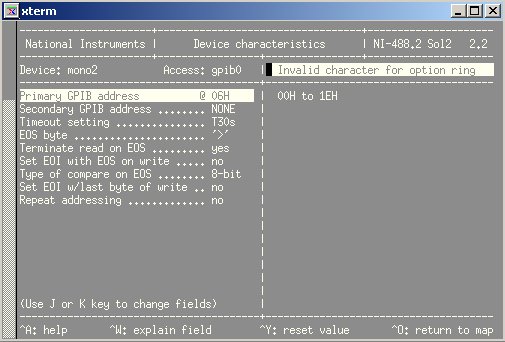
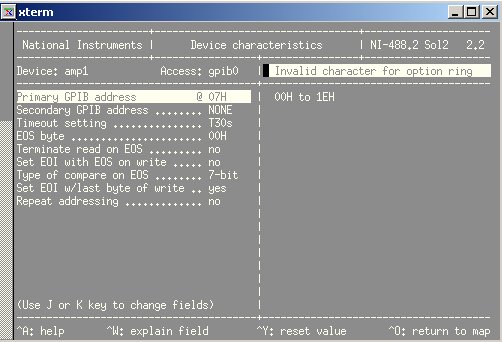
Move to a given devices by using the "k" character on the keyboard.
Hereafter, the panels relating the configuration data for each device :

FROM the workstation's side
The only tool available at that time (April2000) is a local control panel that can be opened using this command :
{root}/tbenchTest/interface/panel.pan &
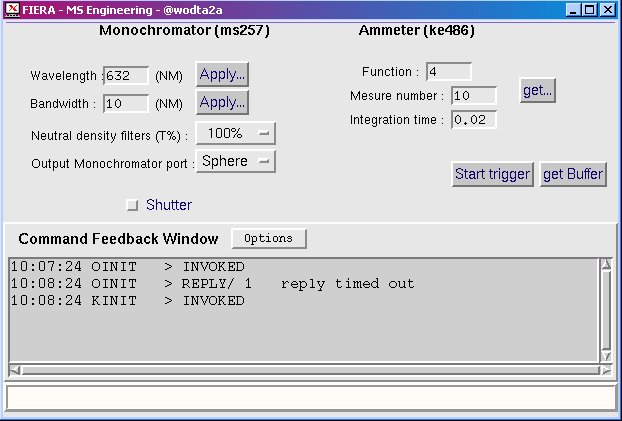
This panel controls the monochromators and the ke486 ammeter locally and interactively. Press buttons and sometime it takes time to get the reply, but please be patient.
For instance :
11:57:57 OSWAV > INVOKED
11:58:12 OSWAV > REPLY/ L OK
FROM the client's side Prism SW
It's needless to say that all the servers (Pulpo, FIERA and testbench devices) must be running on the workstation.
The monochromator :
The monochromator can be initialized by calling the following function :
The parameters are :
"Host name" : The name of the UNIX workstation (for example : "odta2" or "134.171.24.38" )
"Port number" : The tcp-ip socket port number, here 2331.
"RTAP environment" : The name of the RTAP environment. See the $RTAPENV value in the UNIX station environment.
After a while, a dialog box appears, the parameters that you want to apply to the testbench can be set here.

The script command available for the monochromator are :
- "SetMonochromatorWav"
This function set a wavelength value in nanometer (between 0 and 2500).
Example :
# Set the monochromator value to 620nanometer
SetMonochromatorWav 620
- "SetMonochromatorFilter"
This function set the neutral filter position.
Each value corresponds to a specific filter :
for 100%, value = 1
for 50%, value = 2
for 25%, value = 3
for 10%, value = 4
for 1%, value = 5
Example :
# Set the monochromator filter position to 50%
SeMonochromatorFilter 2
- "SetMonochromatorBandwidth"
This function set the monochromator bandwidth in nanometer.
Example :
# Set the monochromator bandwidth to 10nanometer
SetMonochromatorBandwidth 10
- "SetMonochromatorPort"
This function set the monochromator output port (B or C).
for port B, value =1
for port C, value =2
Example :
# Set the output port monochromator B
SetMonochromatorPort 1
- "MonochromatorShutter"
Set the monochromator shutter state.
for open position, value=0
for closed position, value=1
Example :
# Shut up the shutter
MonochromatorShutter 1
The ammeter :
You have to initialize the ammeter by calling the following function :
The parameters are same for the monochromator :
"Host name" : The name of the UNIX station (for example : "odta2" or "134.171.24.38" )
"Port number" : The tcp-ip socket port number talking to the fcdNoVLTSrv : 2331.
"RTAP environment" : The name of the RTAP environment. See the $RTAPENV value in the UNIX station environment.
After a small time, a dialog box appear in which you can choose the parameters that you want to apply on the ammeter. For example, you can get the current ammeter value by pushing the "Measure" button.
The script functions available for the ammeter are :
- "GetAmmeterMeasure"
This function get the ammeter value.
The parameters are :
The kind of measurement : in general, the value is 4 (see the ammeter documentation for more information)
The sample number : from 1 to 50 measurements
The integration time : from 0.01s to 999.999s
Example :
#Set the ammeter value in the variable "MeasureValue"
GetAmmeterMeasure 4 50 0.02 MeasureValue
The fiera controller :
To have a complete description of the standard camera acquisition functions in Prism, see the following address : http://www.astrosurf.org/saturne/pap/PAP_help/recherche.html
At first, you must choose FIERA as the standard controller in Prism For that, you can call the function :
Now, you can call the CCD acquisition module and fill up this panel :
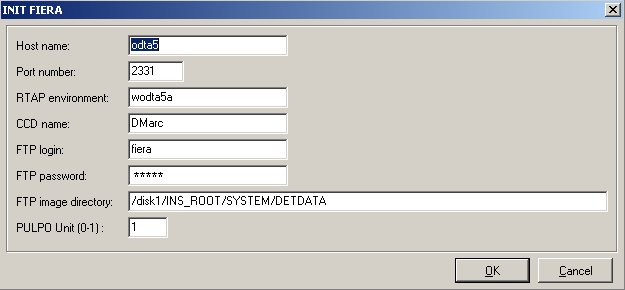
The parameters are :
| "Host name" | The name of the UNIX workstation hosting FIERA-SW (for instance : "odta2" or "134.171.24.38" ) |
| "Port number" | The tcp-ip socket port number to talk to the fcdNoVltSrv. This one must be defined as 2331 |
| "RTAP environment" | The name of the RTAP environment. See the echo $RTAPENV value in the UNIX workstation environment |
| "CCD name" | The name of the current CCD. It should be the value of the environment. variable by echo-ing $CCDNAME to the Solaris workstation. |
| "FTP login" | The login of the FTP server, this FTP account should have read access to the "Image directory:", otherwise it will fail. |
| "FTP password" | The password of the workstation's FTP server. |
| "Image directory" | Where FIERA drops by default the image, {$INS_ROOT}/DETDATA usually. |
FIERA parameters
The common FIERA parameters are available in the "Camera" panel :
CCD temperature, vacuum and heaters power
All monitoring values are available in the "CCD monitoring panel" :
All sensor values are available automatically thru an array.
If you want to display a real time variation graph, you need only to click to the value
Prism programming language
If you want to have an complete and explicit help about the Prism programming language, see the following page :
To launch a Prism script, click the button in the "Script ACQ" panel :
To have some examples, see the "tbenchScriptPack".
Back to the Testbench Software - overview